Mixpost Enterprise
Launch your own white-labeled social media management SaaS and start generating revenue.
- Introduction
- Getting a license
- Installation
- Configuration
- Integrate third-party services
- Create Subscription Plans
- System Settings
- Billing Settings
- Onboarding Settings
- Scripts Settings
- Integrate with Sentry - Error Reporting
- Update Guide
- Upgrade Guide
- Payment Platforms
Introduction
Before installing Mixpost Enterprise, make sure you have a valid license.
There are three ways to install Mixpost Enterprise:
-
If you already have a Laravel 10 application, you can install Mixpost Enterprise as a package inside it. By doing so, you can integrate Mixpost into your application in many interesting ways. If you know Laravel, then this is the recommended route. Head over to the package installation instructions to continue.
-
If you have experience with Laravel and PHP, but don't want to install Mixpost in an existing Laravel application, you can use our standalone app. This standalone app is a regular Laravel app, which Mixpost Enterprise has been preinstalled with. You can use Composer to create this standalone app.
-
If you have experience with Docker, you can use our docker image.
Getting a license
In order to use Mixpost Enterprise, you must buy a license. You can buy a license on the mixpost website.
What happens when your license expires
A few days before a license expires, we'll send you a reminder mail to renew your license.
Should you decide not to renew your license, you won't be able to use Composer anymore to install this package. You won't get any new features or bug fixes.
Instead, you can download a zip containing the latest version that your license covers. This can be done on your purchases page on mixpost.app. You are allowed to host this version in a private repo of your own.
Installation
As a package in an existing Laravel app
Getting a license
If you already have a Laravel 10 application, you can install Mixpost as a package inside it.
To install Mixpost Enterprise, you'll need to get a license first.
Installation via Composer
First, add the packages.inovector.com repository to your composer.json.
"repositories": [
{
"type": "composer",
"url": "https://packages.inovector.com"
}
],Next, you need to create a file called auth.json and place it either next to the composer.json file in your project or the composer home directory. Using this command, you can determine the composer home directory on *nix machines.
composer config --list --global | grep homeThis is the content you should put in auth.json:
{
"http-basic": {
"packages.inovector.com": {
"username": "<YOUR-MIXPOST.APP-ACCOUNT-EMAIL-ADDRESS-HERE>",
"password": "<YOUR-LICENSE-KEY-HERE>"
}
}
}To validate if Composer can read your auth.json you can run this command:
composer config --list --global | grep packages.inovector.comIf you did everything correctly, the above command should display your credentials. If that command doesn't display anything, verify that you created an auth.json as mentioned above.
With this configuration in place, you'll be able to install the package into your Laravel project using this command:
composer require inovector/mixpost-enterprise "^2.0"After installing the Mixpost Enterprise package, you may execute these 2 commands:
php artisan mixpost:install
php artisan mixpost-enterprise:installTo ensure that assets get republished each time Mixpost is updated, we strongly advise you to add the following command to the post-update-cmd of the scripts section of your composer.json.
"scripts": {
"post-update-cmd": [
"@php artisan mixpost:publish-assets --force=true",
"@php artisan mixpost-enterprise:publish-assets --force=true"
]
}Exclude payment webhook handler route From CSRF Protection by adding the URI "'*/payment-webhook'" to the $except property of the VerifyCsrfToken middleware:
<?php
namespace App\Http\Middleware;
use Illuminate\Foundation\Http\Middleware\VerifyCsrfToken as Middleware;
class VerifyCsrfToken extends Middleware
{
/**
* The URIs that should be excluded from CSRF verification.
*
* @var array<int, string>
*/
protected $except = [
'*/payment-webhook'
];
}Mixpost uses Job Batching and you should create a database migration to build a table to contain meta-information about your job batches.
If your application does not yet have this table, it may be generated using the:
php artisan queue:batches-tableRun the migrations with:
php artisan migrateTo make media files (images & videos) accessible from the web you should create a symbolic link from public/storage to storage/app/public
php artisan storage:linkYou can publish the config file with:
php artisan vendor:publish --tag=mixpost-configMixpost has the ability to generate images from video while uploading a video file. This would not be possible without FFmpeg installed on your server. You need to follow FFmpeg installation instructions on their official website.
After installation, depending on the operating system, you need to set the ffmpeg_path and ffprobe_path in the Mixpost config file.
Default folder path: /usr/bin/. If FFmpeg is there, there is no need to change it.
/*
* FFMPEG & FFProbe binaries paths, only used if you try to generate video thumbnails
*/
'ffmpeg_path' => env('FFMPEG_PATH', '/usr/bin/ffmpeg'),
'ffprobe_path' => env('FFPROBE_PATH', '/usr/bin/ffprobe'),Or, you can set them in your .env file
FFMPEG_PATH=/usr/bin/ffmpeg
FFPROBE_PATH=/usr/bin/ffprobeError Reporting
Mixpost utilizes its unique internal exception handler rather than the default "App\Exceptions\ExceptionHandler". To integrate external error reporting tools with your Mixpost setup, you should use the "Mixpost::report" method. Generally, this method is called from the register method of your app's "App\Providers\AppServiceProvider" class:
use Inovector\Mixpost\Mixpost;
use Sentry\Laravel\Integration;
Mixpost::report(function($exception) {
Integration::captureUnhandledException($exception);
});Install Horizon
Mixpost handles various tasks in a queued way via Laravel Horizon. If your application doesn't have Horizon installed yet, follow their installation instructions.
After Horizon is installed, don't forget to set QUEUE_CONNECTION in your .env file to redis.
config/horizon.php should have been created in your project. In this config file, you must add a block named mixpost-heavy to both the production and local environment.
'environments' => [
'production' => [
'supervisor-1' => [
'maxProcesses' => 10,
'balanceMaxShift' => 1,
'balanceCooldown' => 3,
],
'mixpost-heavy' => [
'connection' => 'mixpost-redis',
'queue' => ['publish-post'],
'balance' => 'auto',
'processes' => 8,
'tries' => 1,
'timeout' => 60 * 60,
],
],
'local' => [
'supervisor-1' => [
'maxProcesses' => 3,
],
'mixpost-heavy' => [
'connection' => 'mixpost-redis',
'queue' => ['publish-post'],
'balance' => 'auto',
'processes' => 3,
'tries' => 1,
'timeout' => 60 * 60,
],
],
],In the config/queue.php file you must add the mixpost-redis connection:
'connections' => [
// ...
'mixpost-redis' => [
'driver' => 'redis',
'connection' => 'default',
'queue' => env('REDIS_QUEUE', 'default'),
'retry_after' => 11 * 60,
'block_for' => null,
],Don't forget to run php artisan horizon. In production, you need a way to keep your horizon processes running. For this reason, you need to configure a process monitor Supervisor that can detect when your horizon processes exit and automatically restart them.
Example of supervisor config:
[program:mixpost_horizon]
process_name=%(program_name)s
command=php /path-to-your-project/artisan horizon
autostart=true
autorestart=true
user=your_user_name
stopwaitsecs=3600Schedule the commands
In the console kernel (app/Console/Kernel.php), you should schedule these commands:
protected function schedule(Schedule $schedule)
{
// ...
\Inovector\MixpostEnterprise\Schedule::register($schedule);
$schedule->command('horizon:snapshot')->everyFiveMinutes();
$schedule->command('queue:prune-batches')->daily();
}Don't forget to add a cron that runs the scheduler:
* * * * cd /path-to-your-project && php artisan schedule:run >> /dev/null 2>&1
Visit the UI
After performing all these steps, you should be able to visit the Mixpost UI at /mixpost.
As a Standalone app
If you don't know Laravel, but have basic PHP knowledge and know how to deploy to a server, you can follow these instructions.
You can create a new Laravel application with Mixpost Enterprise preinstalled using Composer.
Getting a license
In order to install Mixpost Enterprise, you'll need to get a license first.
Creating the application
You can create the application with Mixpost pre-installed using this command
composer create-project inovector/mixpost-enterprise-appDuring the execution of this command, Composer will ask for a user and a password. The user is the email address of your mixpost.app account. The password is the key to your Mixpost license.
Configure the app URL
You will need to modify the value of the APP_URL in the .env file to your project URL.
For example: APP_URL=https://your-domain.com
Configure the database
You will need to modify the values of the DB_* entries in the .env file to make sure they are aligned with your database.
Then, run the migration to create all tables.
php artisan migrate
Configure the SMTP
By configuring SMTP, Mixpost will be able to send emails such as (password reset link). You will need to modify your .env file.
MAIL_MAILER=smtp
MAIL_HOST=smtp.mailgun.org
MAIL_PORT=587
MAIL_USERNAME=
MAIL_PASSWORD=
MAIL_ENCRYPTION=tls
MAIL_FROM_ADDRESS="hello@example.com"
MAIL_FROM_NAME="${APP_NAME}"Integrate with Sentry - Error Reporting
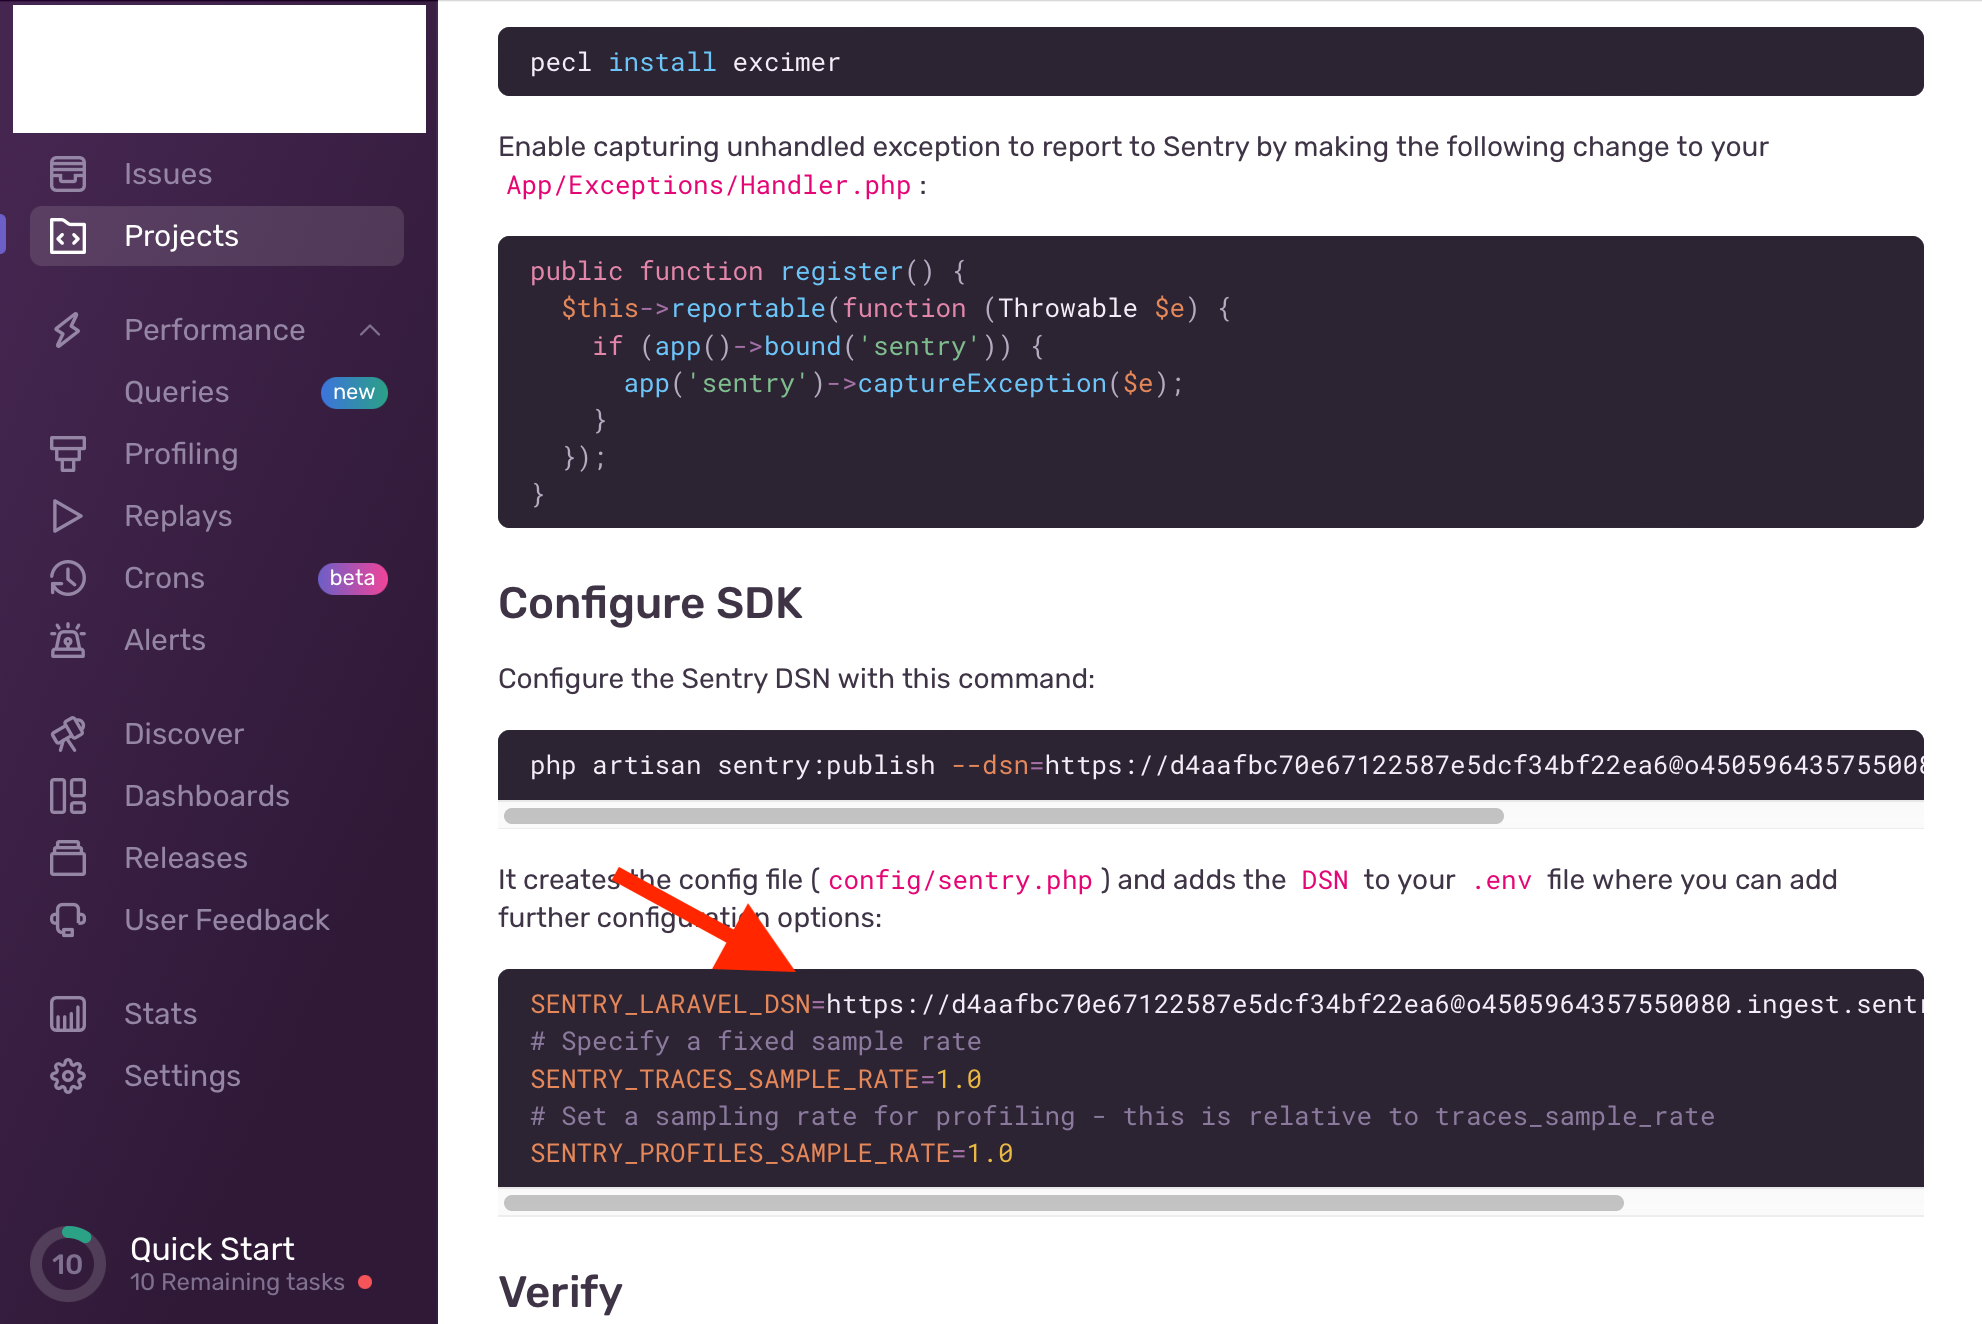
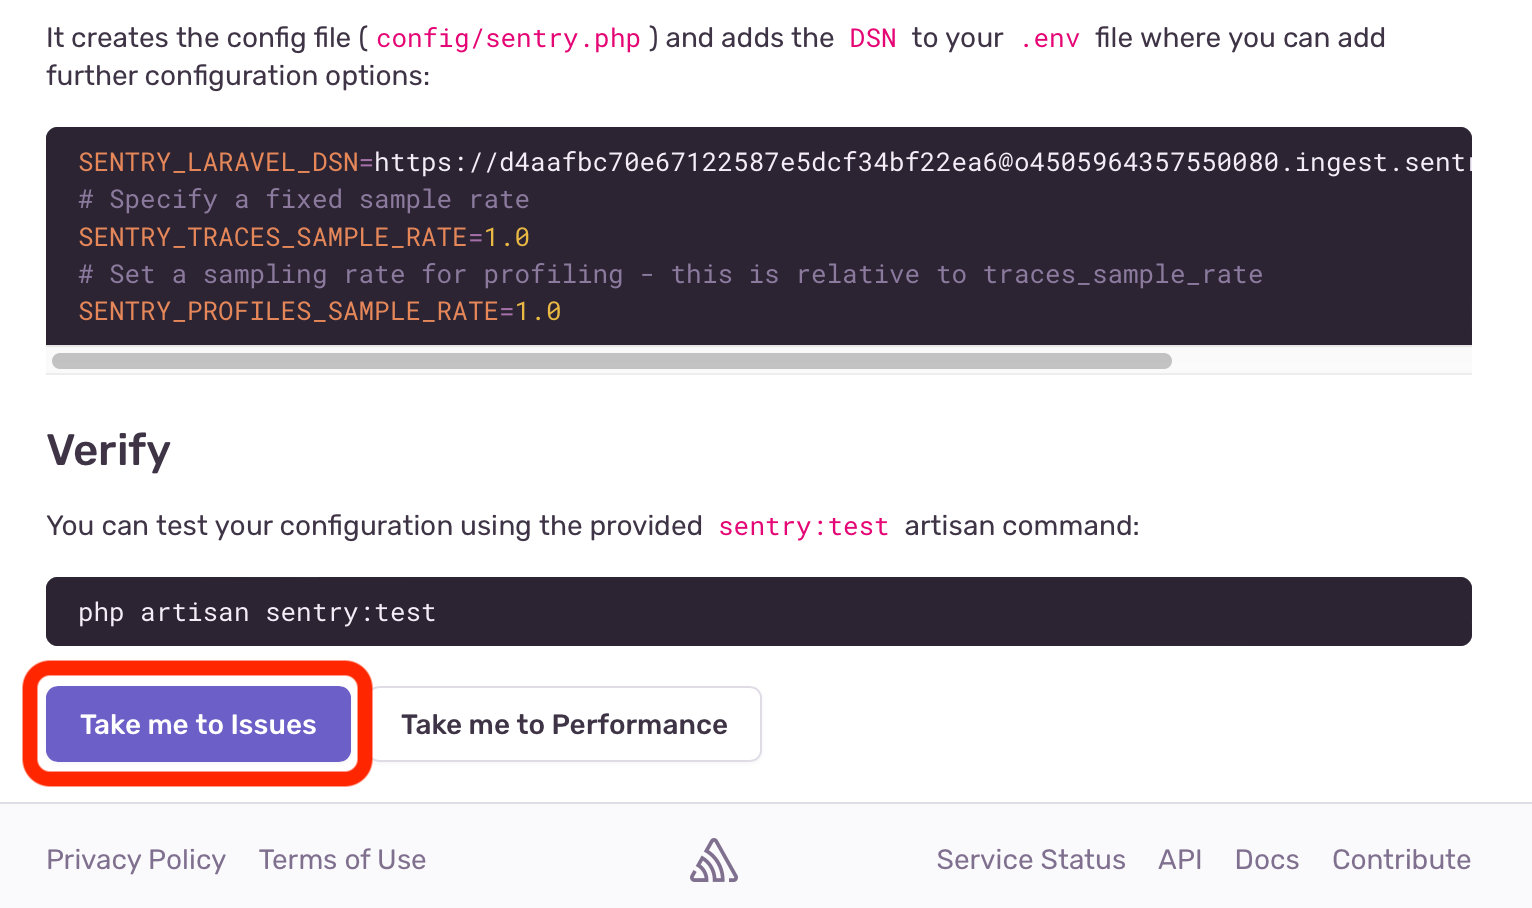
Modify the value of "SENTRY_LARAVEL_DSN=" in the .env file.
File Permissions
Make sure you have the right file permissions by following this tutorial.
Server configuration (Manual)
Visit the UI
After performing all these steps, you should be able to visit the Mixpost UI at /mixpost.
Deploying to production
Change the value of APP_ENV from the .env file to production.
APP_ENV=productionDebug Mode
In your production environment, this value should always be false. If the APP_DEBUG variable is set to true in production, you risk exposing sensitive configuration values to your application's end users.
Caching Configuration
When deploying to production, you should make sure that you run the config:cache command during your deployment process:
php artisan config:cacheOnce the configuration has been cached, everything you change in the .env file will have no effect. To have an effect, you must repeat the execution of the cache command.
Caching Routes
To improve Mixpost application performance, run:
php artisan route:cacheOnce the route has been cached, you have to repeat it every time you deploy/update/upgrade the Mixpost application.
Deploying Horizon
During your Mixpost deployment process (update/upgrade of Mixpost or change some code), you should instruct the Horizon process to terminate so that it will be restarted by your process monitor and receive your code changes:
php artisan horizon:terminateUsing Docker Image
Docker Installation (Guide)
Have a VPS?
Desktop?
Just create a docker-compose.yml file on your server, and change the values (which start with the example_*) with real values.
For passwords, we recommend using strong values. You can use this tool to generate strong passwords:
Required:
LICENSE_KEY(license key, see Mixpost Enterprise license page)APP_URL(your app URL, for example, https://my-project.com)APP_KEY(your app key. Generate a base64 secret with this tool)DB_DATABASE(the database name of the linked MySQL container)DB_USERNAME(the user of the linked MySQL container)DB_PASSWORD(the user password of the linked MySQL container)
Optional:
APP_NAME(Your project name. Default value:'Mixpost')APP_DEBUG(Available options:true/false. Default value:false)MIXPOST_CORE_PATH(This is the path that Mixpost will use to load its core routes and assets. Default value:mixpost)MIXPOST_PUBLIC_PAGES_PREFIX(public pages have an endpoint directly after the URL domain (for example, https://your-domain/privacy-policy). Default value:pages, which means https://your-domain/pages/privacy-policy)MIXPOST_FORGOT_PASSWORD(Enable/Disable Forgot Password feature. Default value:'true')MIXPOST_TWO_FACTOR_AUTH(Enable/Disable Two Factor Authentication feature. Default value:'true')- FORCE_CORE_PATH_CALLBACK_TO_NATIVE (true/false)- Force the callback URL to use the native "mixpost" core path. Default value: 'false'
-
SENTRY_LARAVEL_DSN - Send errors to sentry. Read the integration guide
MAIL_HOST(Default value: smtp.mailgun.org)MAIL_PORT(Default value: 587)MAIL_USERNAMEMAIL_PASSWORDMAIL_ENCRYPTION(Default value: tls)MAIL_FROM_ADDRESS(Default value: hello@example.com)MAIL_FROM_NAME(Default value: Example)DB_HOST(The IP of the MySql server. Default value:mysql)DB_PORT(The port of the MySql server. Default value:3306)REDIS_HOST(The IP of Redis server. Default value:redis)REDIS_PORT(The port of the Redis server. Default value:6379)
version: '3.1'
services:
mixpost:
image: inovector/mixpost-enterprise:latest
environment:
LICENSE_KEY: 'example_license_key'
APP_URL: https://your-domain.com
APP_KEY: example_secret_key # Generate a base64 secret with this tool: https://mixpost.app/encryption-key-generator
DB_DATABASE: 'example_db_name'
DB_USERNAME: 'example_db_user'
DB_PASSWORD: 'example_db_password'
ports:
- 9000:80
volumes:
- storage:/var/www/html/storage/app
depends_on:
- mysql
- redis
restart: unless-stopped
mysql:
image: 'mysql/mysql-server:8.0'
ports:
- '3306:3306'
environment:
MYSQL_DATABASE: 'example_db_name'
MYSQL_USER: 'example_db_user'
MYSQL_PASSWORD: 'example_db_password'
volumes:
- 'mysql:/var/lib/mysql'
healthcheck:
test: ["CMD", "mysqladmin", "ping", "-p example_db_password"]
retries: 3
timeout: 5s
restart: unless-stopped
redis:
image: 'redis:latest'
command: redis-server --appendonly yes --replica-read-only no
volumes:
- 'redis:/data'
healthcheck:
test: ["CMD", "redis-cli", "ping"]
retries: 3
timeout: 5s
restart: unless-stopped
volumes:
mysql:
driver: local
redis:
driver: local
storage:
driver: localThen execute this command:
docker-compose up -dYou can connect to Mixpost by accessing the URL address set in APP_URL
Important information
Mixpost uses encrypting and decrypting text via OpenSSL using AES-256 and AES-128 encryption to secure your credentials of services and connected social accounts. That said, we don't recommend you change APP_KEY. By changing the APP_KEY, some functions in the applications will stop working, namely: service credentials and connected social account tokens will no longer be able to be decrypted. You will have to re-enter your service credentials and reconnect your social accounts. For Mastodon, you have to re-create a new app, see the instructions.
Change the API_KEY only if you have a serious reason such as your access to the server has been compromised.
Configuration
Integrate third-party services
After the installation of Mixpost Enterprise, the integration of third-party services is required.
Integrate Social Platforms:
Follow the integration instructions for each social platform
Integrate Payment Platforms:
Follow the integration instructions for each payment platform
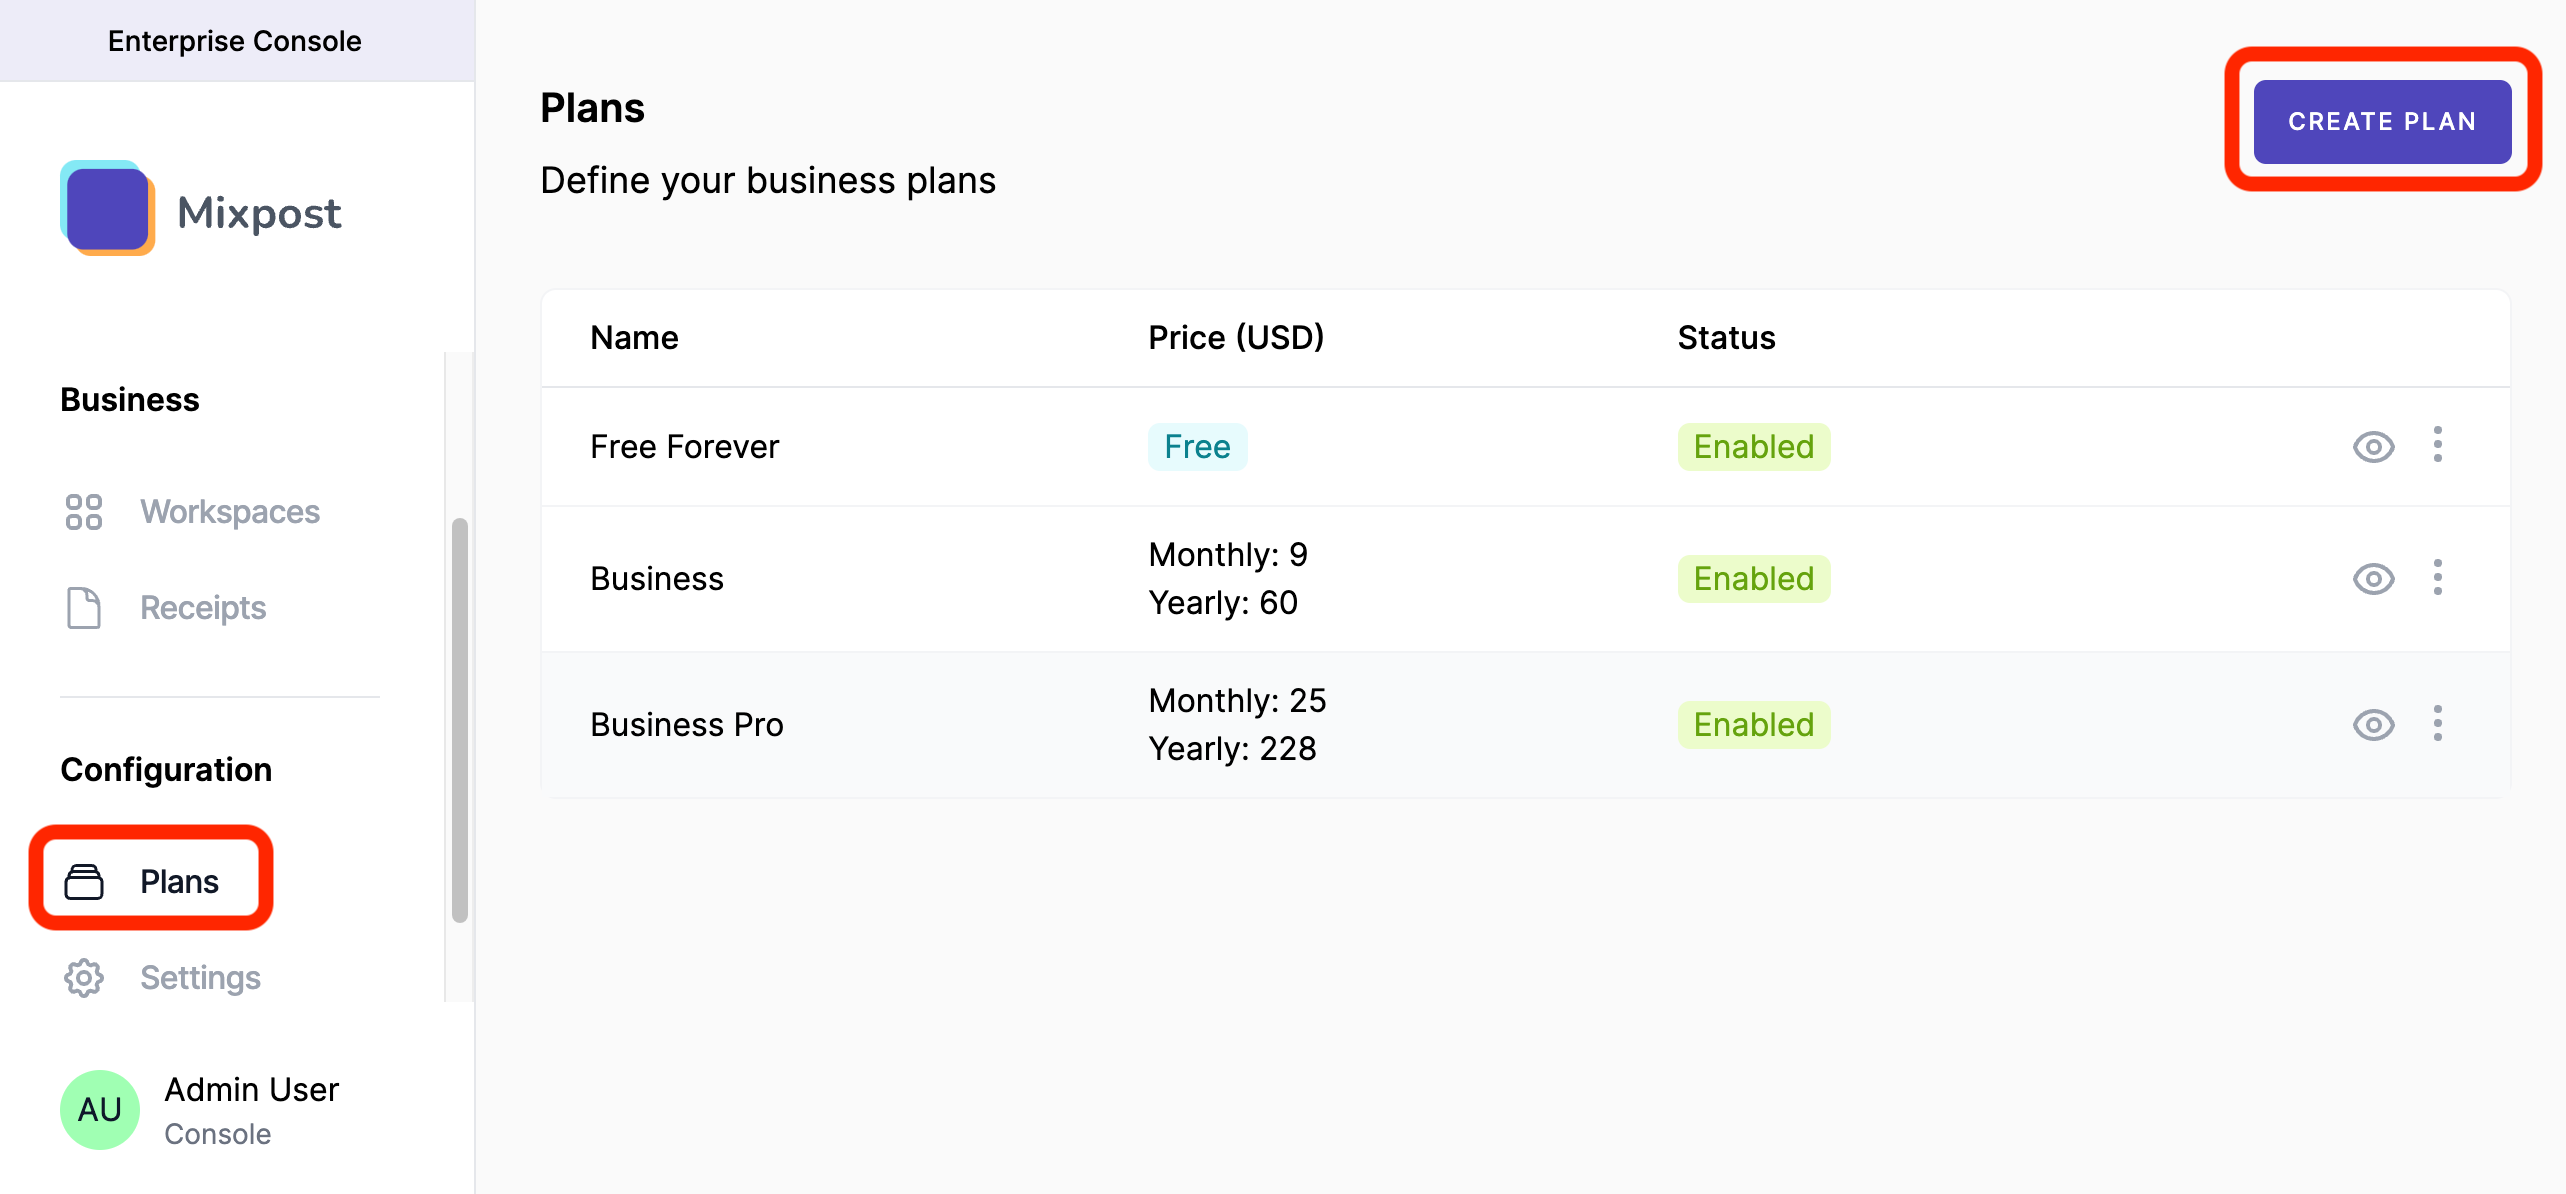
Create Subscription Plans
With Mixpost Enterprise, setting up your own subscription plans is super easy. You can easily pick and choose which features to offer and even set limits for different plan levels. It's all about giving you the flexibility to create the perfect plan for your customers. From the Mixpost billing portal, your customers can subscribe to plans, update the subscription plan, update their payment information, and download their invoices.
Integrate a payment platform and create pricing plans
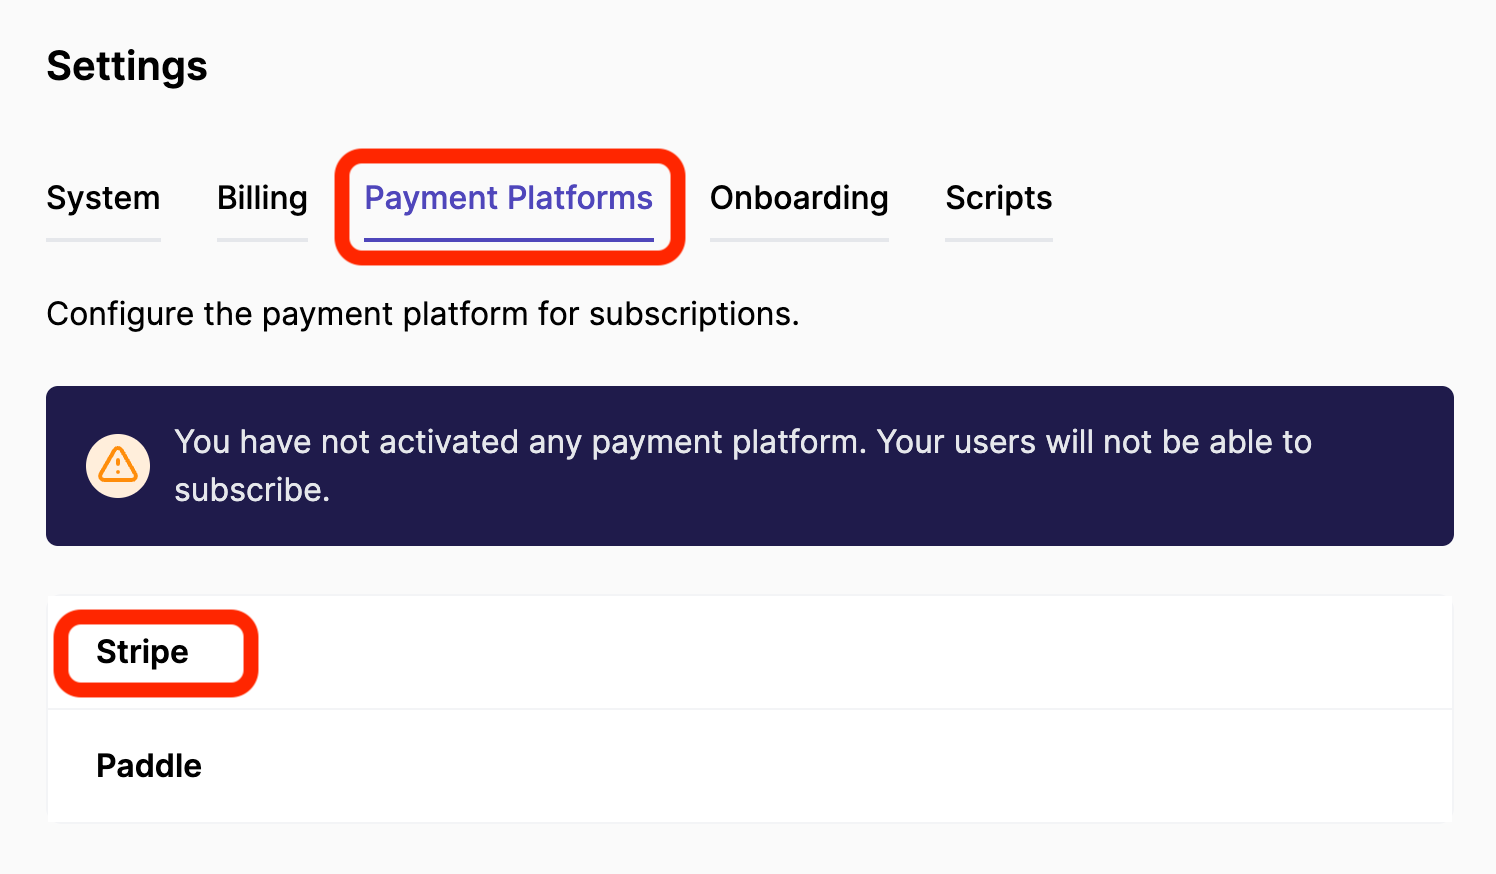
Mixpost Enterprise supports payment platforms like Stripe and Paddle. If you have not yet integrated a payment platform, follow the integration instructions.
Create pricing plans in Mixpost Enterprise
- Open the Enterprise Console from the user menu.
- Navigate to "Plans"
- Here, you'll see the "Create Plan" button. Click on it.
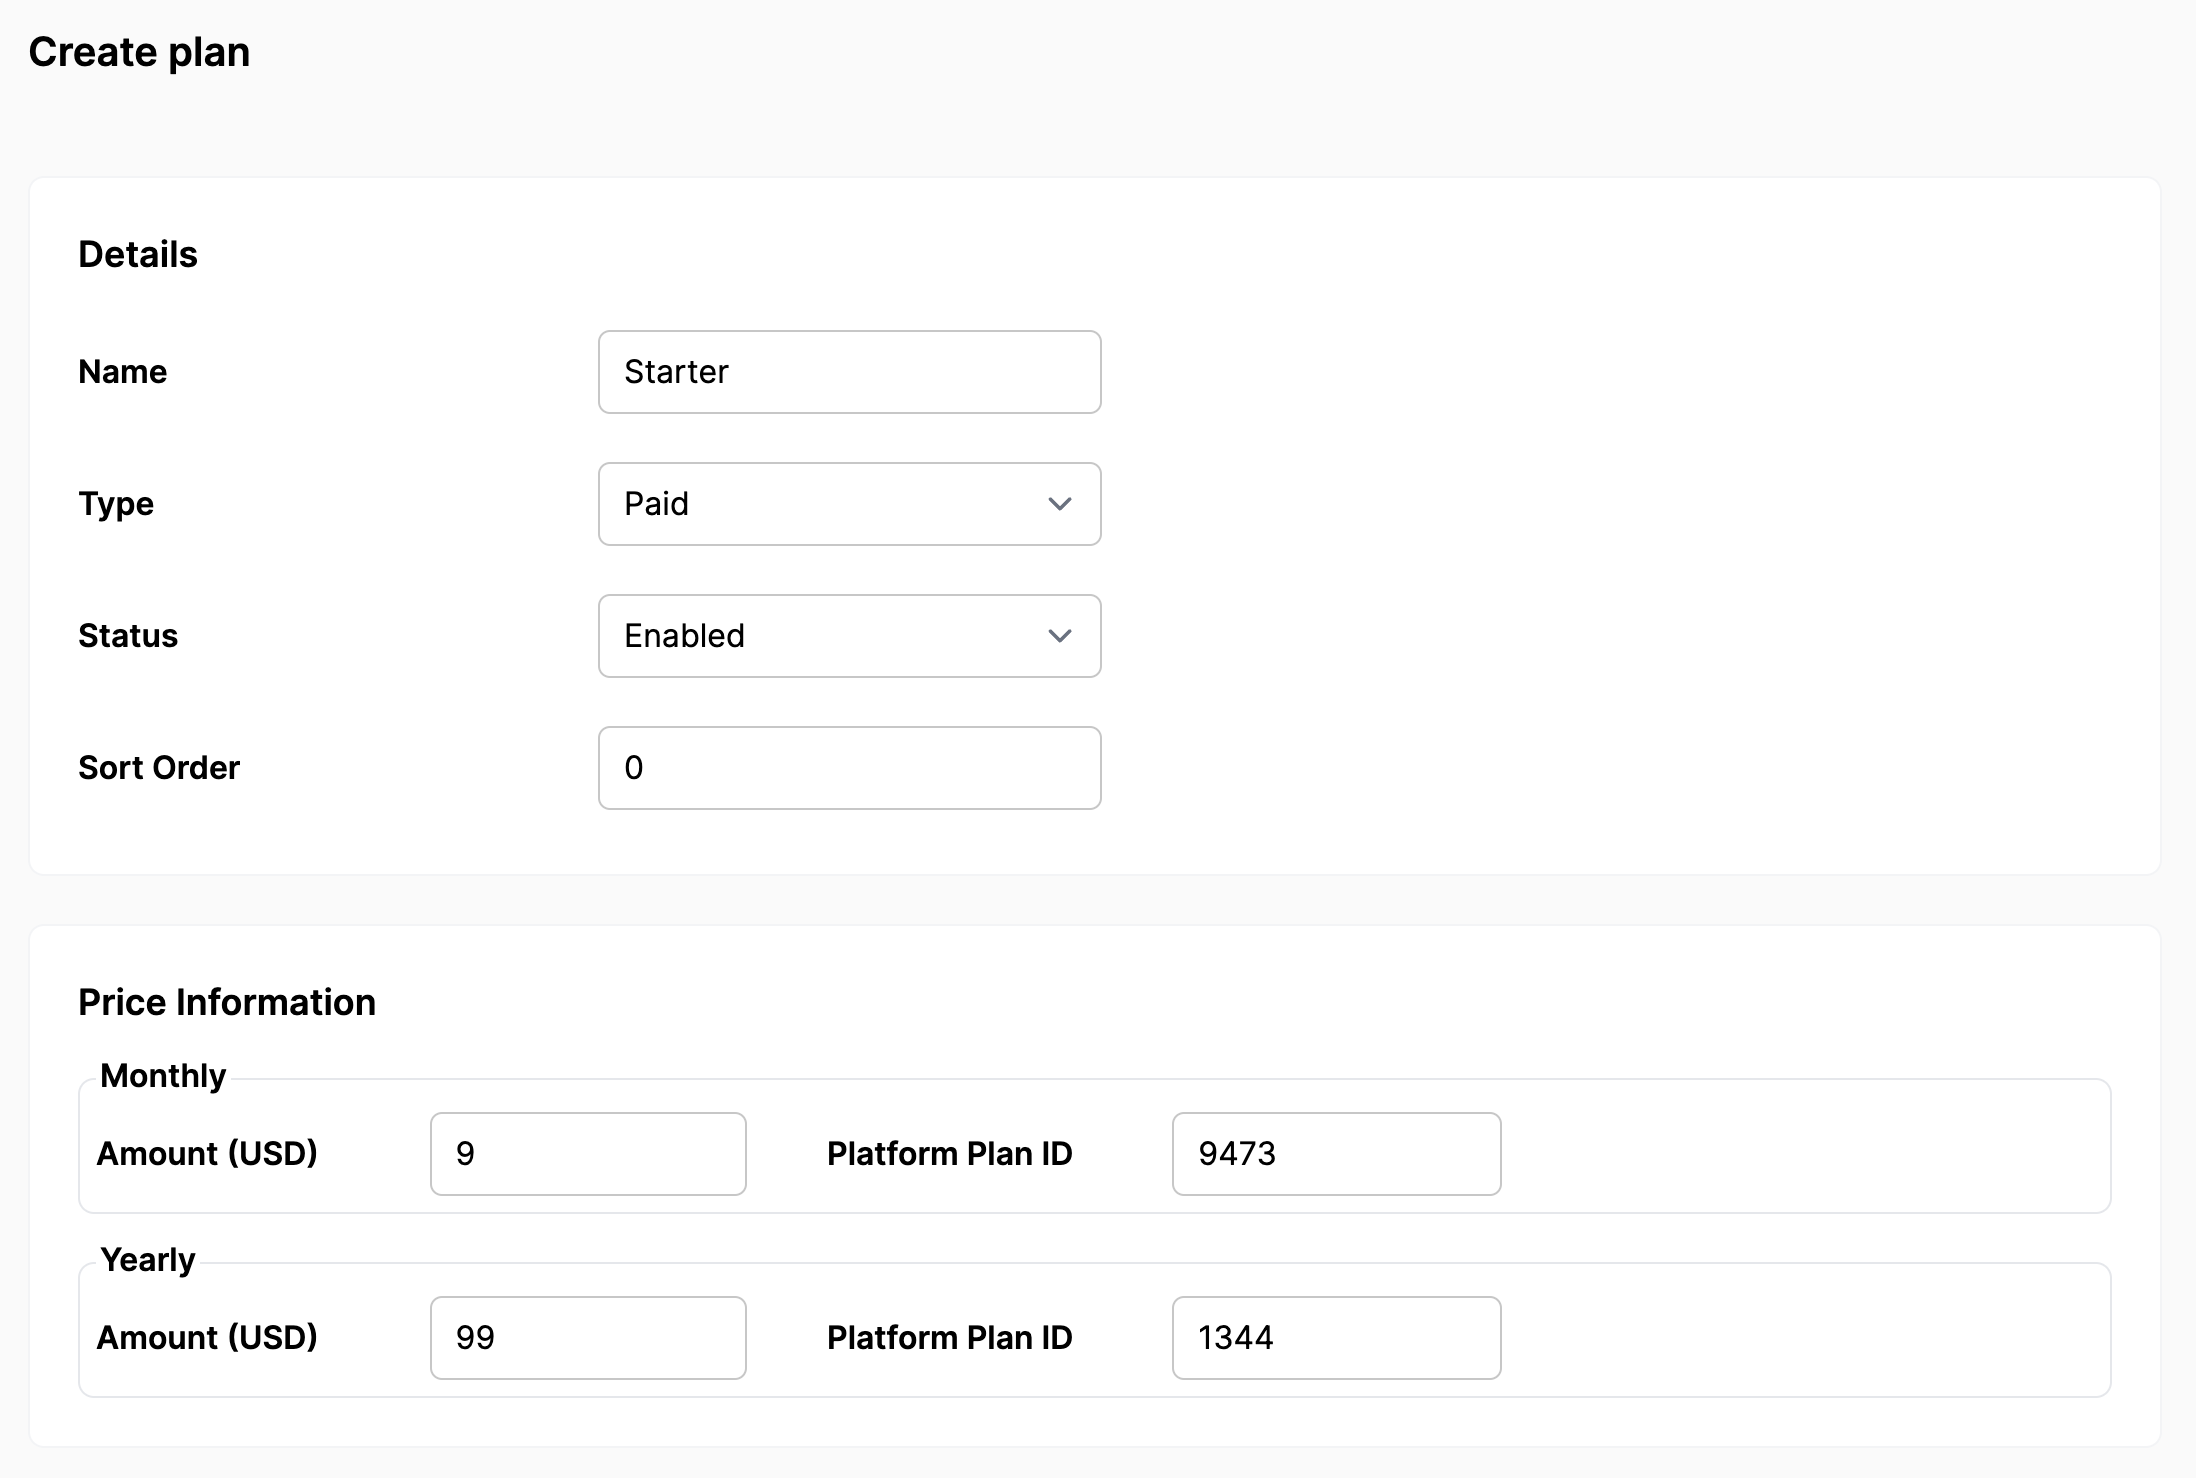
- Give a plan name, for example: "Starter"
- Select "Type" of the plan:
- Free - That says the plan is free. You can only have one free plan.
- Paid - That says it requires payment processing. Here you need to input the Price information:
- Monthly
- Amount - the price of your monthly plan
- Platform Plan ID - the ID of your monthly plan created in the payment platform.
- Yearly
- Amount - the price of your yearly plan
- Platform Plan ID - the ID of your yearly plan created in the payment platform.
- Monthly
- Select the status "Enabled"
- Input "Sort order". For example: Starter (1), Advanced (2), Business (3), etc.
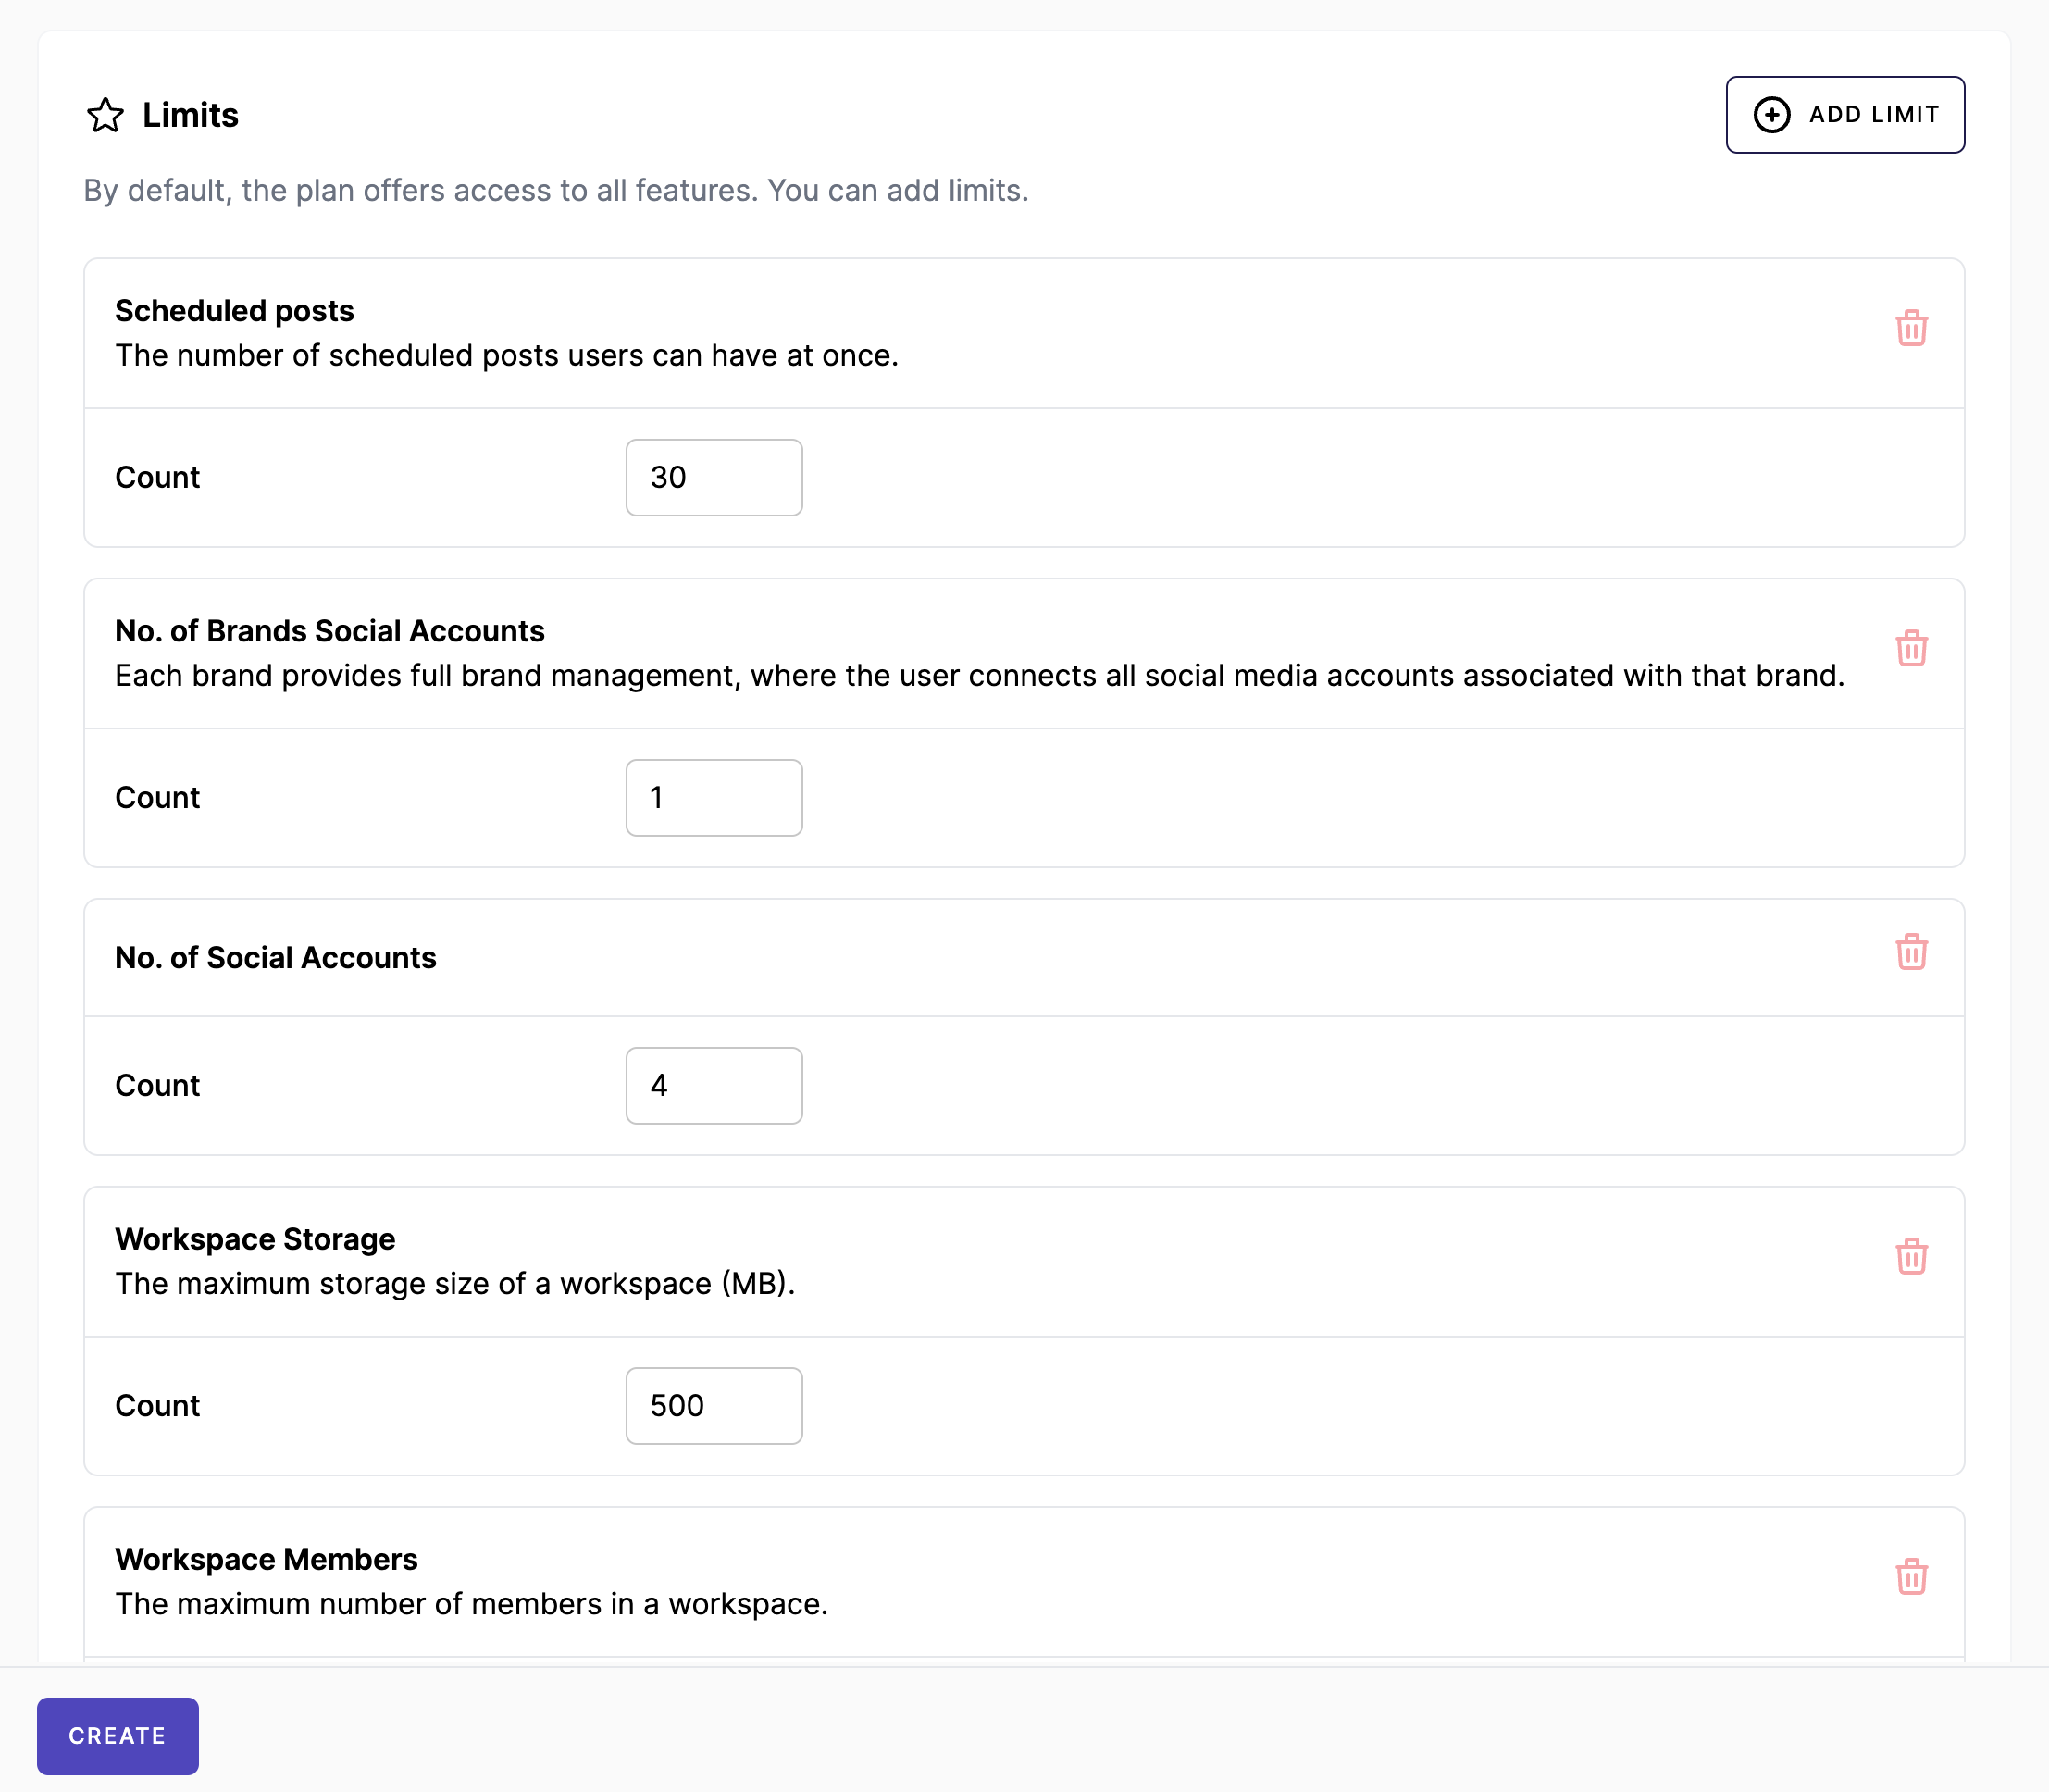
- Add limits - By default, the plan offers access to all features. You can add limits.
- Save the plan by clicking on the "Create" or "Update" button.
Conclusion
If you have successfully completed the integration of the payment platform and created plans in Mixpost Enterprise, you can test by registering a new user and subscribing to a plan.
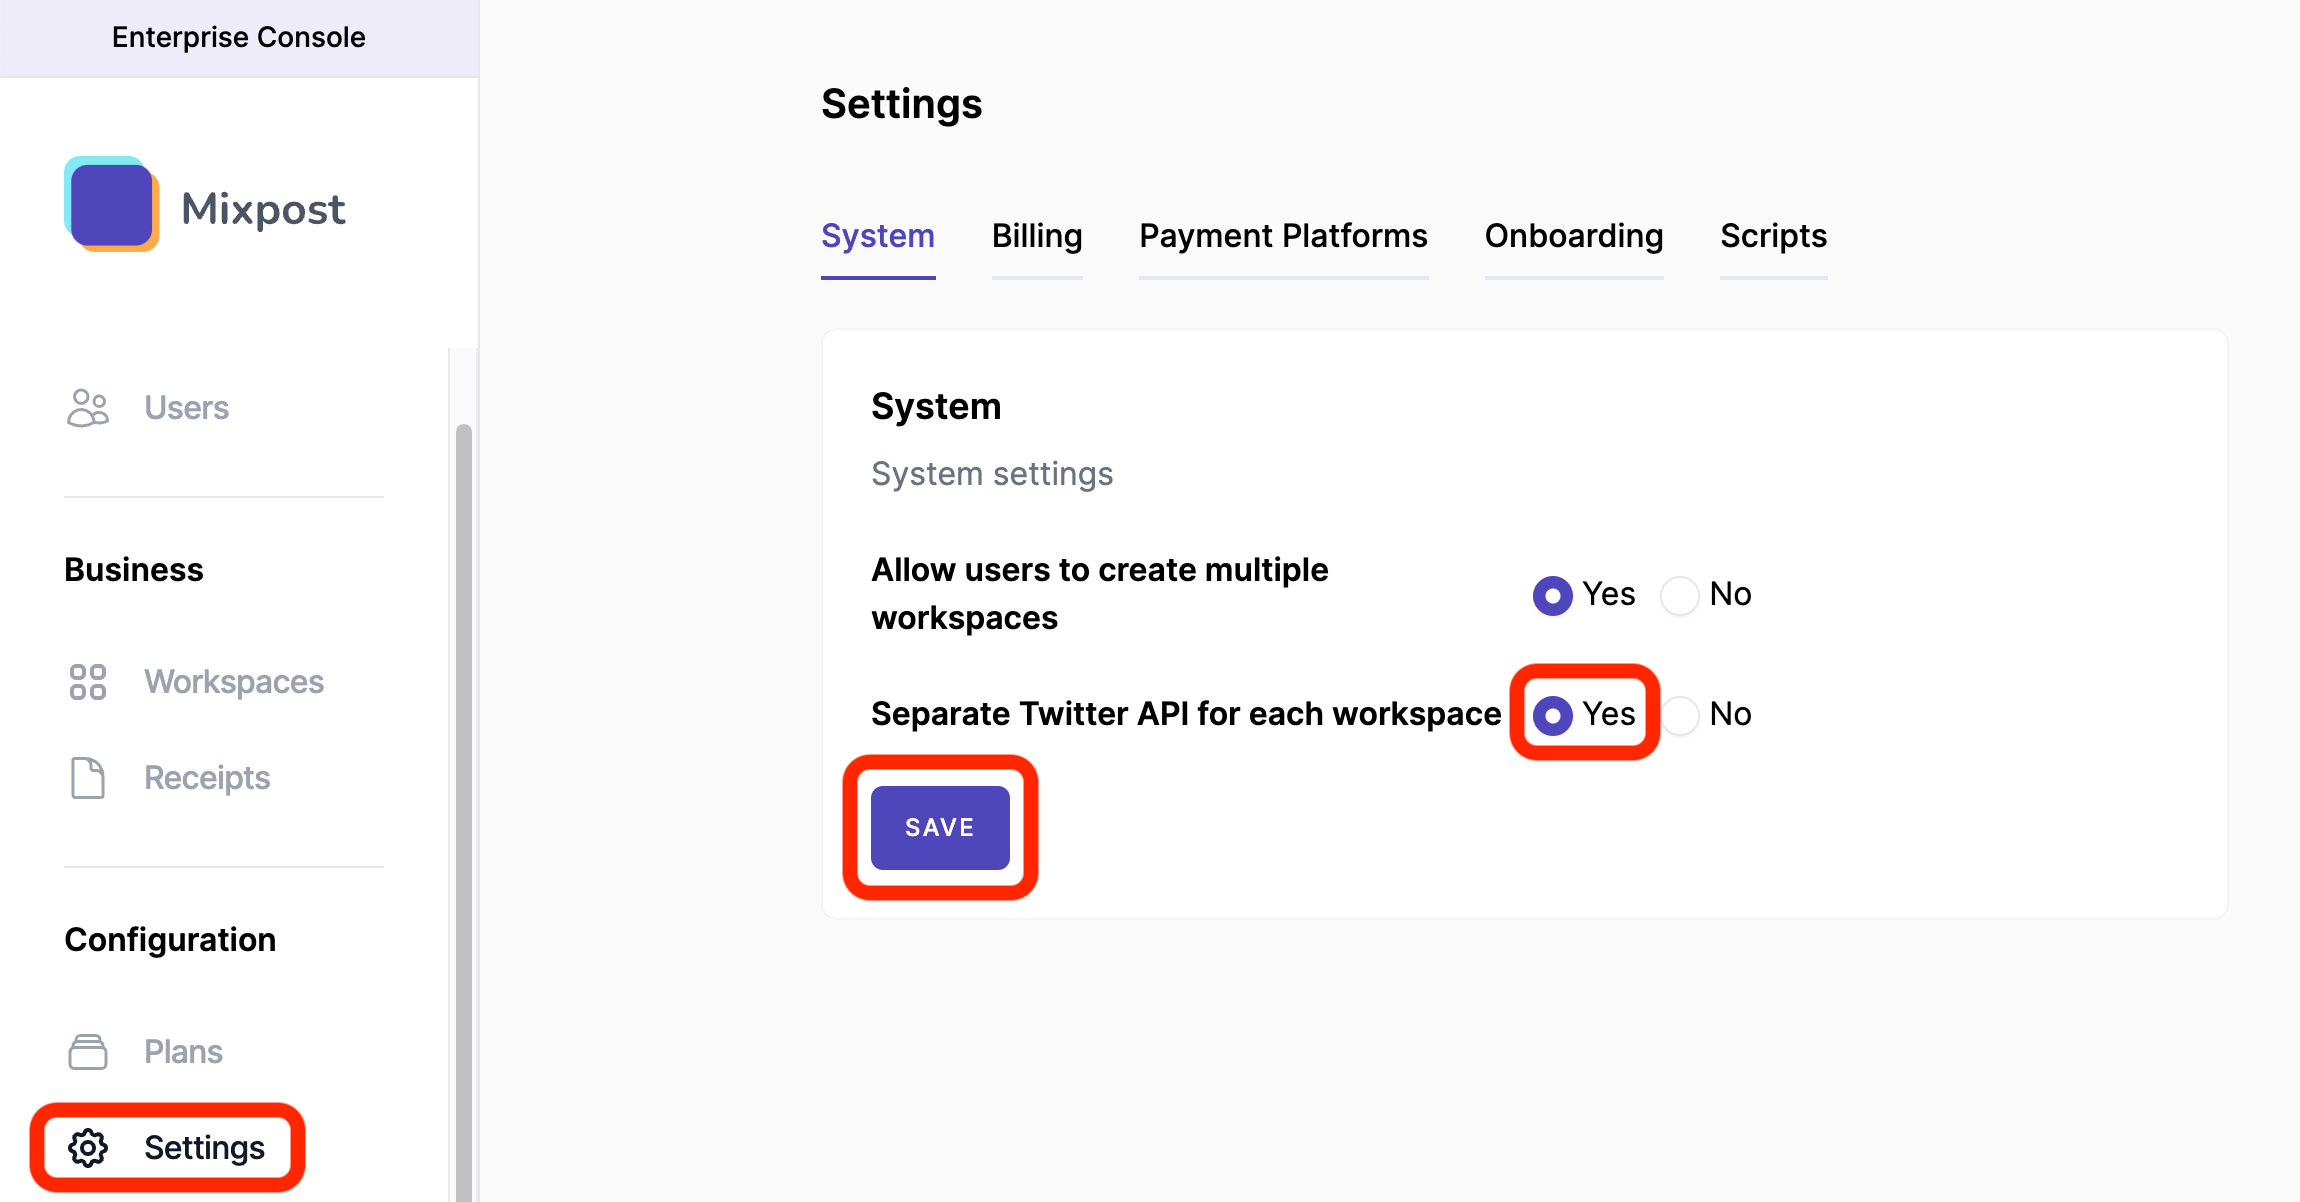
System Settings
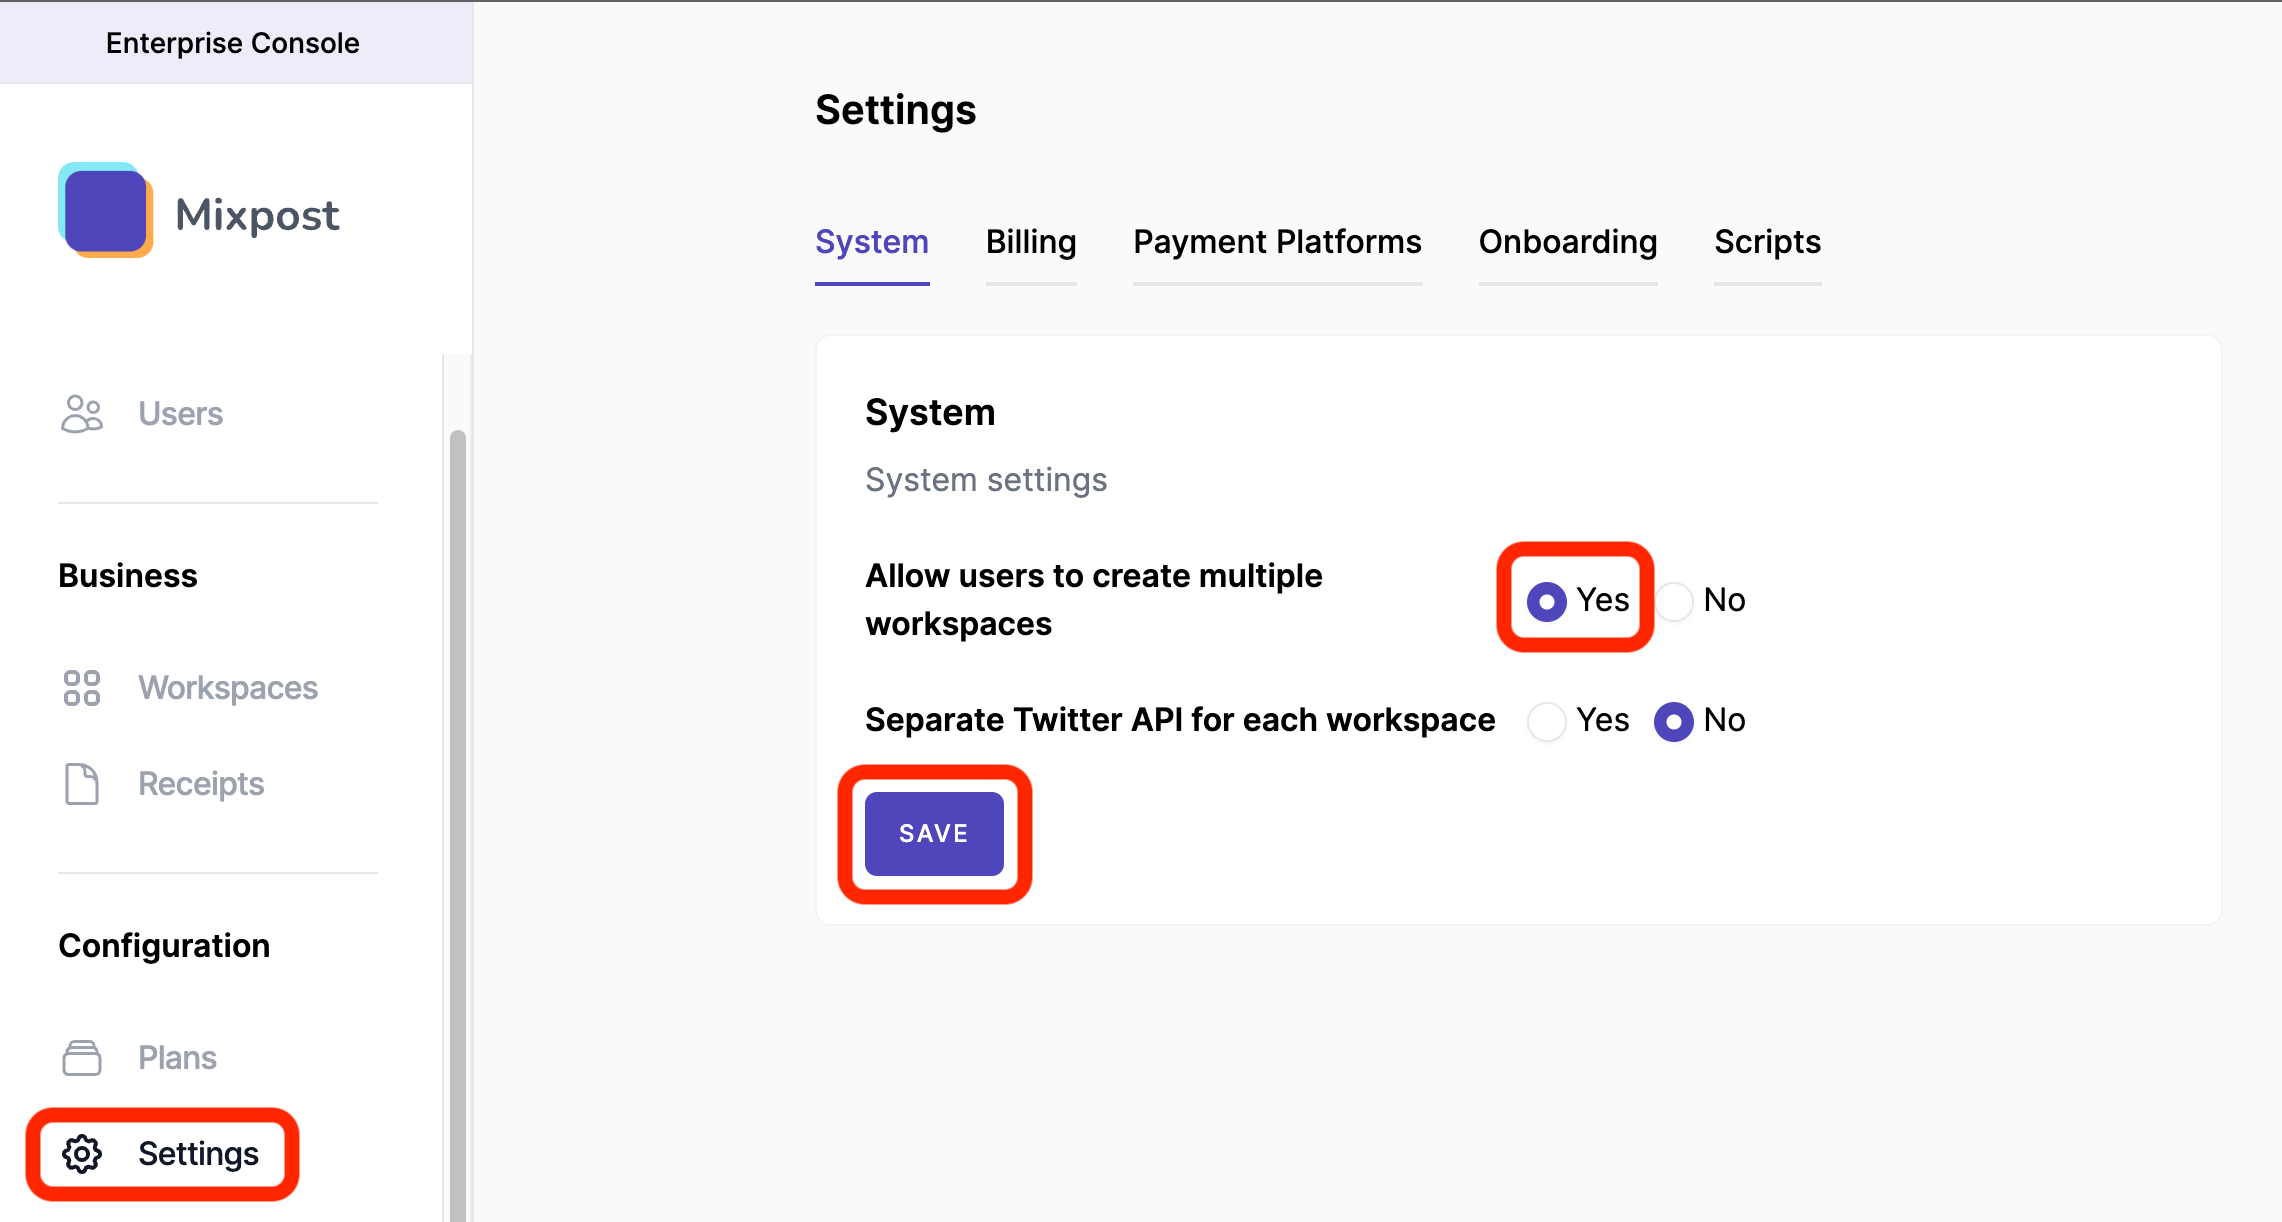
Allow users to create multiple workspaces
A workspace is the primary entity for billing. In other words, all charges, payments, and subscriptions are tied to the workspace, rather than the individual user. By default, the user can own only one workspace.
You may want Mixpost to allow users to own multiple workspaces:
- Go to "Enterprise Console" (left-bottom user menu)
- Click on "Settings" (left sidebar)
- Here you will see "Allow users to create multiple workspaces"
- Select "Yes"
- Save
Separate Twitter API for each workspace
In the context that Twitter API has a free limit, but the paid limit may be too high for some businesses at the beginning. However, the solution is to let the workspace administrator insert his Twitter Keys.
Billing Settings
Mixpost Enterprise allows you to configure the system according to the specifics of your business:
- Go to "Enterprise Console" (left-bottom user menu)
- Click on "Settings" (left sidebar)
- Here you will see the "Billing" tab item. Click on it.
- Made the changes.
- Save changes by clicking on the "Save" button.
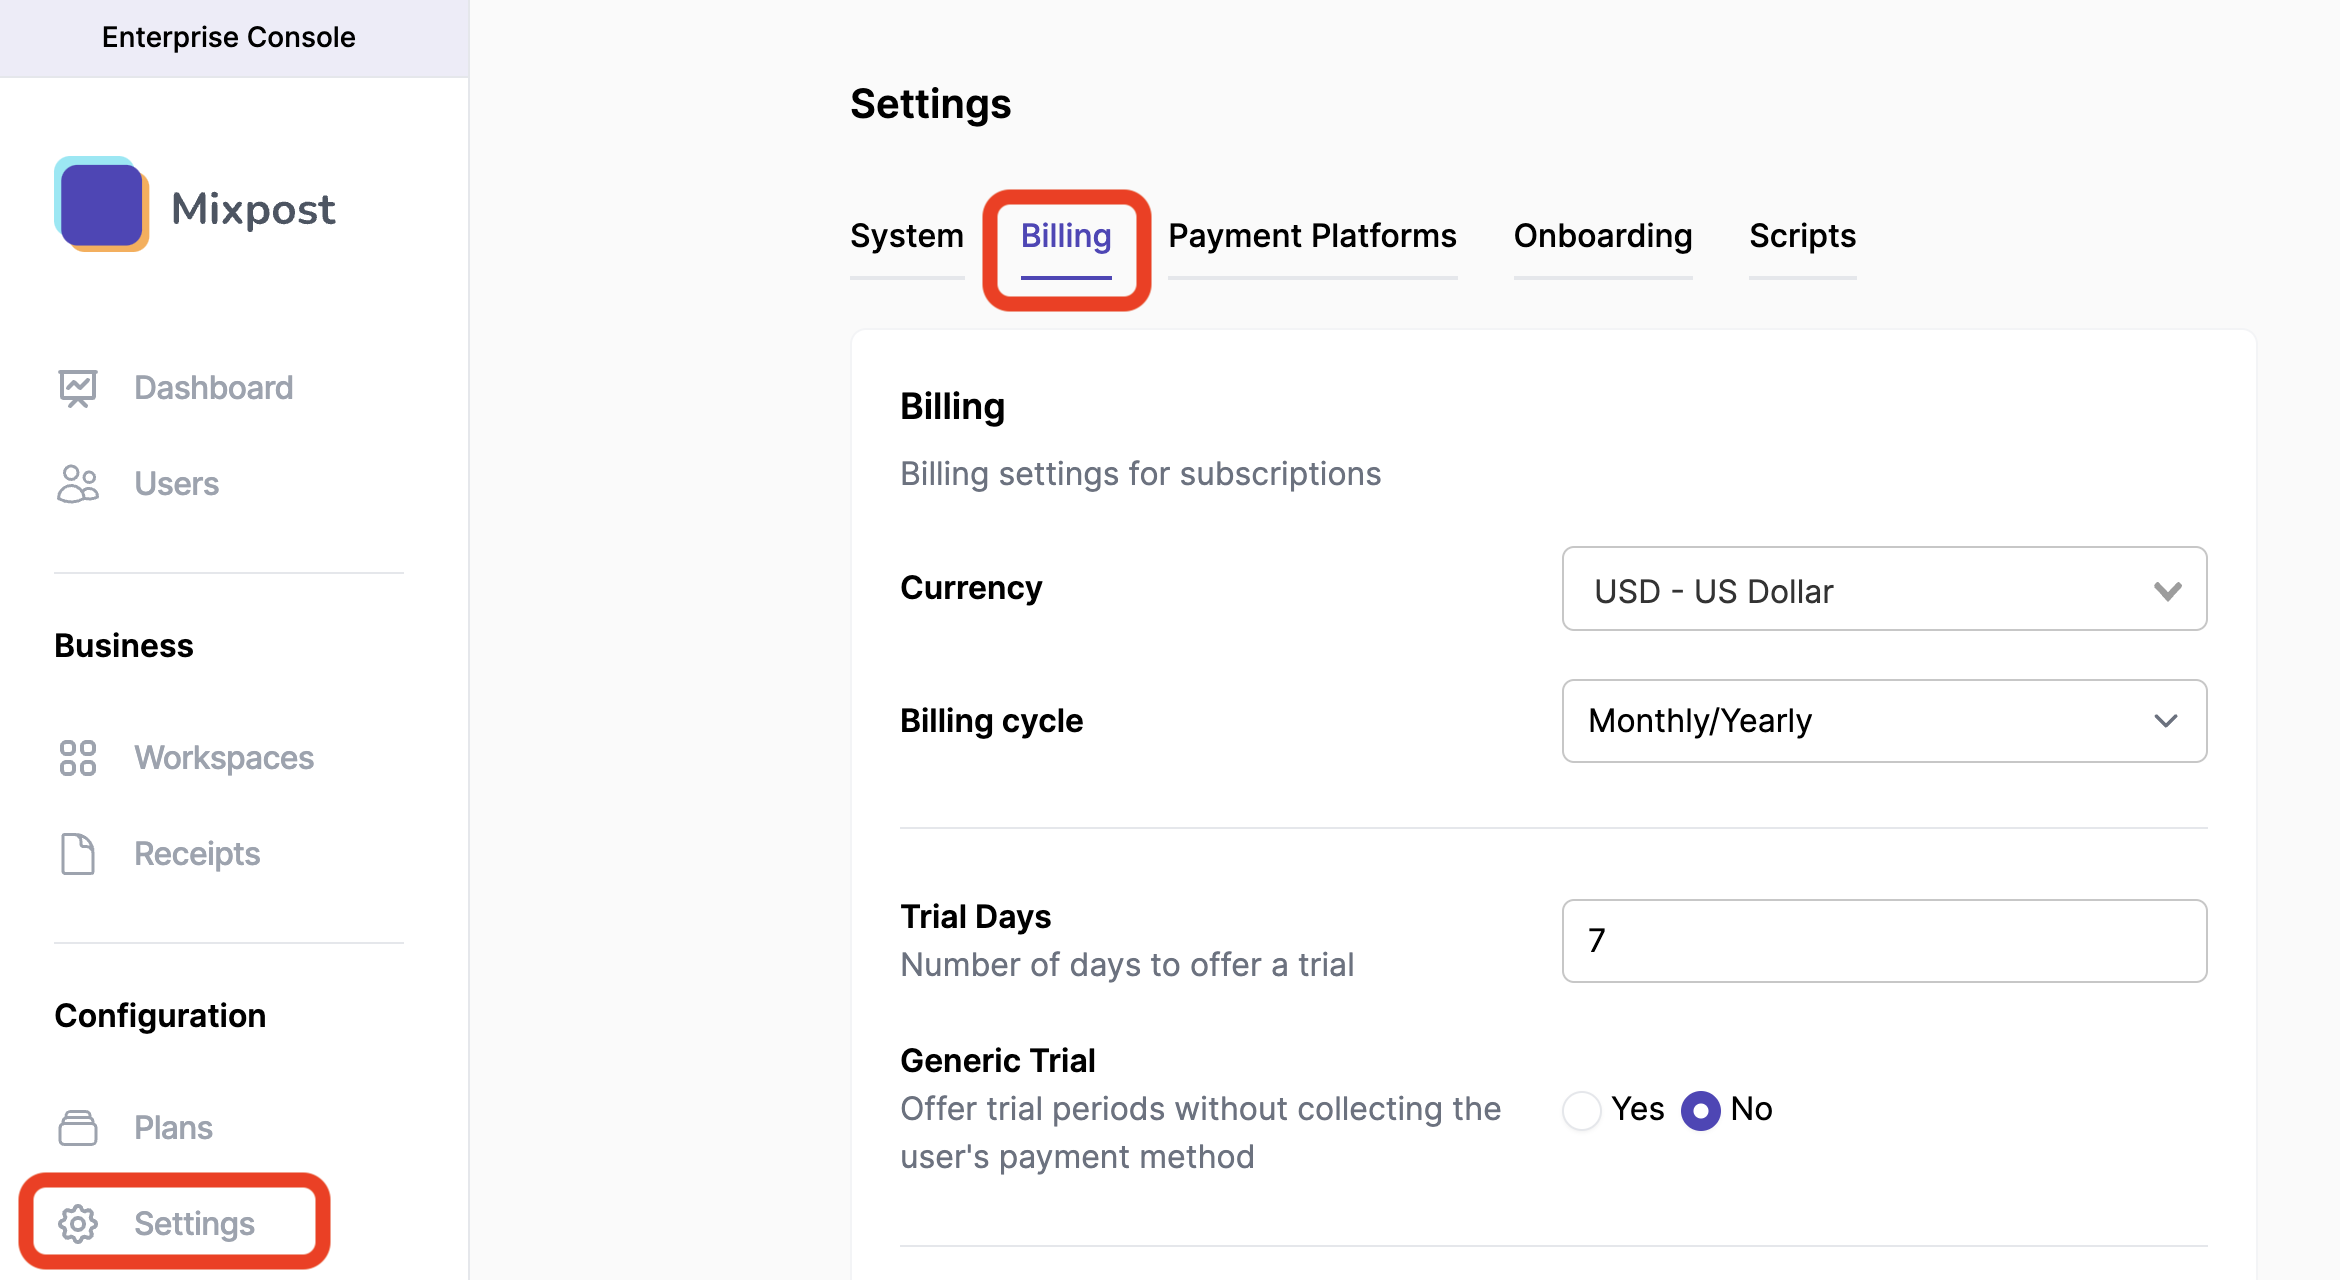
Currency
Default: "USD - US Dollar"
Billing cycle
Default: "Monthly/Yearly"
There are 3 cycles you can select:
- Monthly/Yearly (default) - Will let your customers choose a period of subscription, monthly or yearly.
- Monthly only - Your customer can only subscribe monthly.
- Yerly only - Your customer can only subscribe yearly.
Trial Days
Default: "7"
By default, Mixpost has a 7-day trial period set up to provide trial periods to your customers. You can increase or decrease the number of days. If you want to disable Trials, you should leave it empty or set to 0.
Generic Trial
Default: "No"
If you would like to offer trial periods without collecting the user's payment method up front, you may check "Yes".
Prorations
Default: "Yes"
By default, Mixpost prorates charges when swapping between plans. The "No" checkbox can be checked to allow customers to change subscription plans without prorating costs.
Swap and invoice
Default: "Yes"
Receipt Title
Default: 'Receipt'
This value is used in the receipt that the customer can download after the payment is successful. You can change it to anything you want, like "Invoice" for example.
Company Details
This information will appear on all of your receipts and is a great place to add your full business name, VAT number, or address of record. Do not include any confidential or financial information such as credit card numbers.
Plans Page URL & Title
Put your URL to the pricing or comparison plans on your website.

What your customers see when they try to subscribe to a plan:

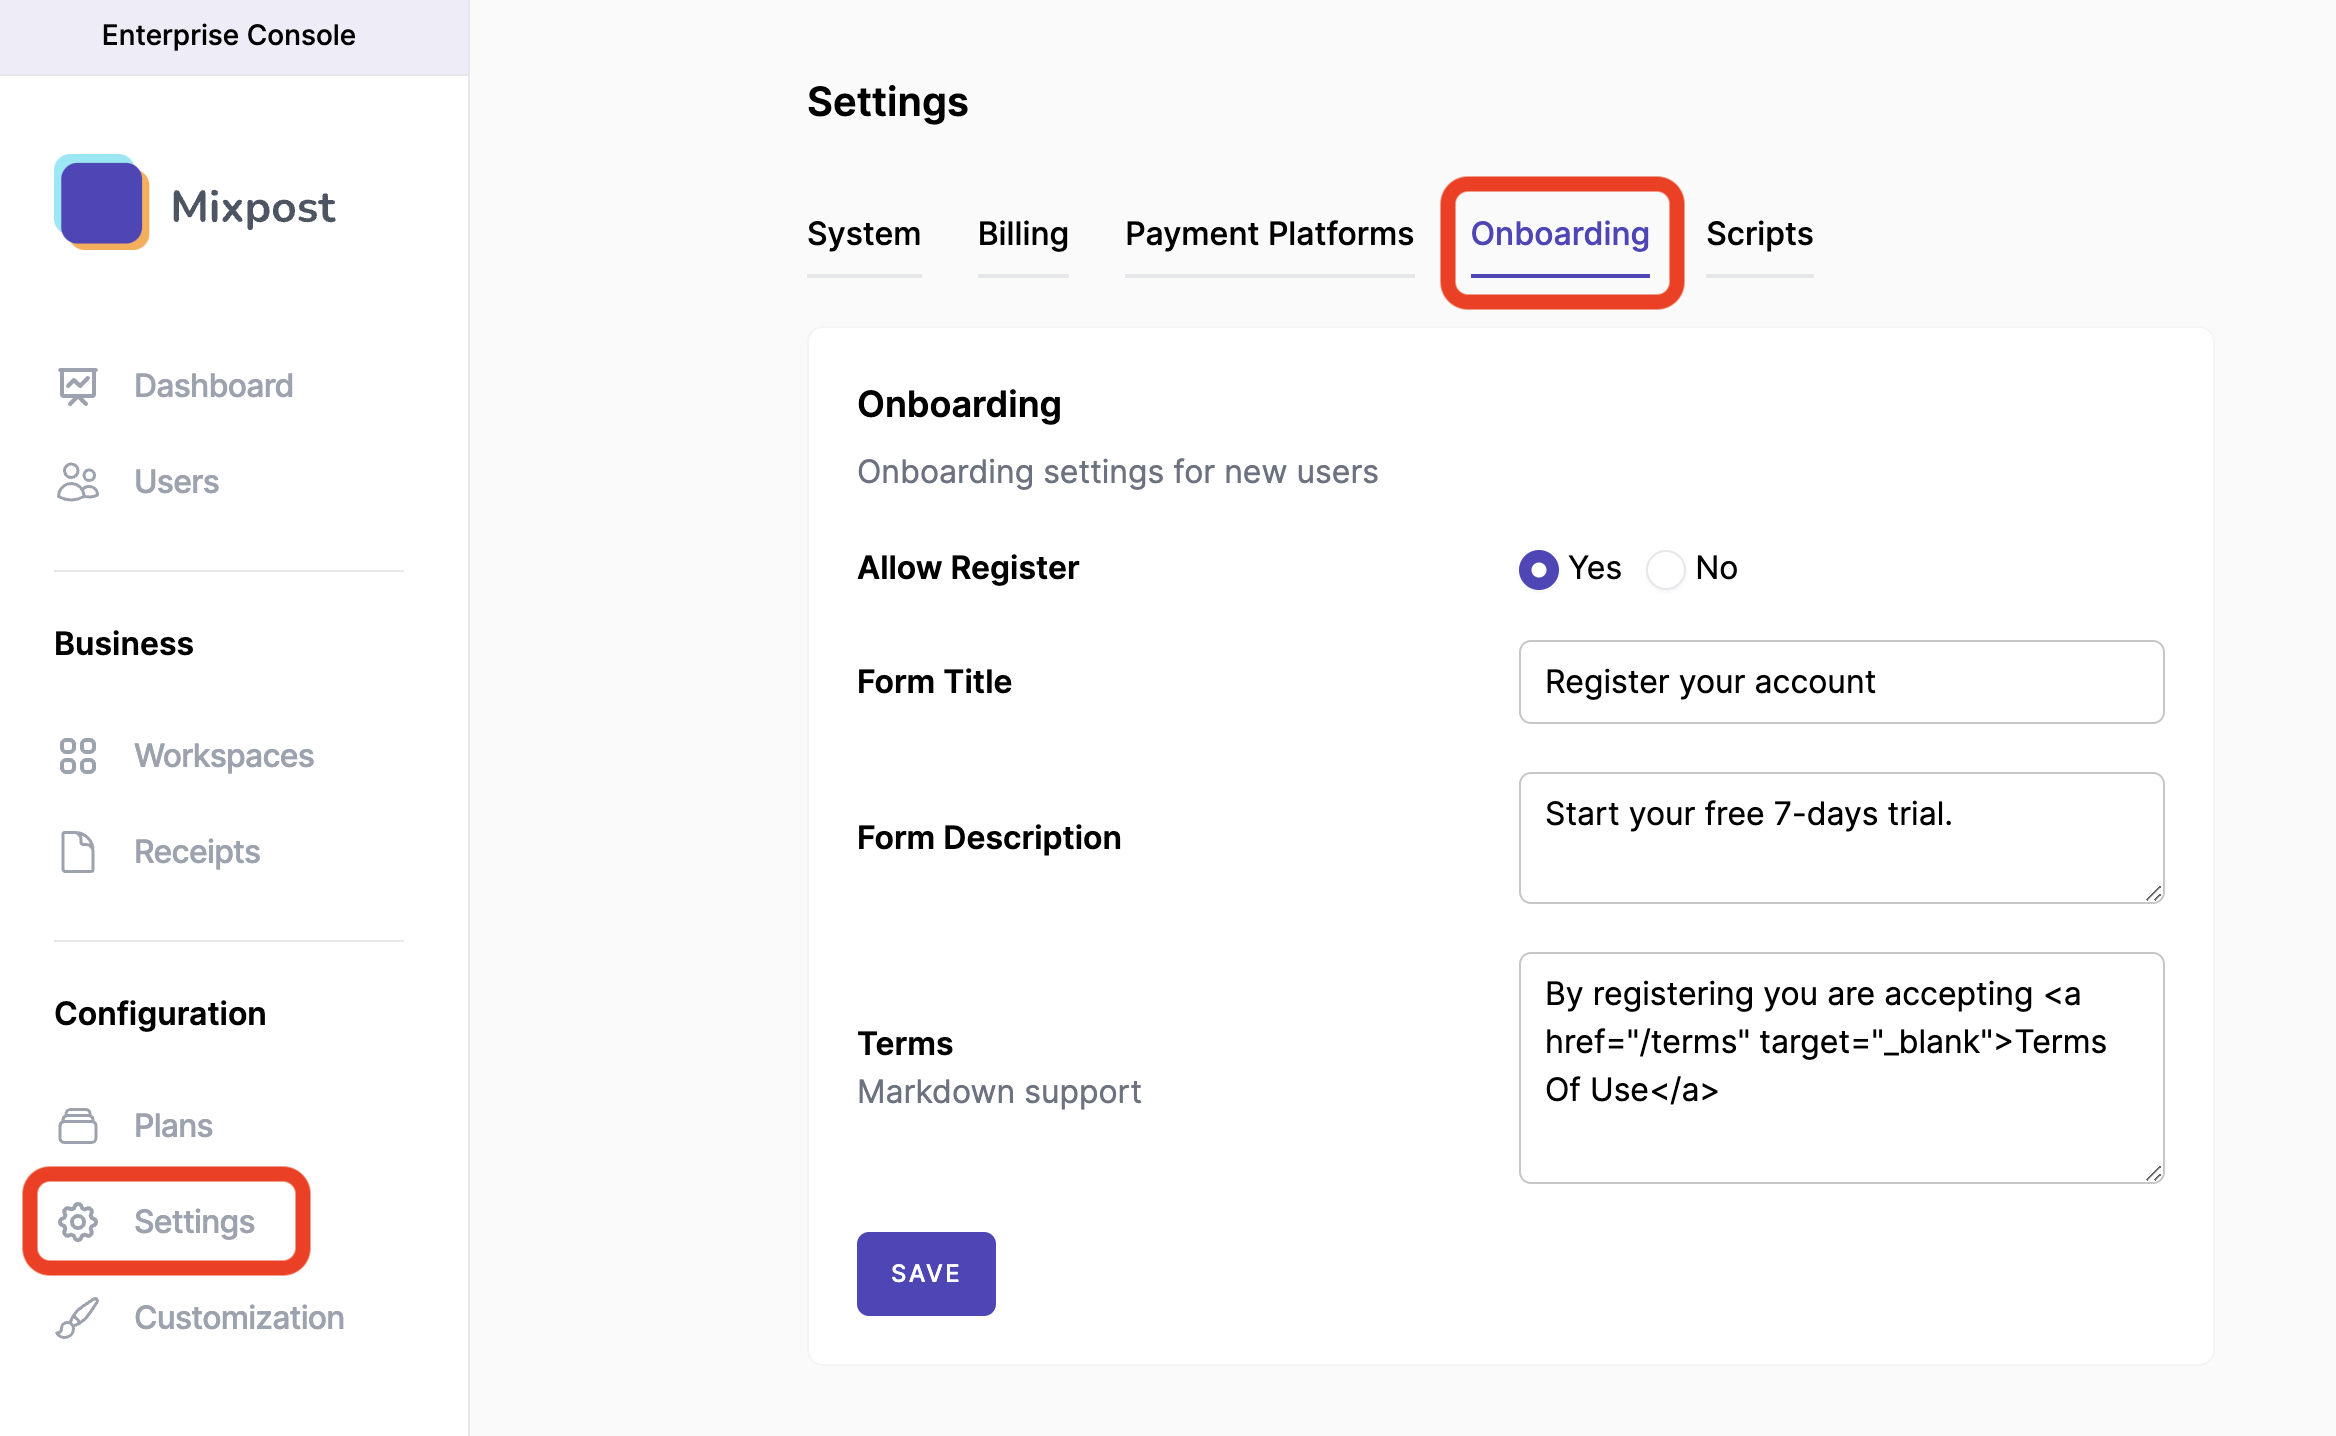
Onboarding Settings
Mixpost Enterprise allows you to configure the register Onboarding process according to the specifics of your business:
- Go to "Enterprise Console" (left-bottom user menu)
- Click on "Settings" (left sidebar)
- Here you will see the "Onboarding" tab item. Click on it.
- Made the changes.
- Save changes by clicking on the "Save" button.
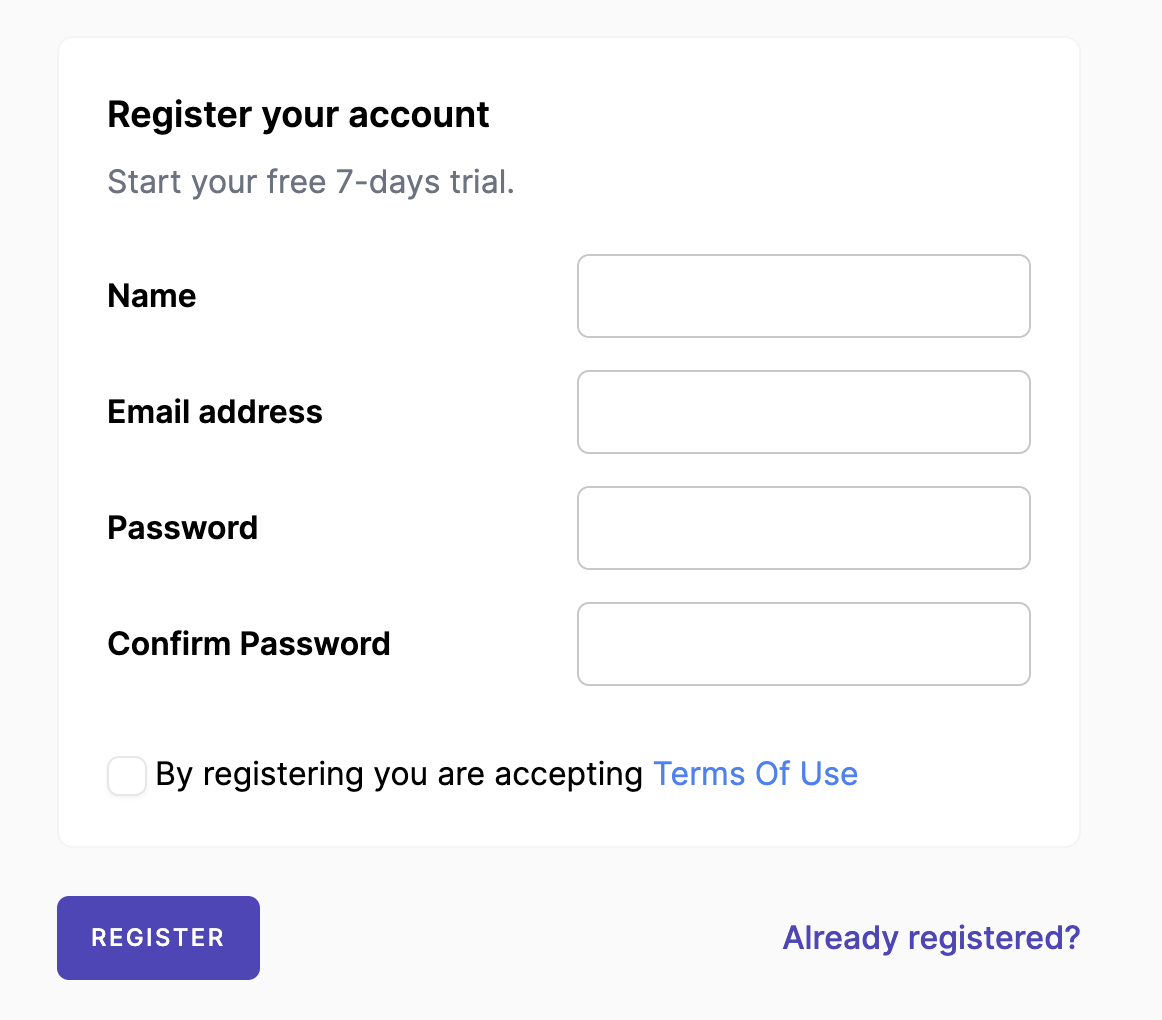
What your customers see when they try to register:
Allow Register
Default: "Yes"
You can disable registration for new users by checking "No". Save changes by clicking on the "Save" button.
Form Title
Default: "Register your account"
Form Description
Default: "Start your free 7-day trial."
Terms
Default: "By registering you are accepting <a href="/terms" target="_blank">Terms Of Use</a>"
Change the Terms of Use page URL from "href=".
Html or Markdown support.
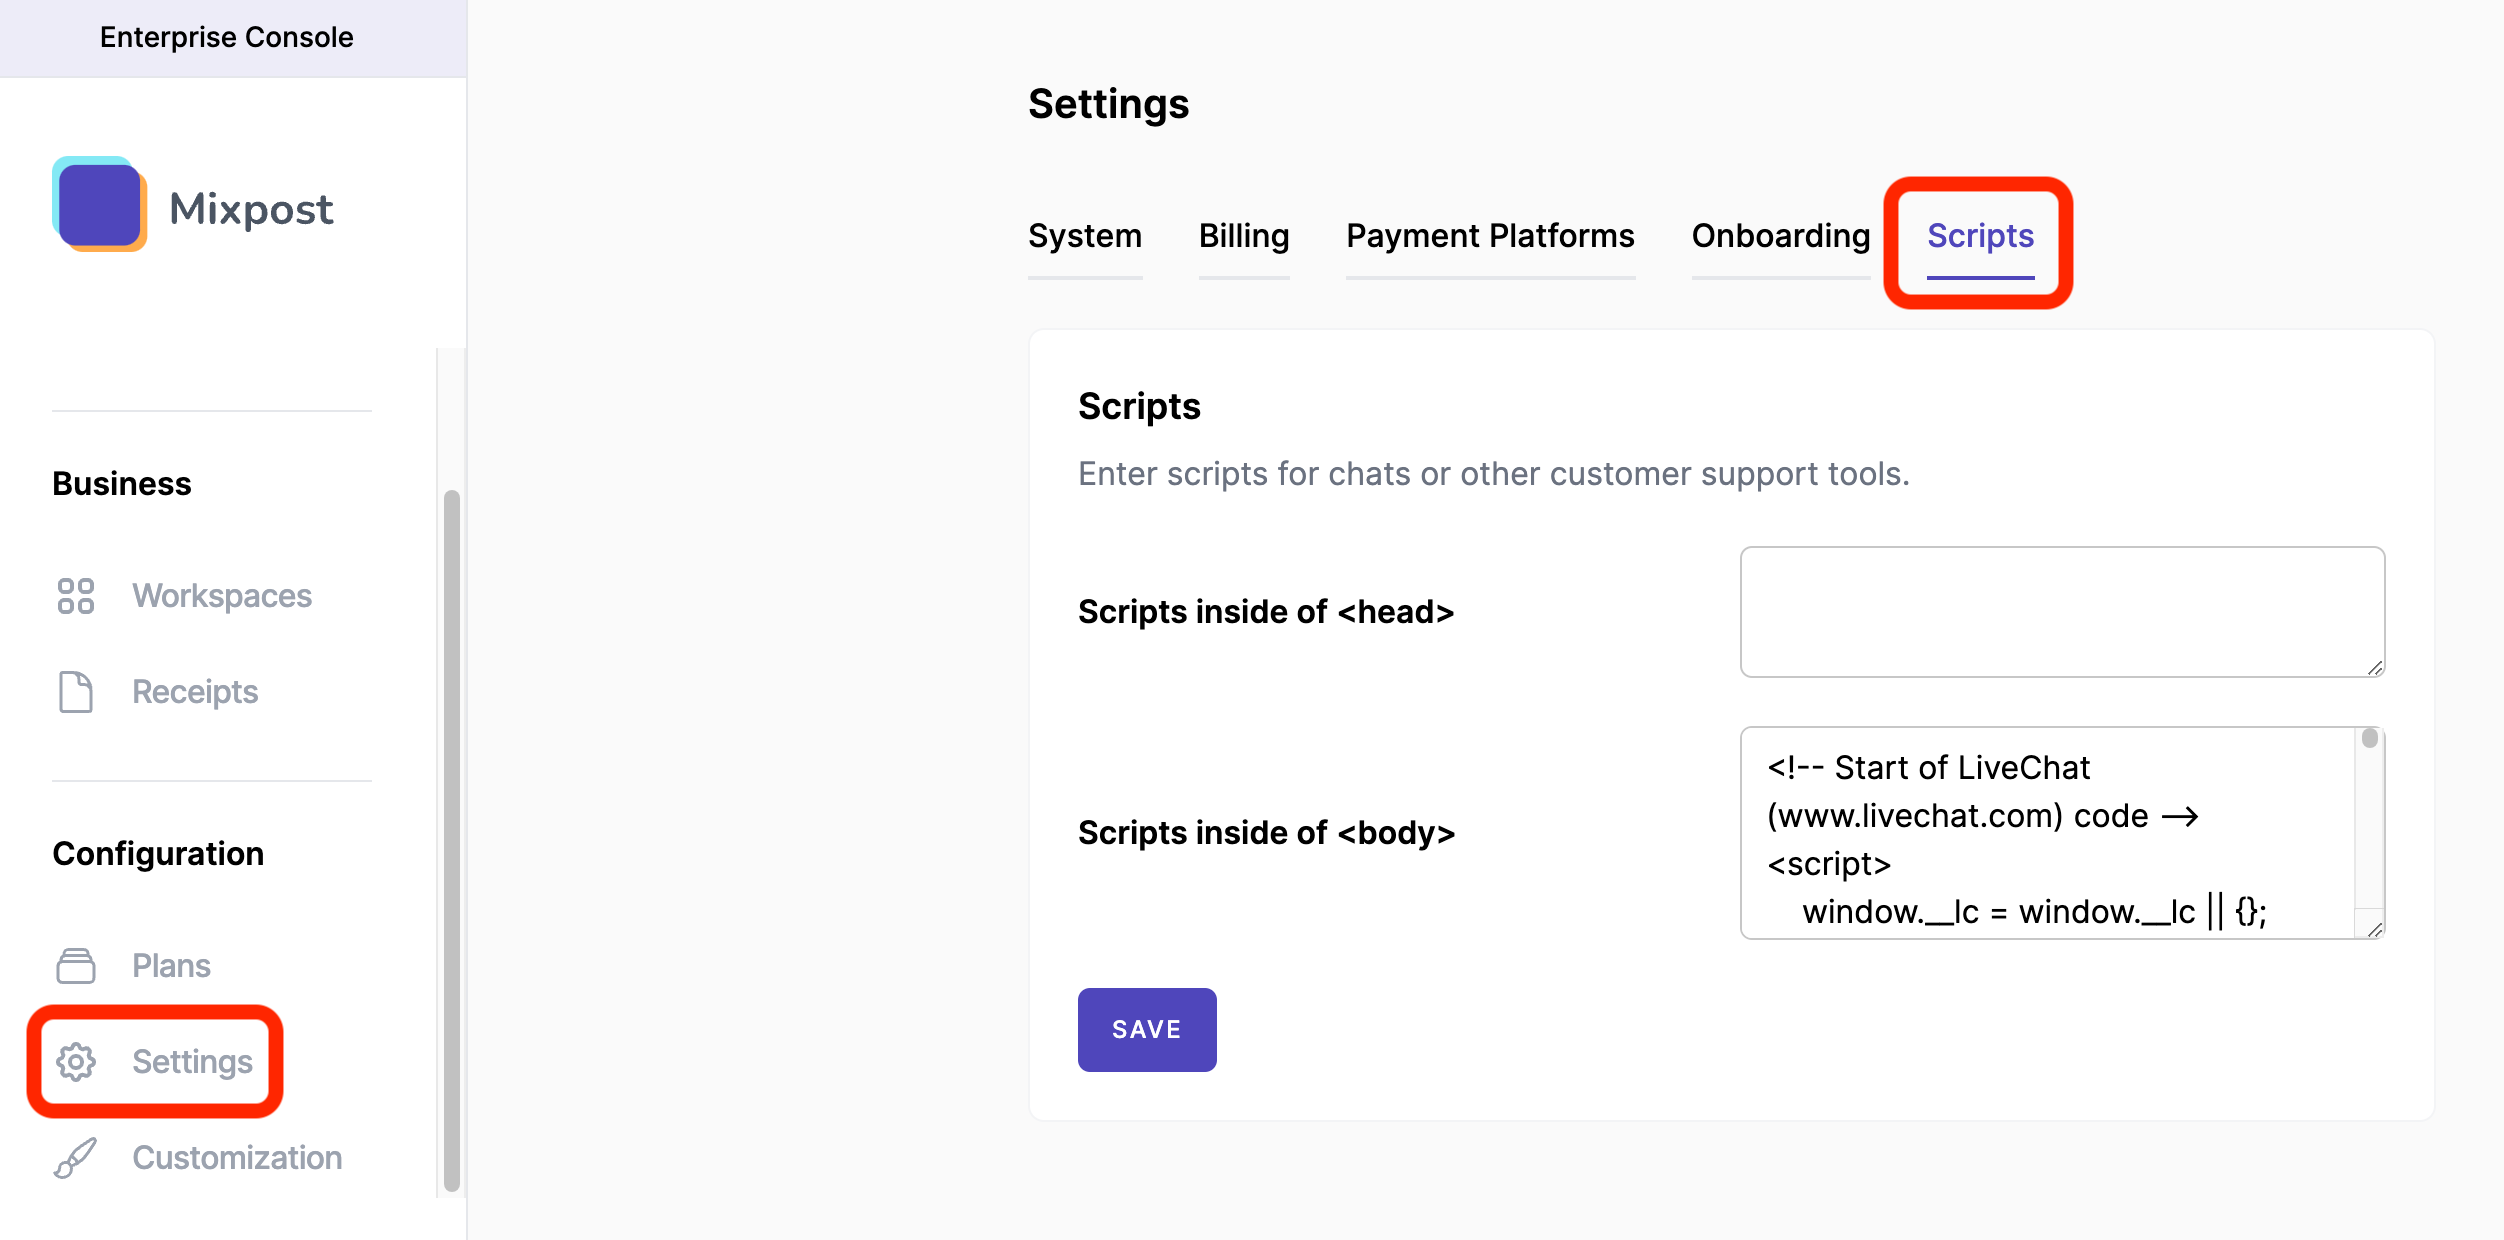
Scripts Settings
In SaaS, it is normal to have a live chat for support, and there are many online solutions like this. The integration is very simple, it is necessary to place the "JS" or "HTML" script offered by these tools.
The live chat tools we recommend:
Mixpost Enterprise allows you to easily insert"JS" or "HTML" scripts.
- Go to "Enterprise Console" (left-bottom user menu)
- Click on "Settings" (left sidebar)
- Here you will see the "Scripts" tab item. Click on it.
- Made the changes.
- Save changes by clicking on the "Save" button.
Integrate with Sentry - Error Reporting
Sentry is a popular error and application performance monitoring platform that can be easily integrated into your Mixpost Enterprise instance to help you identify and fix performance issues quickly. With Sentry, you can capture errors, crashes, and performance problems that occur within your application and receive alerts to take immediate action.
1. Sign up for a Sentry Account
If you haven't already, head to Sentry's website and sign up for an account.
2. Create Project

3. Get Your DSN
There you can copy the DSN and insert it into your environment list:
- SENTRY_LARAVEL_DSN=your-sentry-dsn
Update Guide
In your Standalone or Laravel app
Updating Mixpost is a simple task that can be executed in a few steps. This guide will provide you with the necessary steps to update Mixpost.
composer update inovector/mixpost-enterprise inovector/mixpost-pro-teamAfter the update is complete, clear the cache by running the following command:
php artisan route:cache
php artisan view:clear
php artisan mixpost:clear-settings-cache
php artisan mixpost:clear-services-cacheFinally, terminate the Horizon process by running:
php artisan horizon:terminateDone!
You can check the version of Mixpost by running the command:
composer show inovector/mixpost-enterpriseOr just log in to your Mixpost dashboard and Navigate to Admin Console -> Status
Update with Docker
Updating Mixpost with Docker is straightforward, you just make sure to preserve the mounted volume. Just pull the latest image, stop and remove the current container, and then start a new one.
# Pull the latest version
docker-compose pull
# Stop and remove the old container
docker-compose down
# Start a new container
docker-compose up -dUpgrade Guide
Upgrading from Pro to Enterprise
Theoretically, this upgrade should go smoothly and without data loss. But before upgrading, we recommend that you back up your storage and MySQL volume in case something goes wrong.
Docker
The "mixpost" service should look like this:
mixpost:
image: inovector/mixpost-enterprise:latest
environment:
LICENSE_KEY: 'your_enterprise_license_key'
APP_URL: https://your-domain.com
APP_KEY: example_secret_key
DB_DATABASE: 'example_db_name'
DB_USERNAME: 'example_db_user'
DB_PASSWORD: 'example_db_password'
ports:
- 9000:80
volumes:
- storage:/var/www/html/storage/app
depends_on:
- mysql
- redis
restart: unless-stopped Pull the image and recreate the containers with the following commands:
# Pull the latest version
docker-compose pull
# Stop and remove the old container
docker-compose down
# Start a new container
docker-compose up -dIn your Standalone or Laravel app
Delete the Pro package
composer remove inovector/mixpost-pro-teamIf you installed Mixpost Pro using the Standalone app, may appear some error after removing it. No need to do anything, just skip it.

Install the Enterprise package
composer require inovector/mixpost-enterprise "^1.0"After installing the Mixpost Enterprise package, you may execute this command:
php artisan mixpost-enterprise:installAt the question "Would you like to run the migrations now? (yes/no)" answer with "yes".
Next, it will ask you to create an admin user. If you already have one, you can cancel cancel the command.
To ensure that assets get republished each time Mixpost Enterprise is updated, we strongly advise you to add the following command to post-update-cmd the scripts section of your composer.json.
"scripts": {
"post-update-cmd": [
...
"@php artisan mixpost-enterprise:publish-assets --force=true"
]
}Exclude payment webhook handler route From CSRF Protection by adding the URI "*/payment-webhook" to the $except property of the VerifyCsrfToken middleware:
<?php
namespace App\Http\Middleware;
use Illuminate\Foundation\Http\Middleware\VerifyCsrfToken as Middleware;
class VerifyCsrfToken extends Middleware
{
/**
* The URIs that should be excluded from CSRF verification.
*
* @var array<int, string>
*/
protected $except = [
'*/payment-webhook'
];
}Modify the schedule command
In the console kernel (app/Console/Kernel.php):
- Remove "\Inovector\Mixpost\Schedule::register($schedule)" command.
- Add "\Inovector\MixpostEnterprise\Schedule::register($schedule)" command.
protected function schedule(Schedule $schedule): void
{
// Remove or comment this command
# \Inovector\Mixpost\Schedule::register($schedule);
// Insert new command
\Inovector\MixpostEnterprise\Schedule::register($schedule);
$schedule->command('horizon:snapshot')->everyFiveMinutes();
$schedule->command('queue:prune-batches')->daily();
}Clear cache
php artisan route:cache
php artisan mixpost:clear-settings-cache
php artisan mixpost:clear-services-cacheTerminate the Horizon process
php artisan horizon:terminateThe supervisor will start it automatically.
Conclusion
After you've upgraded to Enterprise, you can configure the settings for your business.
Upgrading to v2 from v1
Sometimes the upgrade can go wrong, so we recommend that you back up your database before starting the upgrade.
Docker
Upgrading to Mixpost Enterprise v2 with Docker is straightforward.
# Pull the latest version
docker-compose pull
# Stop and remove the old container
docker-compose down
# Start a new container
docker-compose up -dIf something goes wrong, you can use the inovector/mixpost-enterprise:v1 tag to revert. Also, you need to restore your database backup.
In your Standalone or Laravel app
Updating your composer.json using the "require" command
composer require inovector/mixpost-enterprise "^2.0" --with-all-dependenciesUpdating the database
Some changes were made to the database, use the migration below to update your database to the latest schema:
<?php
use Illuminate\Database\Migrations\Migration;
use Illuminate\Database\Schema\Blueprint;
use Illuminate\Support\Facades\Schema;
use Inovector\Mixpost\Models\Service;
return new class extends Migration {
public function up()
{
if (Schema::hasTable('mixpost_services')) {
if (Schema::hasColumn('mixpost_services', 'credentials') && !Schema::hasColumn('mixpost_services', 'configuration')) {
Schema::table('mixpost_services', function (Blueprint $table) {
$table->renameColumn('credentials', 'configuration');
});
}
if (!Schema::hasColumn('mixpost_services', 'active')) {
Schema::table('mixpost_services', function (Blueprint $table) {
$table->boolean('active')->default(false);
});
}
Service::query()->update(['active' => true]);
}
if (!Schema::hasTable('mixpost_user_tokens')) {
Schema::create('mixpost_user_tokens', function (Blueprint $table) {
$table->id();
$table->bigInteger('user_id')->unsigned()->index();
$table->foreign('user_id')->references('id')->on('users')->onDelete('cascade');
$table->string('name');
$table->string('token', 64)->unique();
$table->timestamp('last_used_at')->nullable();
$table->date('expires_at')->nullable();
$table->timestamps();
});
}
if (!Schema::hasTable('mixpost_webhooks')) {
Schema::create('mixpost_webhooks', function (Blueprint $table) {
$table->id();
$table->uuid('uuid')->unique();
$table->bigInteger('workspace_id')->nullable()->index(); // if null, it's a system webhook
$table->string('name');
$table->string('callback_url');
$table->string('method')->default('post');
$table->string('content_type');
$table->tinyInteger('max_attempts')->default(1);
$table->tinyInteger('last_delivery_status')->nullable();
$table->text('secret')->nullable();
$table->boolean('active')->default(false);
$table->json('events')->nullable();
$table->timestamps();
$table->index(['workspace_id', 'active']);
});
}
if (!Schema::hasTable('mixpost_webhook_deliveries')) {
Schema::create('mixpost_webhook_deliveries', function (Blueprint $table) {
$table->id();
$table->uuid('uuid')->unique();
$table->bigInteger('webhook_id')->unsigned()->index();
$table->foreign('webhook_id')->references('id')->on('mixpost_webhooks')->onDelete('cascade');
$table->string('event');
$table->tinyInteger('attempts')->default(0);
$table->tinyInteger('status');
$table->integer('http_status')->nullable();
$table->timestamp('resend_at')->nullable();
$table->boolean('resent_manually')->default(false);
$table->json('payload')->nullable();
$table->json('response')->nullable();
$table->timestamp('created_at')->nullable();
});
}
if (!Schema::hasTable('mixpost_e_usage_records')) {
Schema::create('mixpost_e_usage_records', function (Blueprint $table) {
$table->bigIncrements('id');
$table->bigInteger('workspace_id')->unsigned()->index();
$table->string('type');
$table->timestamp('created_at');
$table->index(['workspace_id', 'type']);
});
}
if (!Schema::hasTable('mixpost_e_workspace_services')) {
Schema::create('mixpost_e_workspace_services', function (Blueprint $table) {
$table->id();
$table->bigInteger('workspace_id')->unsigned()->index();
$table->string('name');
$table->longText('configuration');
$table->boolean('active')->default(false);
$table->unique(['workspace_id', 'name'], 'workspace_service_name_unique');
});
}
Schema::dropIfExists('mixpost_post_version_media');
}
};
Don't know how to migrate?
Updating the config file
There have been numerous config changes. If you have published the Mixpost configuration file, you should update it manually.
The easiest way to update this is to run:
php artisan vendor:publish --tag=mixpost-config --forceClear the cache
Clear the cache by running the following command:
php artisan route:cache
php artisan mixpost:clear-settings-cache
php artisan mixpost:clear-services-cacheFinally, terminate the Horizon process by running:
php artisan horizon:terminatePayment Platforms
Collect payments from your customers by integrating with a payment platform.
Stripe
Stripe is a powerful tool for processing payments, it provides an efficient method for generating revenue from your clients. Here's a step-by-step guide to help you integrate Stripe with Mixpost Enterprise and get started with processing payments:
1. Sign up for a Stripe Account
If you haven't already, head to Stripe's website and sign up for an account.
2. Access the Stripe Dashboard
Once you've registered, log in to your Stripe account and access the Dashboard. This will be your primary interface for managing payments.
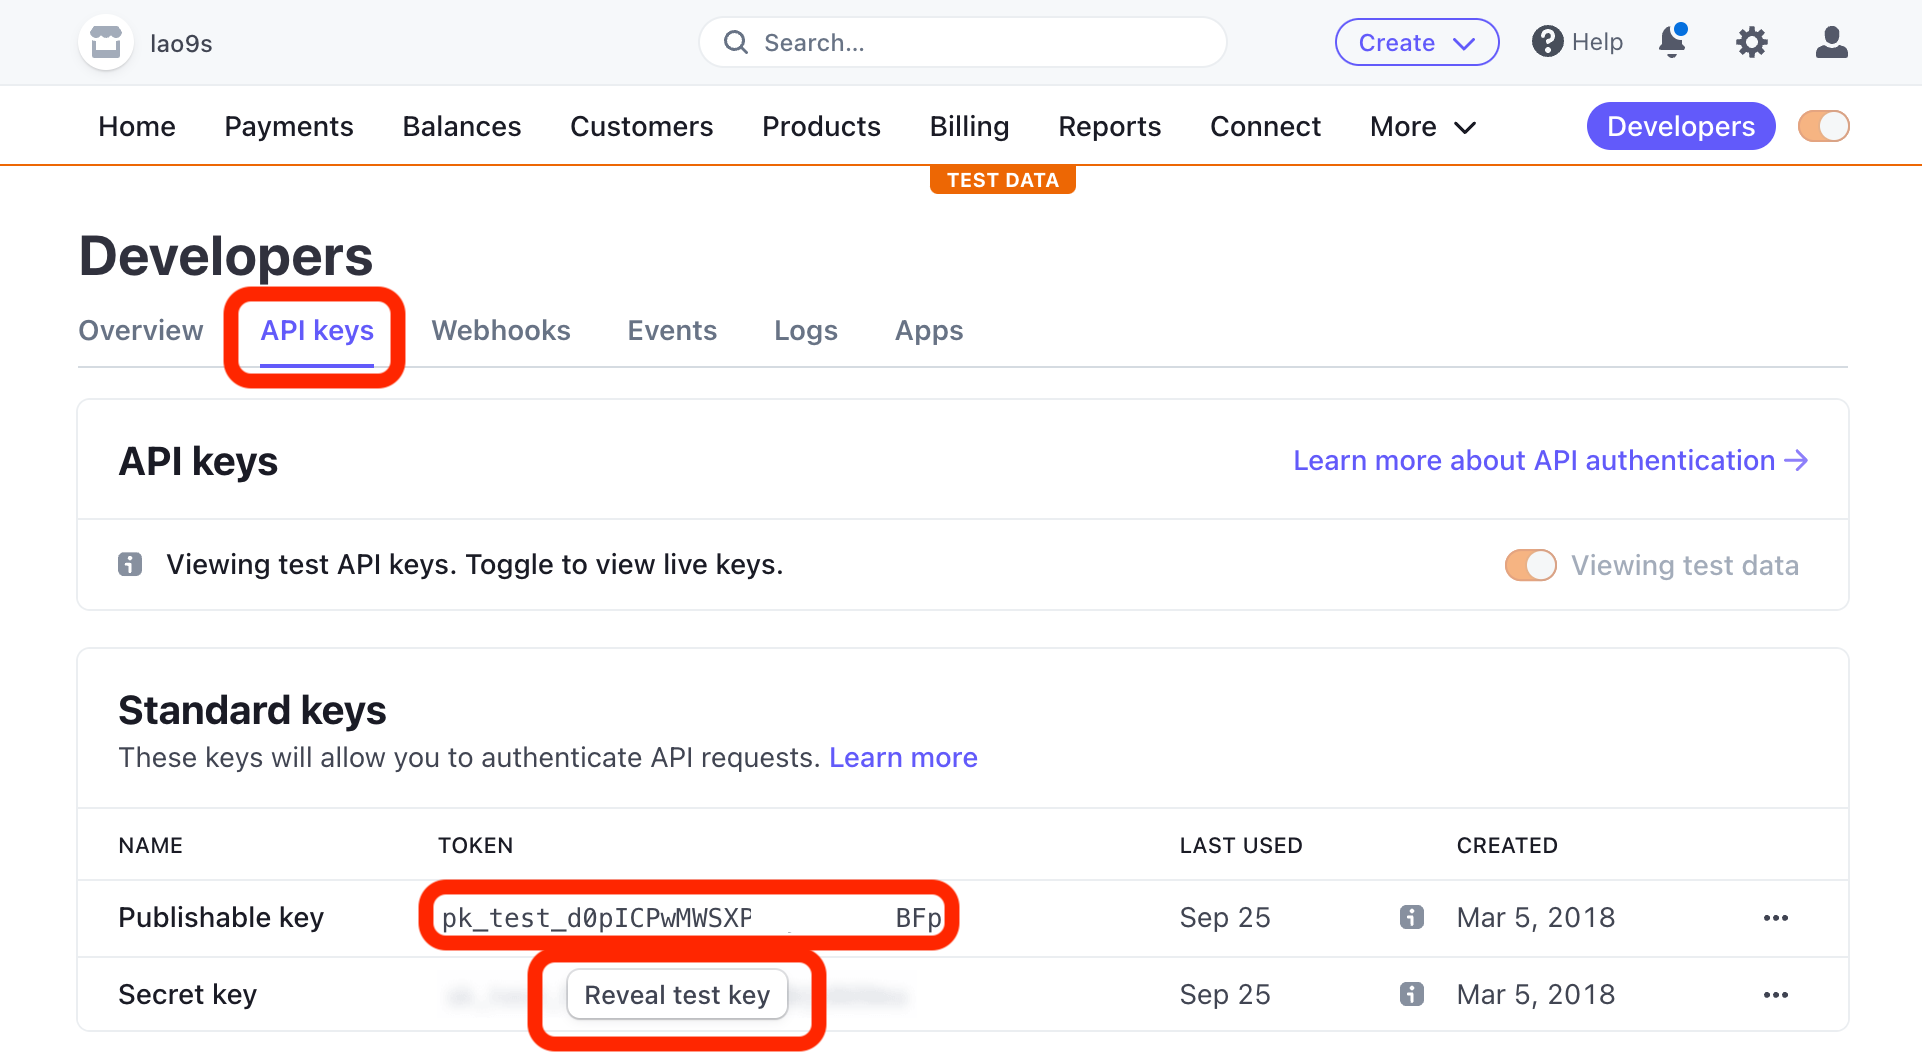
3. Get Your API Keys
From the Dashboard:
- Go to the “Developers” section.
- Click on "API Keys".
- You'll see two keys: a Publishable Key and a Secret Key. You'll need both for integration.
Note: Always keep your Secret Key confidential.

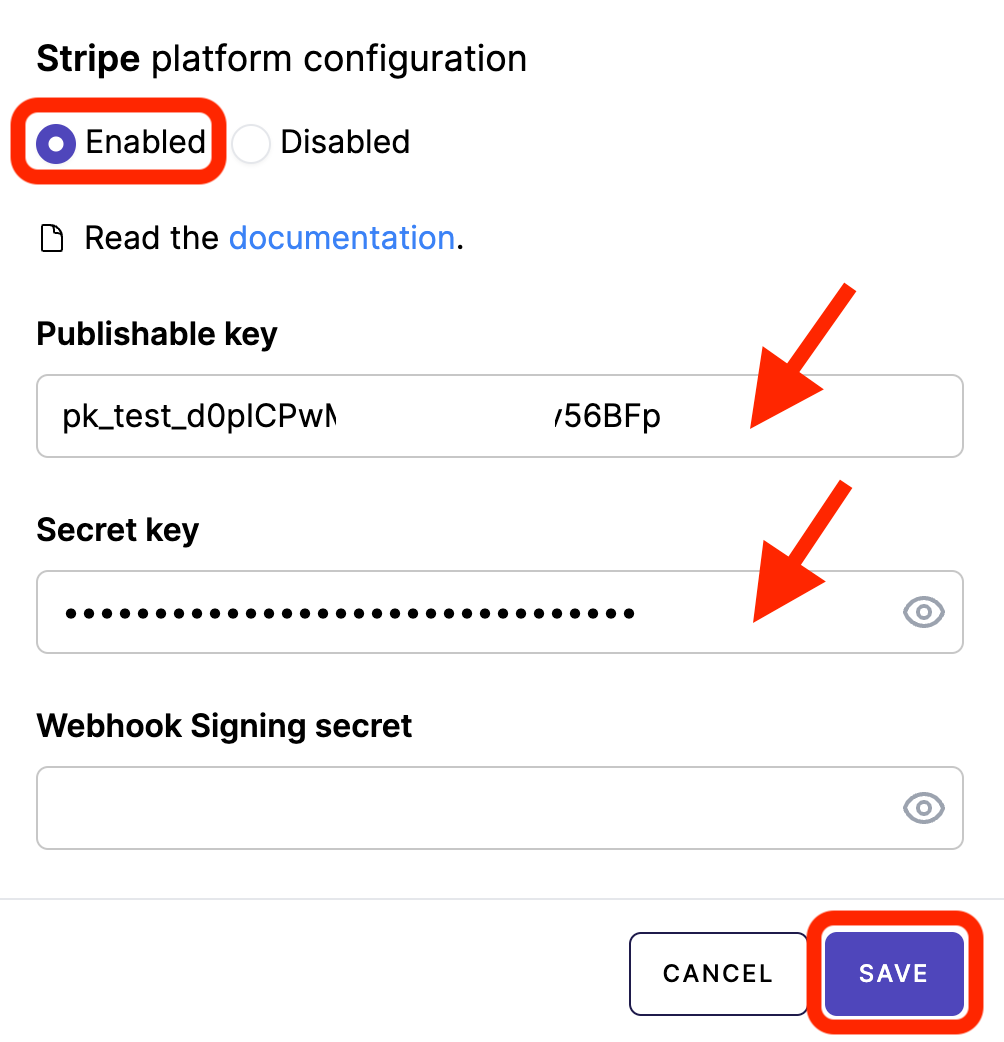
4. Integrate API Keys into Mixpost Enterprise
Once you have your API keys:
- Open the Enterprise Console from the user menu.
- Navigate to Settings ->
- Click on Stripe
- Choose "Enabled" radio input
- Input your Publishable Key and Secret Key.
- Save
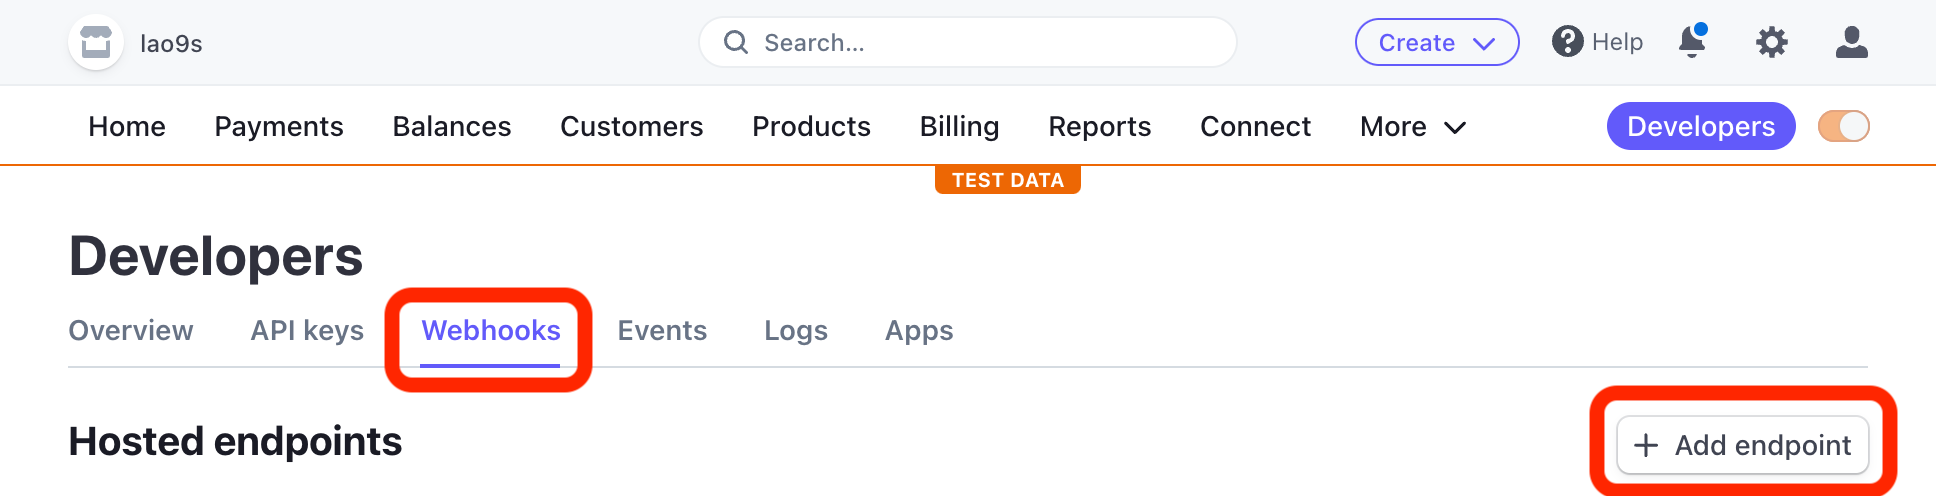
5. Set Up Webhooks
Webhooks allow Stripe to communicate with Mixpost Enterprise when certain events happen (e.g., a successful payment, subscription changes, etc.).
- In your Stripe Dashboard, navigate to the "Developers" section.
- Click on "Webhooks".
- Here, you'll see the "+ Add endpoint" button. Click on it.
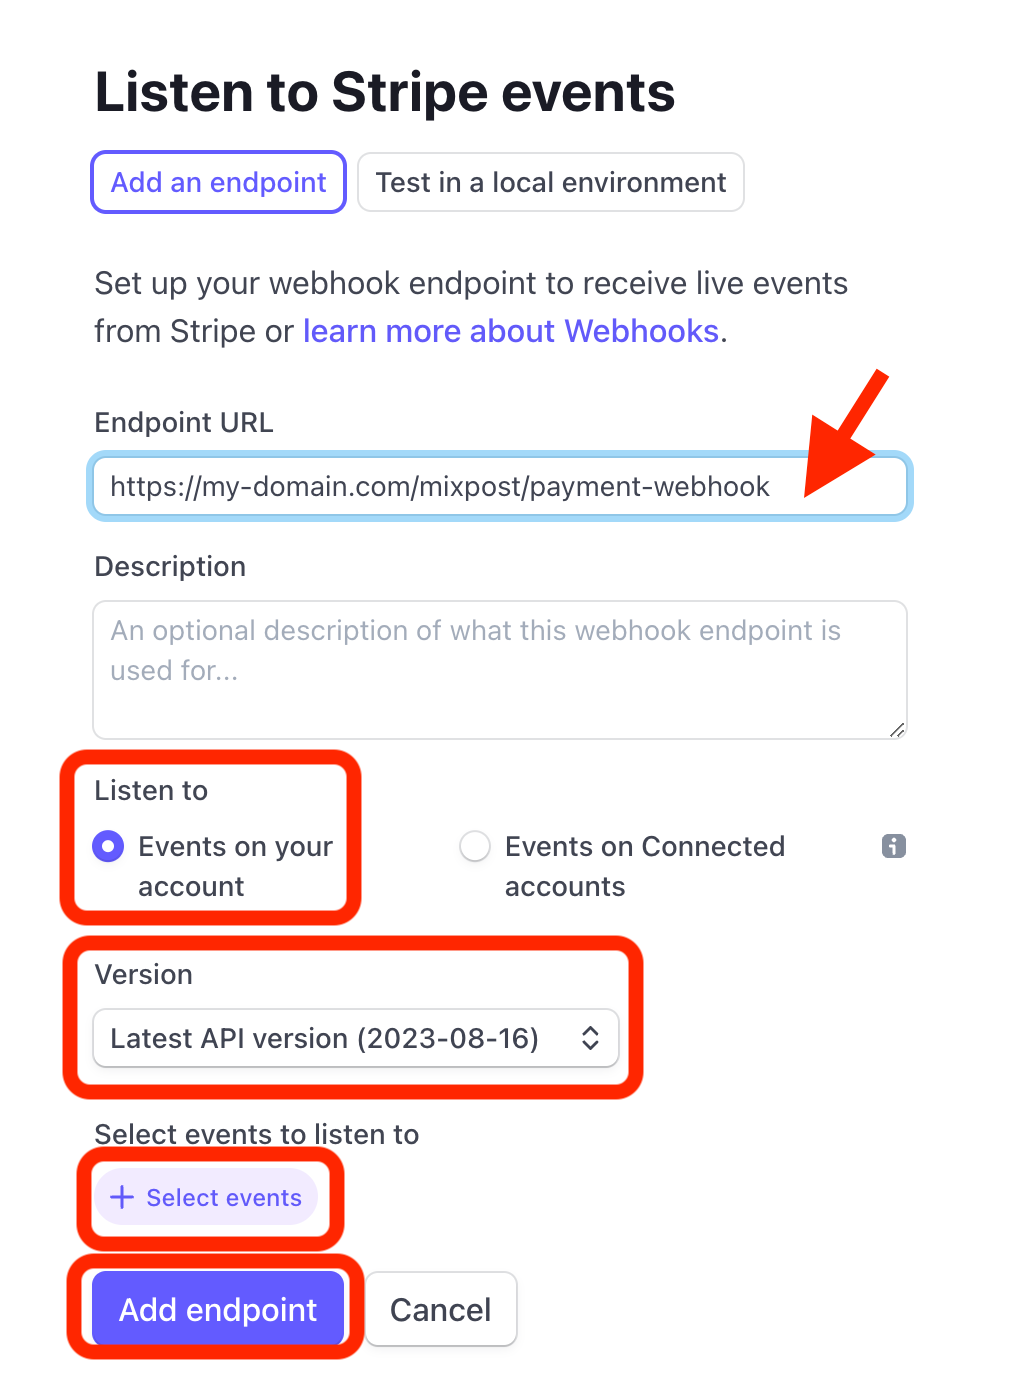
- Input Endpoint URL "https://your-app-url.com/mixpost/payment-webhook".
- Select "Listen to" to "Events on your account".
- Select "Version" to "Latest API version (2023-08-16)".
- Select the events the following events:
- customer.subscription.created
- customer.subscription.updated
- customer.subscription.deleted
- customer.updated
- customer.deleted
- invoice.payment_succeeded
- payment_method.automatically_updated
- Click "Add endpoint" button
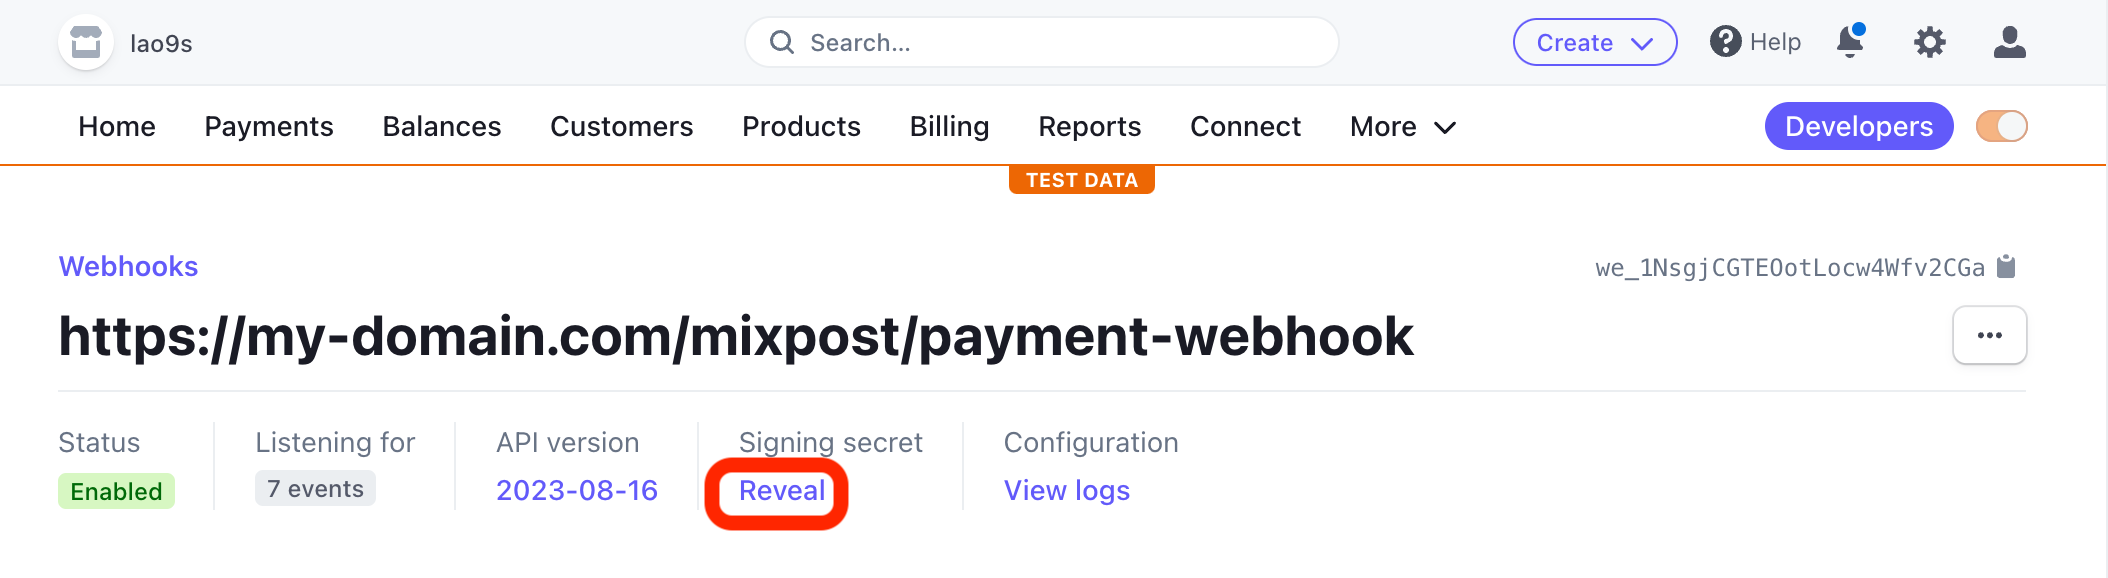
After adding the endpoint, you should copy the signing secret into the Mixpost Enterprise Console:
- In your Stripe Dashboard, navigate to the "Developers" section.
- Click on "Webhooks".
- Click on added Webhook.
- Here, you'll see the "Signing secret" section and "Reveal" button, click on it.
- Copy the "Signing secret"
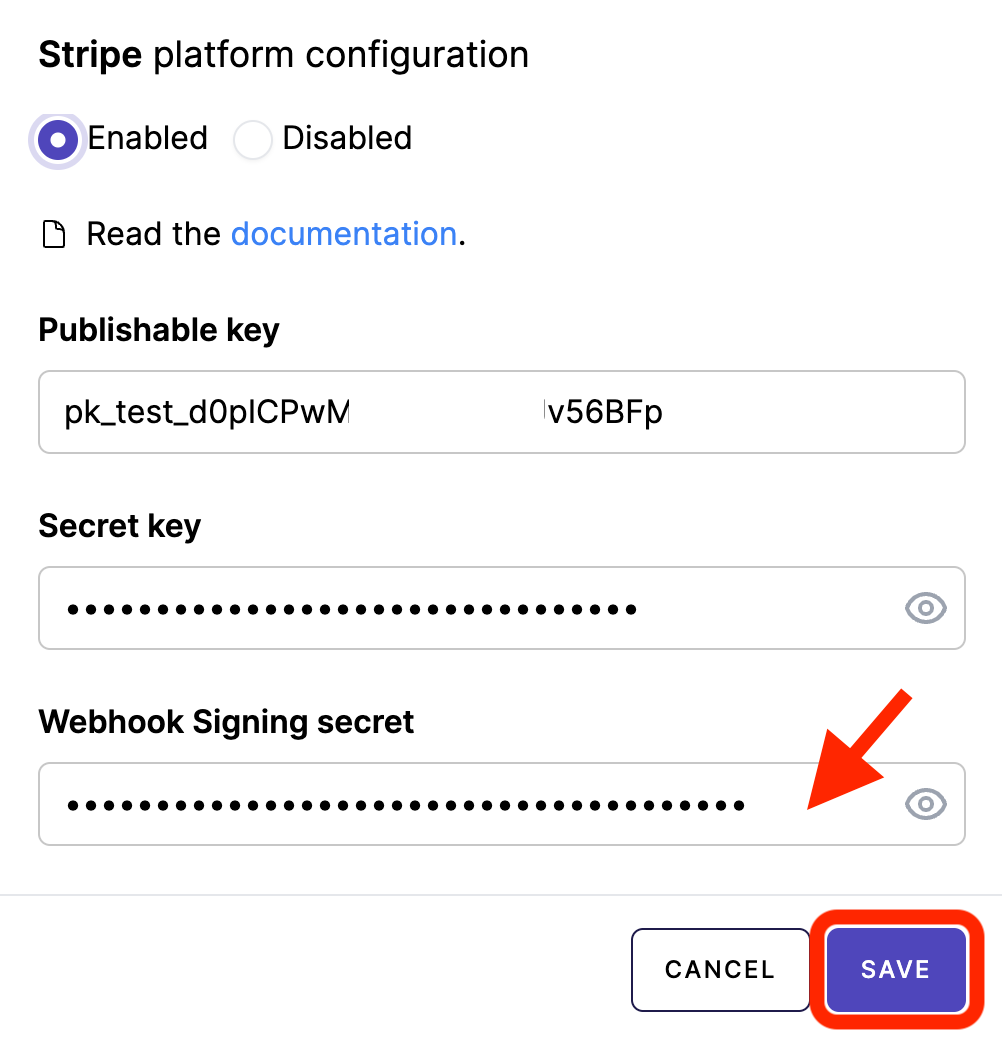
- Open the Enterprise Console from the user menu.
- Navigate to Settings ->
- Click on Stripe
- Input your Signing secret in "Webhook Signing secret"
- Save
6. Add pricing plans
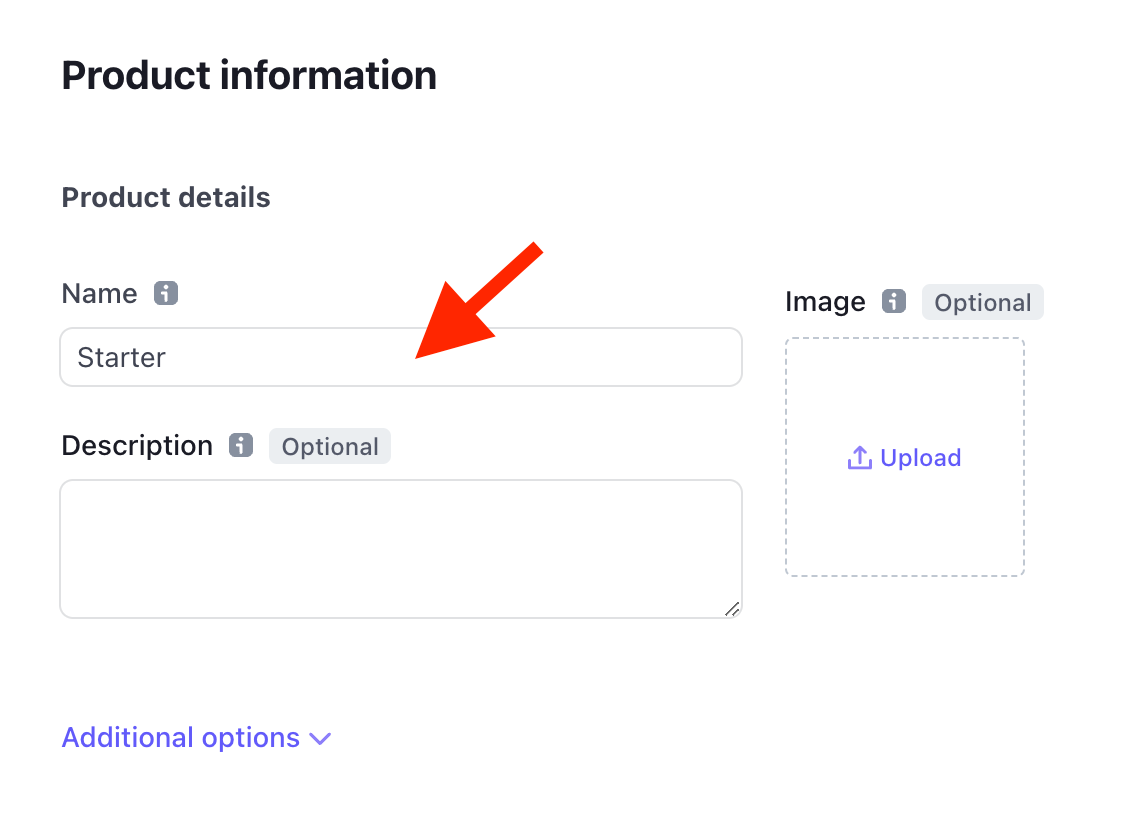
We are adding all the necessary pricing plans in both Stripe and Mixpost Enterprise.
- In your Stripe Dashboard, navigate to the "Products" section.
- Here, you'll see the “+ Add product” button. Click on it.
- Give a plan name, for example: "Starter"
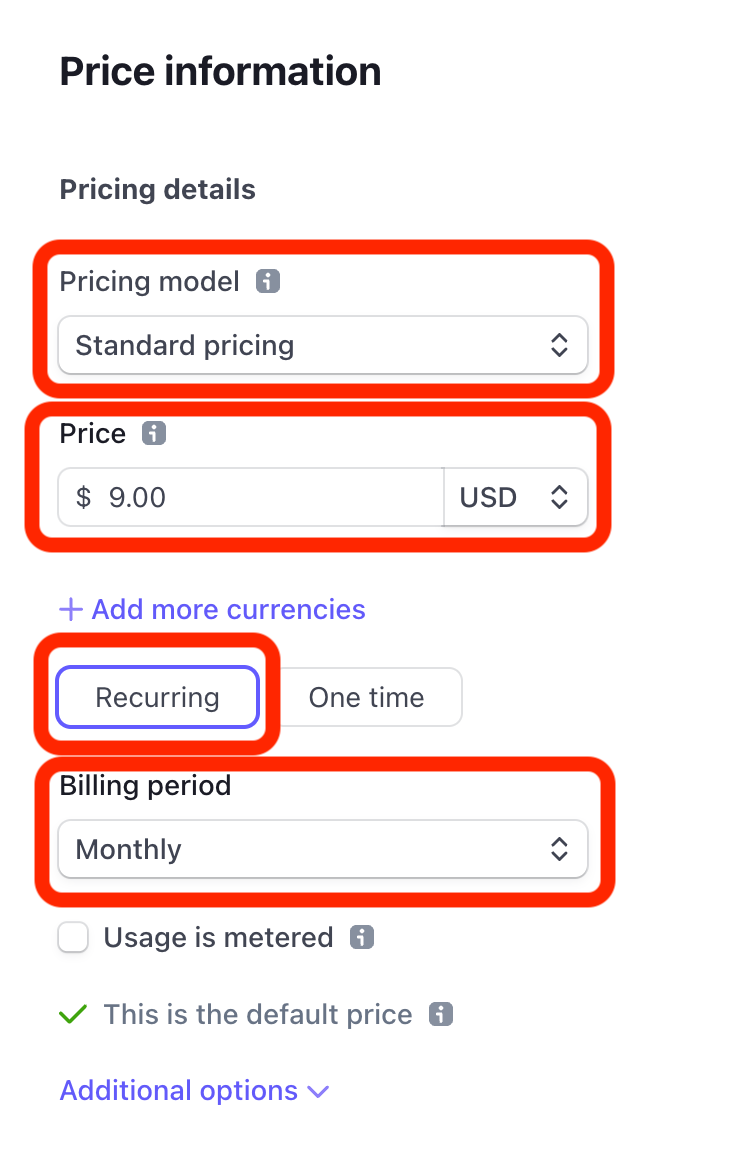
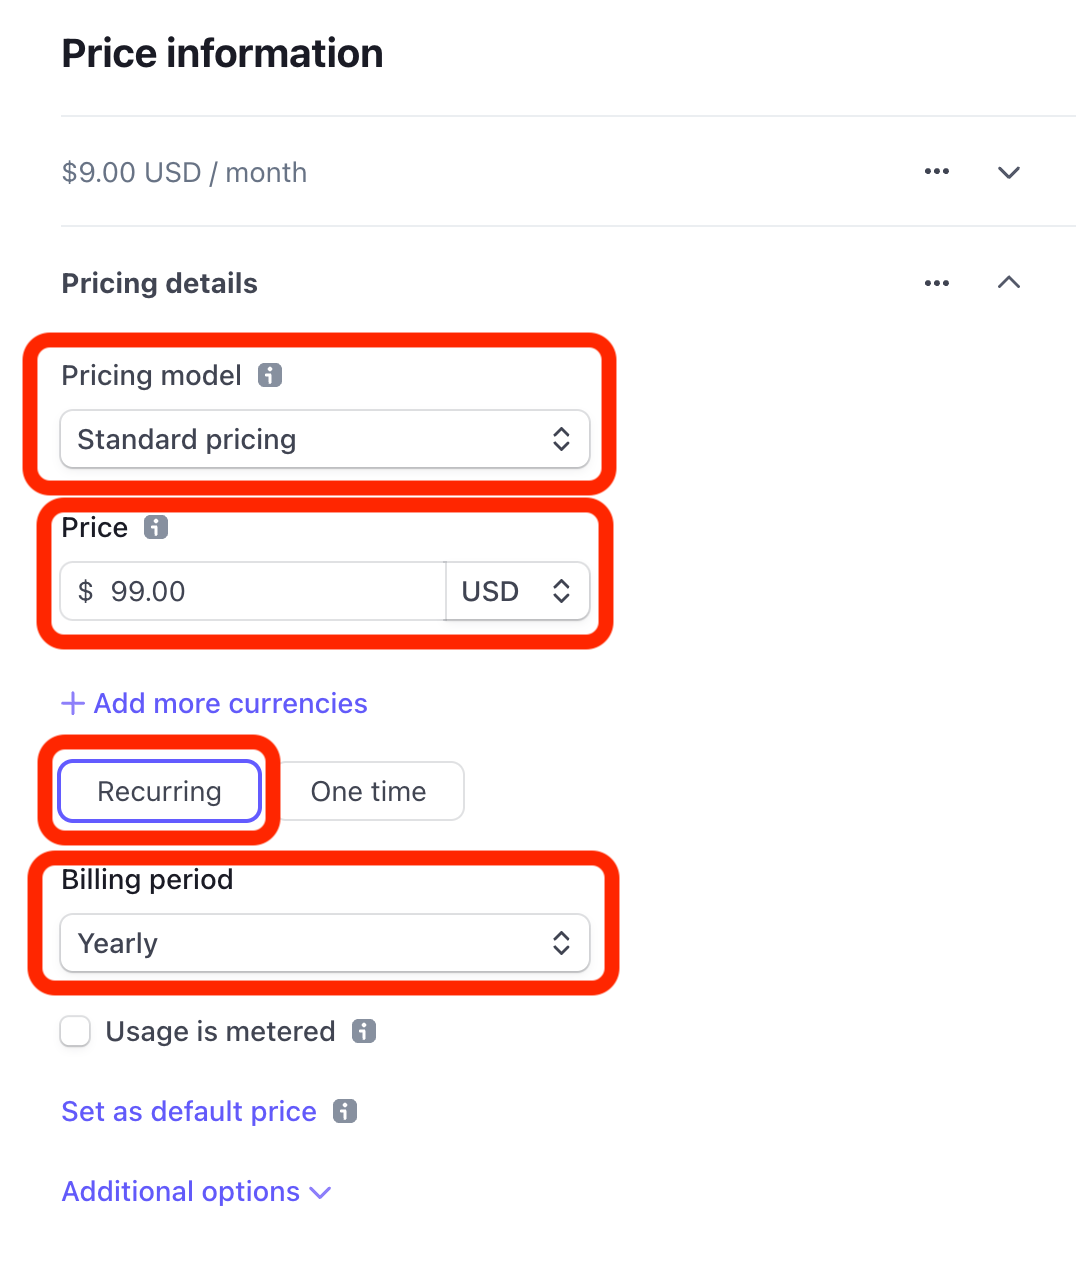
- Scroll down to the "Price information" section
- Select the "Standard pricing" model.
- Input the plan price, for example: "$9.00"
- Select "Recurring"
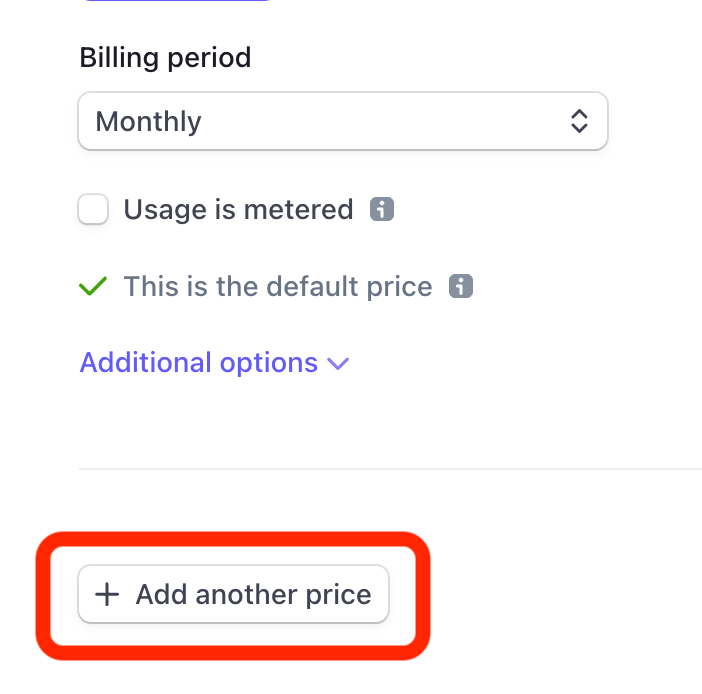
- Select "Billing period". Mixpost only accepts Monthly or Yearly billing periods.
- If you are planning to sell your plan Monthly and Yearly, you can add another price, by clicking on the "+ Add another price" button.
- Save product


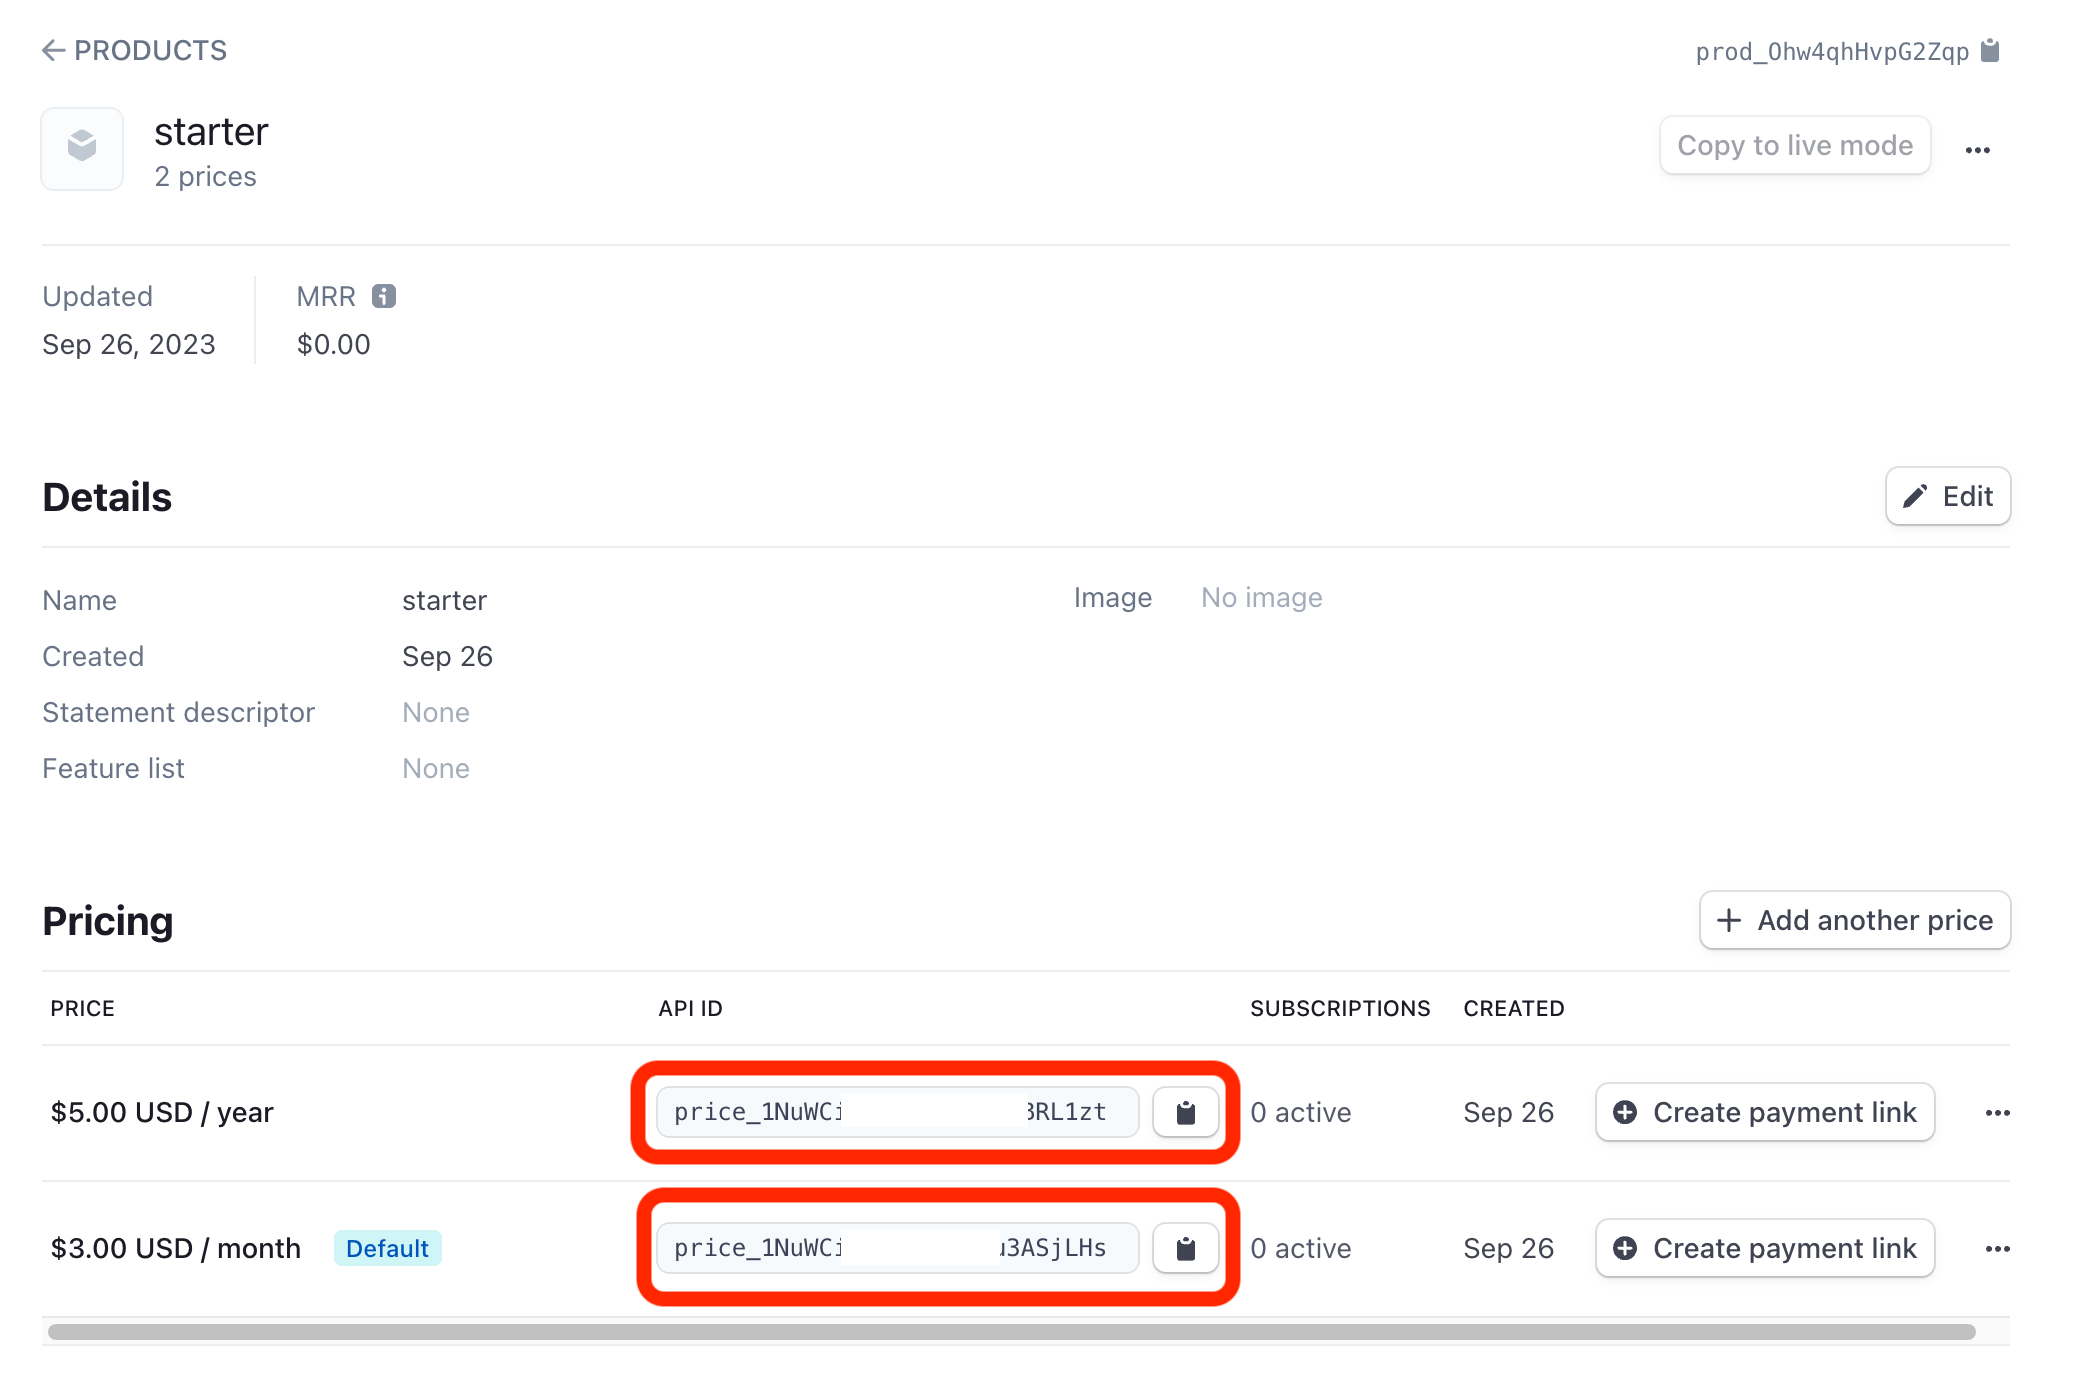
After the product has been created in your Stripe dashboard. You should copy the API ID of each product price to your created plans in the Mixpost Dashboard. See the instructions.
Here is how you can get the API ID for each product price:
7. Test the Integration
- Try to register a user and subscribe to a plan.
- Use Stripe's test card numbers to make sure the subscription is done correctly.
8. Go Live
Once you're confident in the integration:
- Switch from using Stripe's test mode to live mode.
- Ensure you've added any necessary pricing plans in both Stripe and your Mixpost Enterprise console.
- Start onboarding users and generating revenue!
Here is how you can switch to Live:

Paddle
Paddle is a popular platform for selling software and other digital goods. Here's a step-by-step guide to help you integrate Paddle with Mixpost Enterprise and get started with processing payments:
1. Sign up for a Paddle Account
- Production: If you haven’t already, visit Paddle's website and sign up for an account.
- Sandbox (only for testing): If you haven’t already, visit Paddle's sandbox website and sign up for an account.
We recommend integrating a Sandbox account first and testing the integration. If everything is fine, you can switch to a production Paddle account.
2. Access the Paddle Dashboard
Once you've registered, log in to your Paddle account and access the Dashboard. This will be your primary interface for managing payments.
3. Get Your API Keys
From the Dashboard:
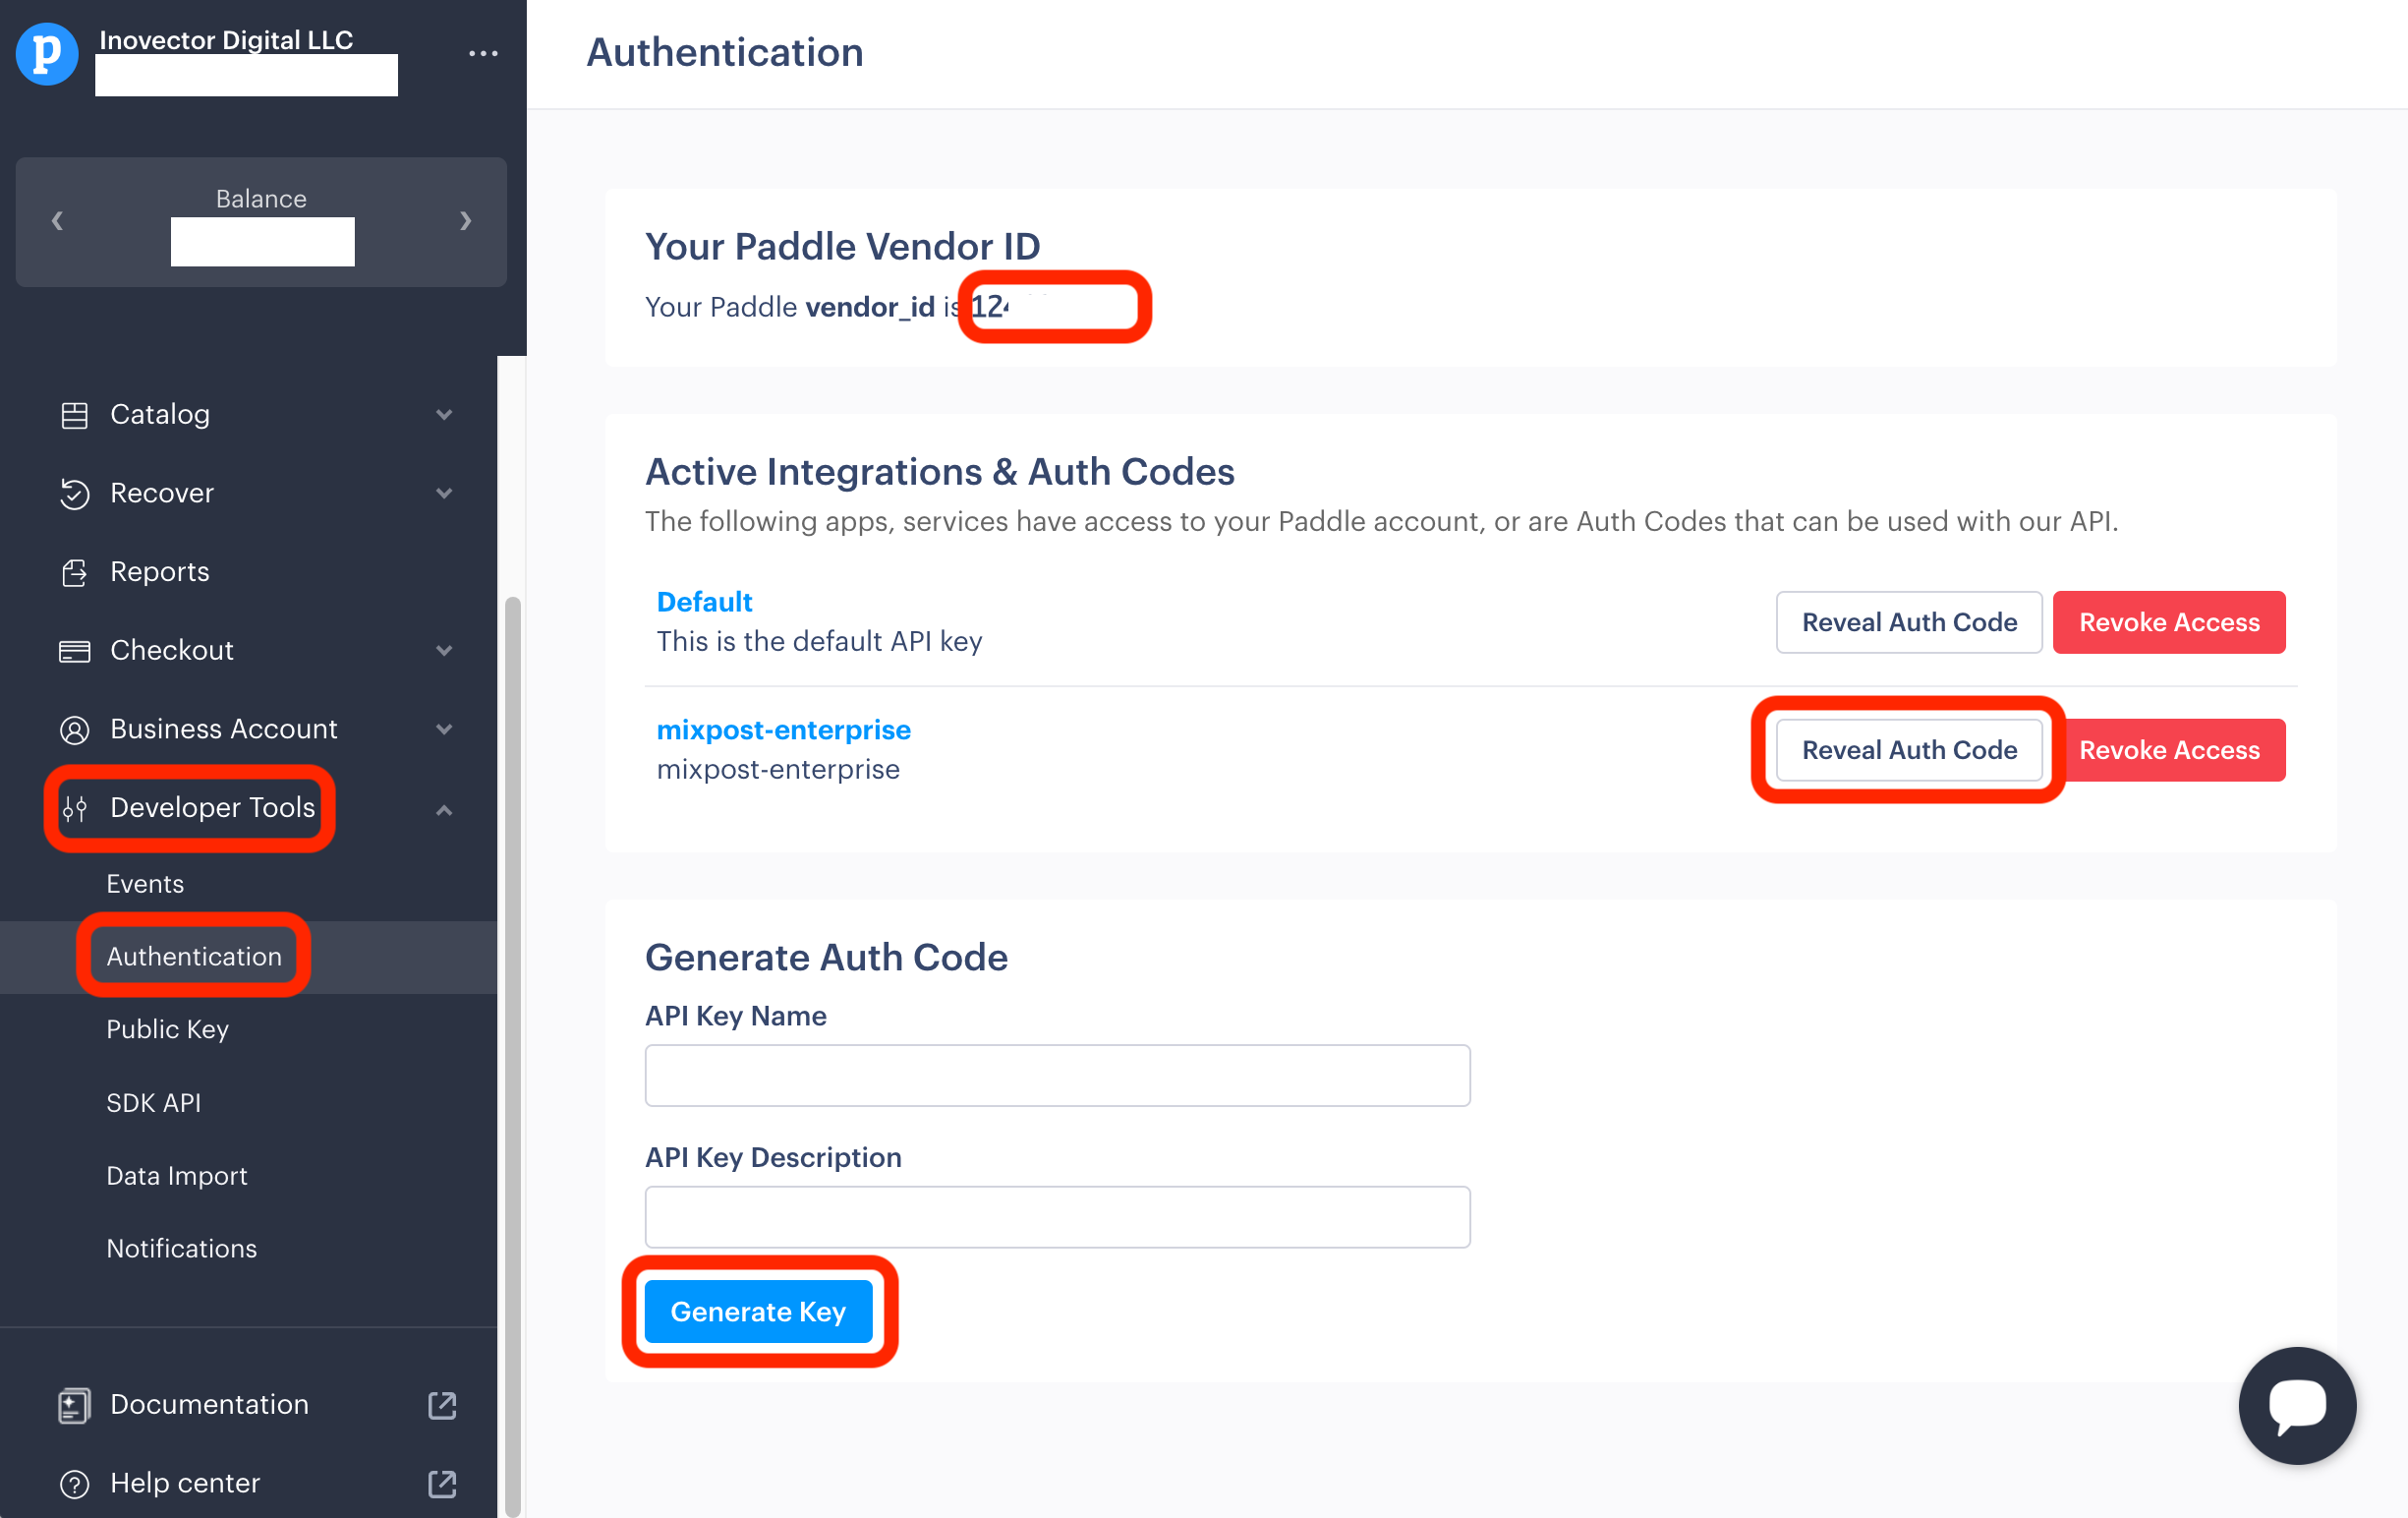
- Go to the “Developer Tools” section.
- Click on "Authentication".
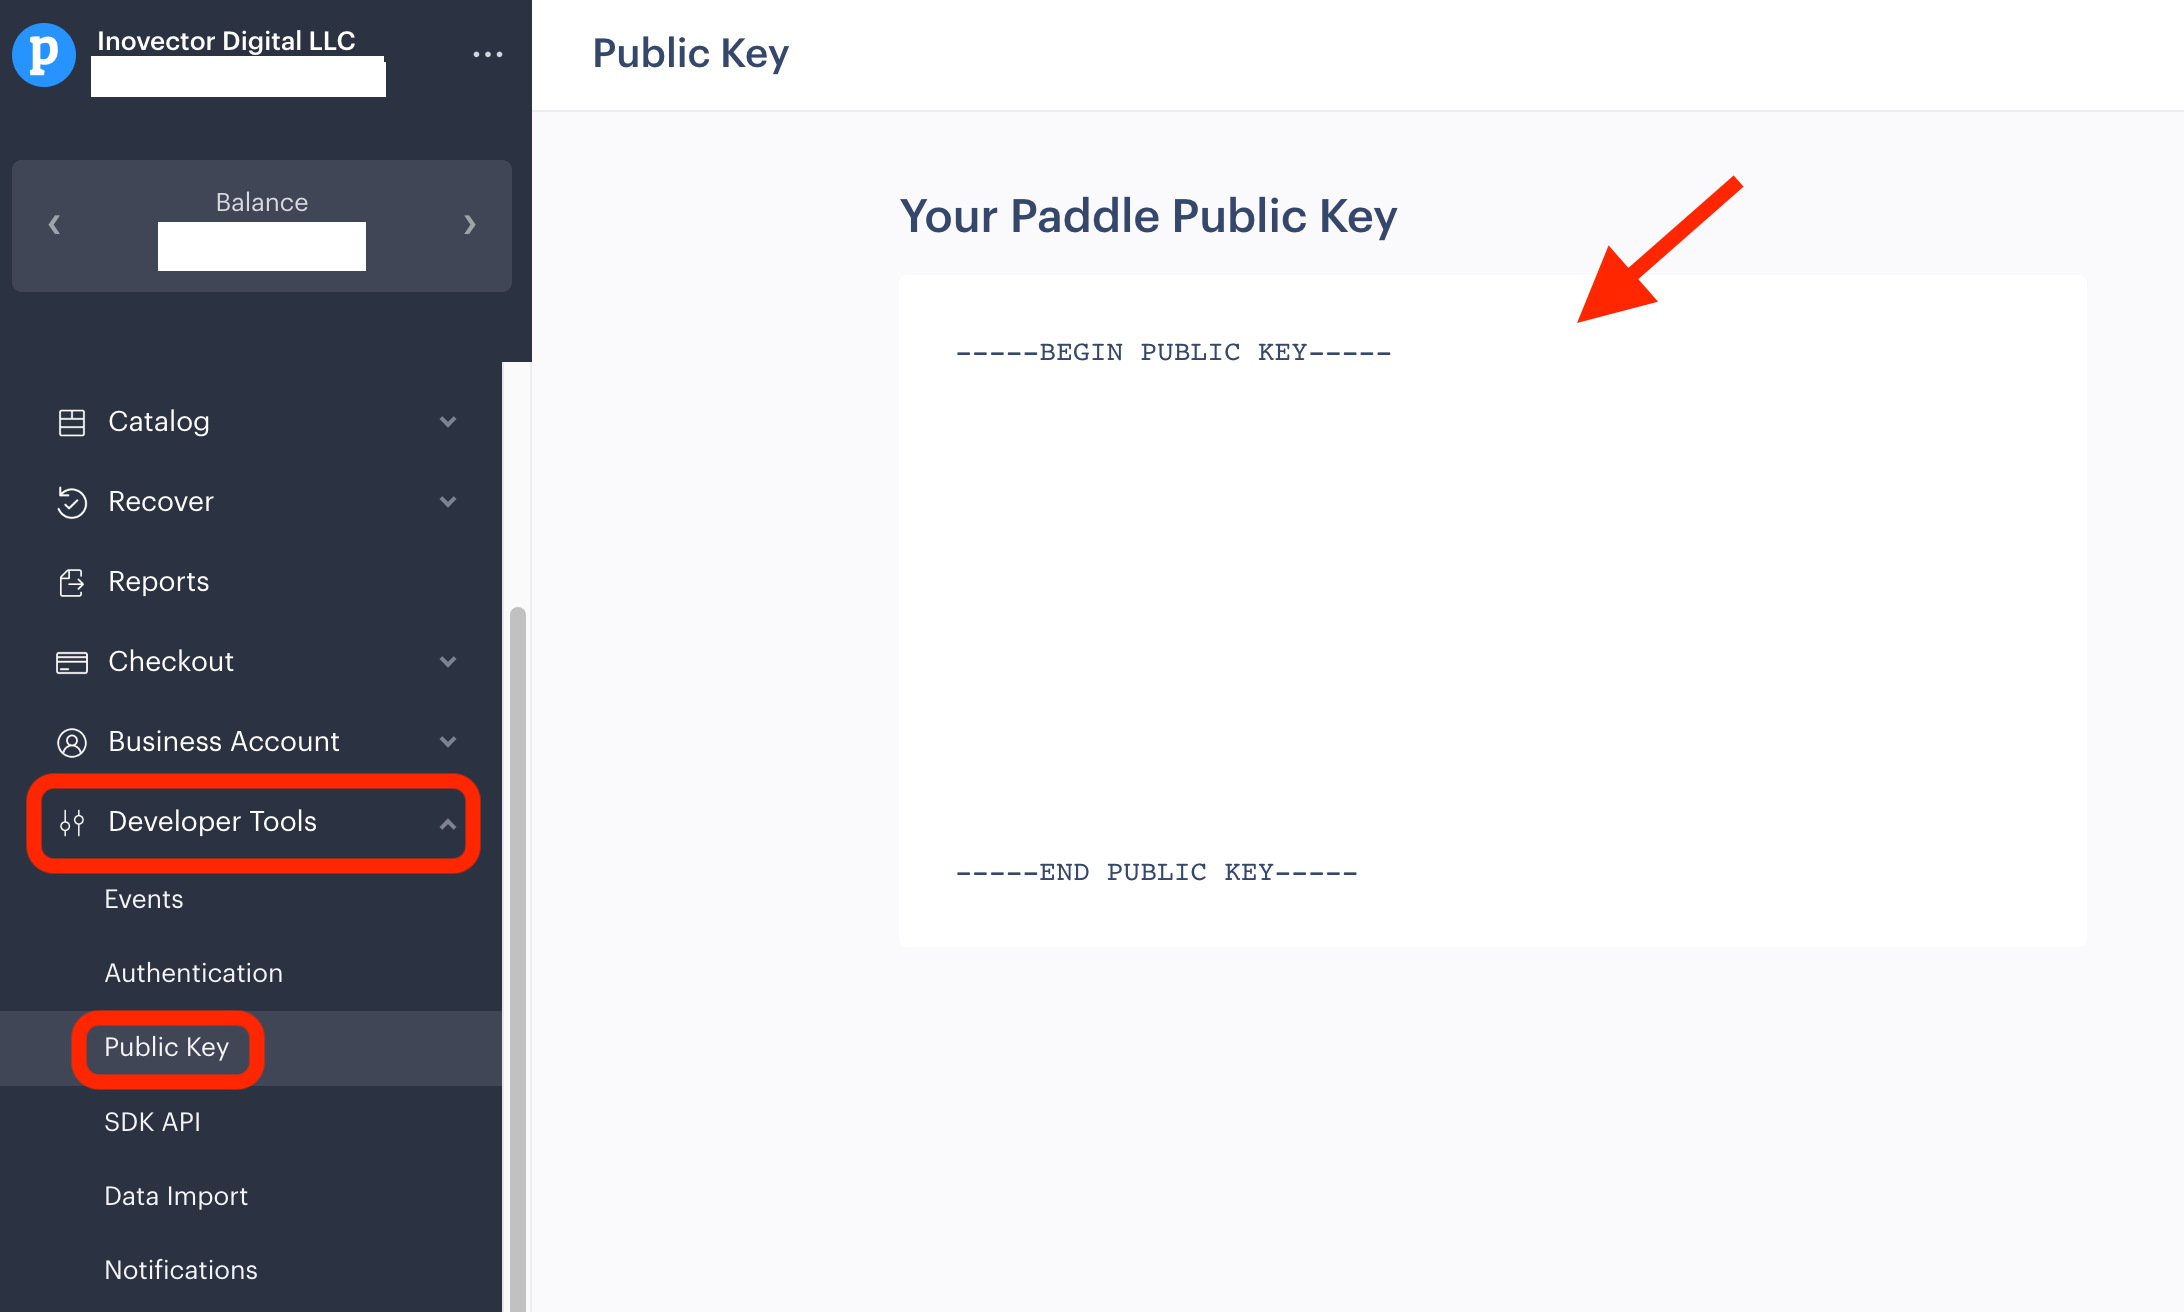
- You'll see Your Paddle Vendor ID. Copy it.
- Scroll down to the "Generate Auth Code" section and generate one.
- You will see your generated key and the "Reveal Auth Code" button. Click on it and copy the key.
- Go to the “Public Key” page (under the Developer Tools menu) and copy the entire Public Key
Note: Always keep your Secret Key confidential.
4. Integrate API Keys into Mixpost Enterprise
Once you have your API keys:
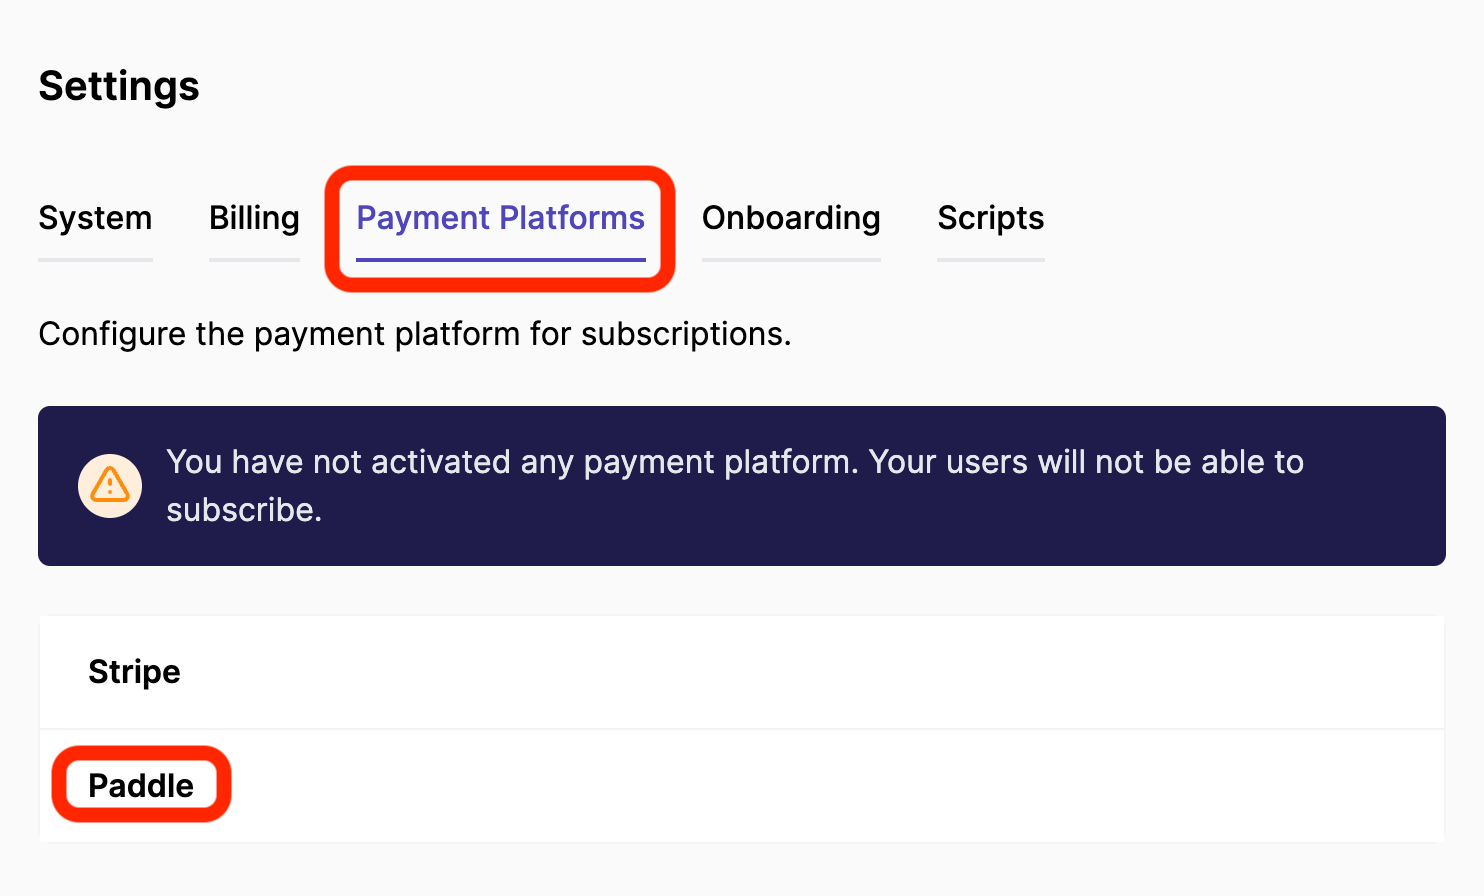
- Open the Enterprise Console from the user menu.
- Navigate to Settings ->
- Click on Paddle
- Choose "Enabled" radio input
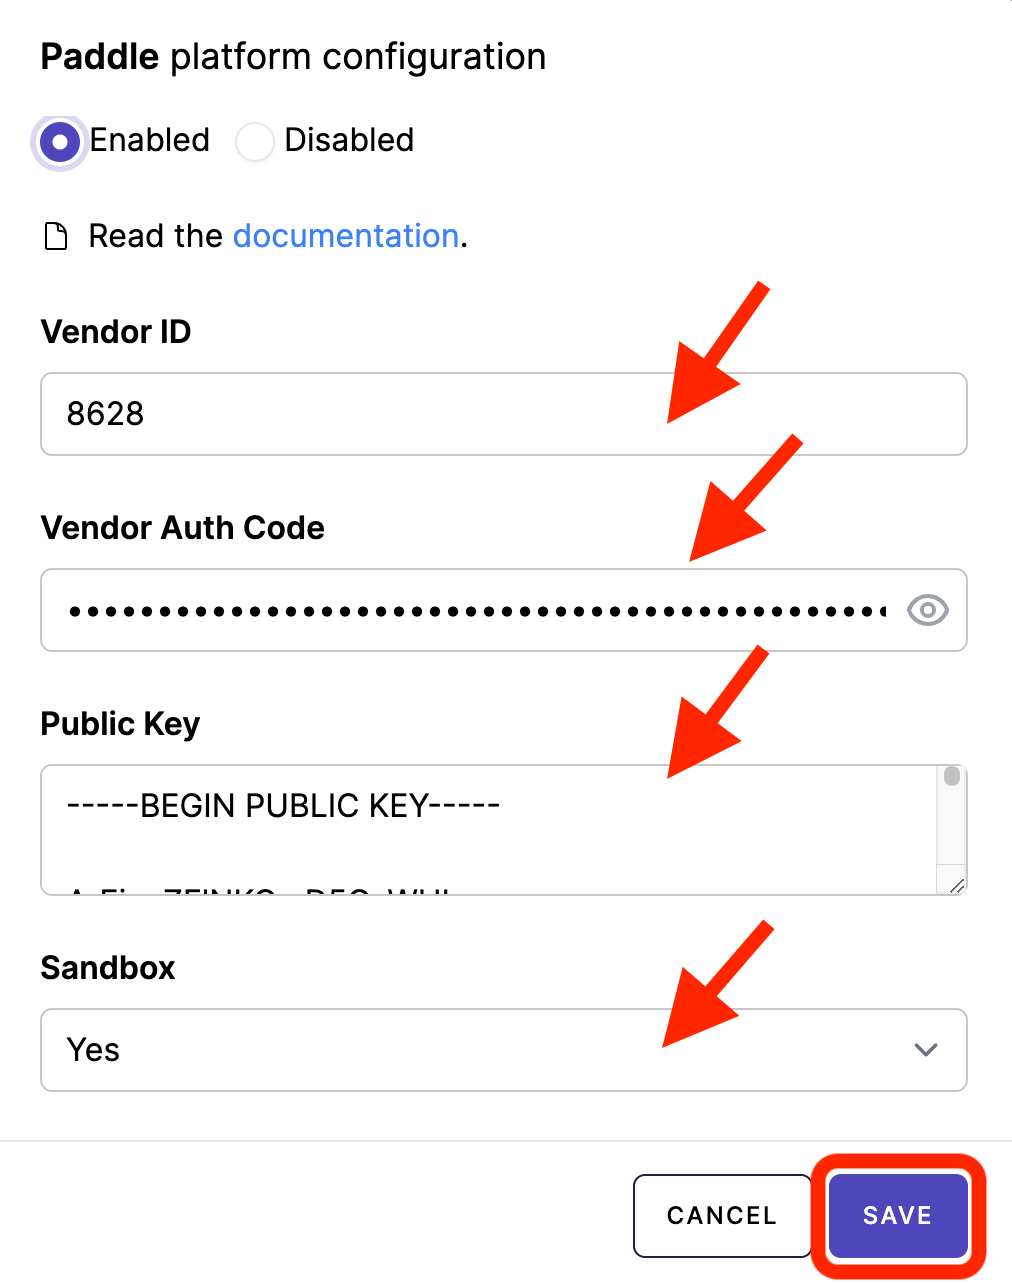
- Input your Vendor ID, Vendor Auth Code, and Public Key.
- Select Sandbox (Yes) If you are in a Sandbox Paddle account.
- Save
5. Set Up Webhooks
Webhooks allow Paddle to communicate with Mixpost Enterprise when certain events happen (e.g., a successful payment, subscription changes, etc.).
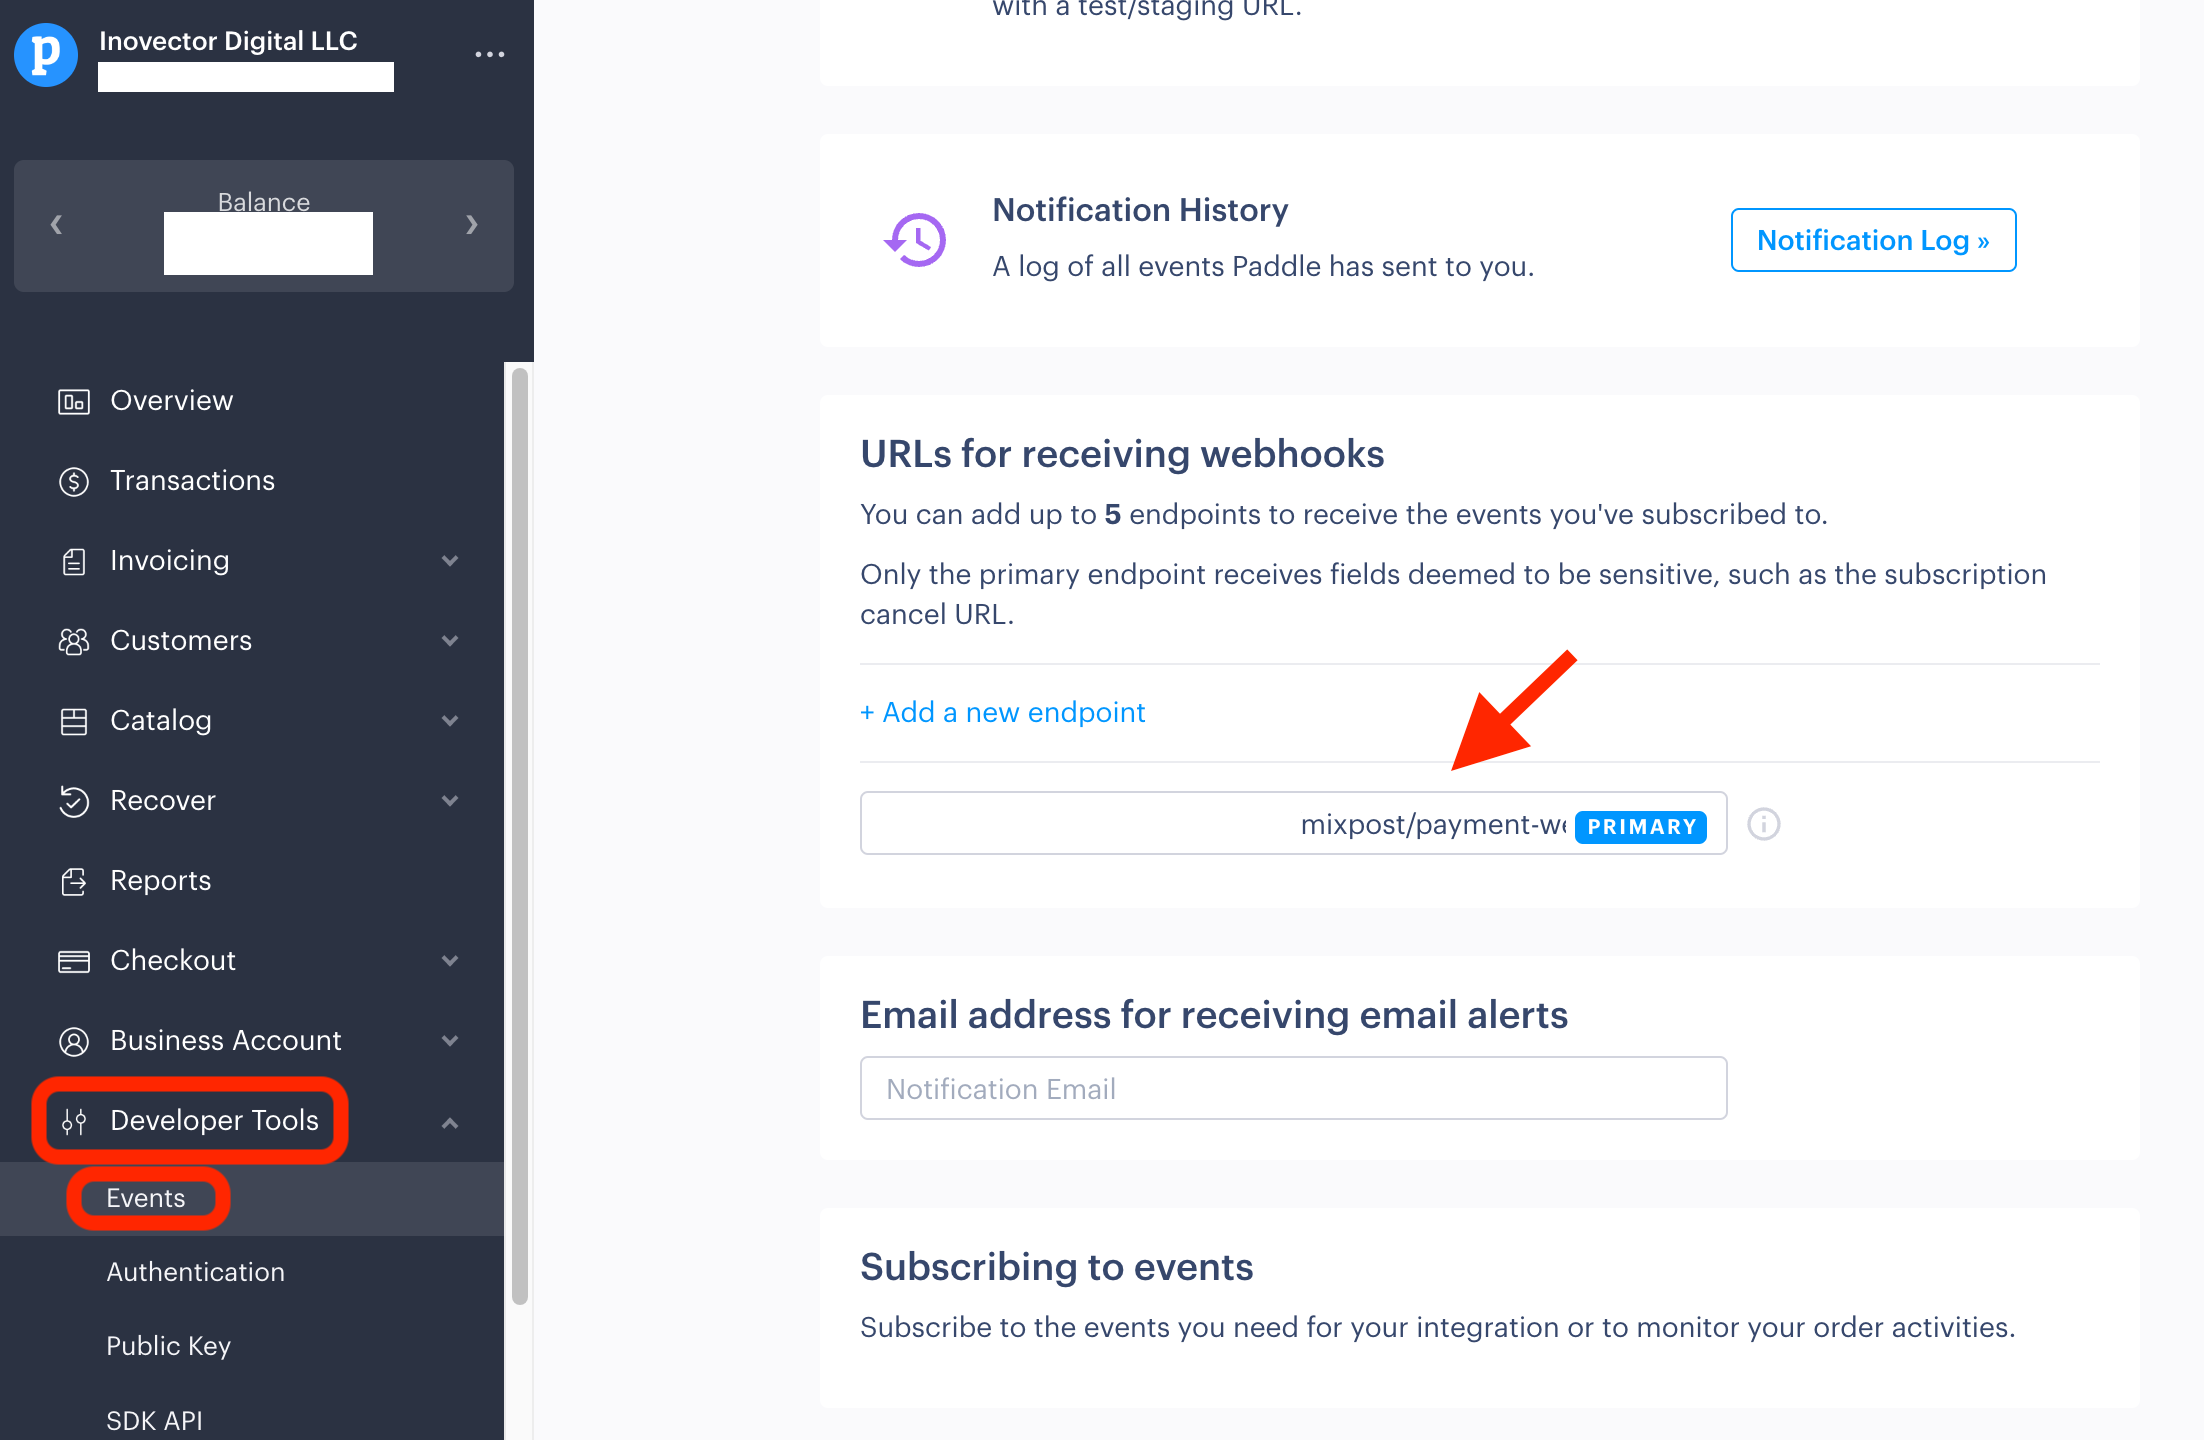
- In your Paddle Dashboard, navigate to the "Developers" section.
- Click on "Events".
- Scroll down to the "URLs for receiving webhooks" section.
- Input Endpoint URL "https://your-app-url.com/mixpost/payment-webhook".
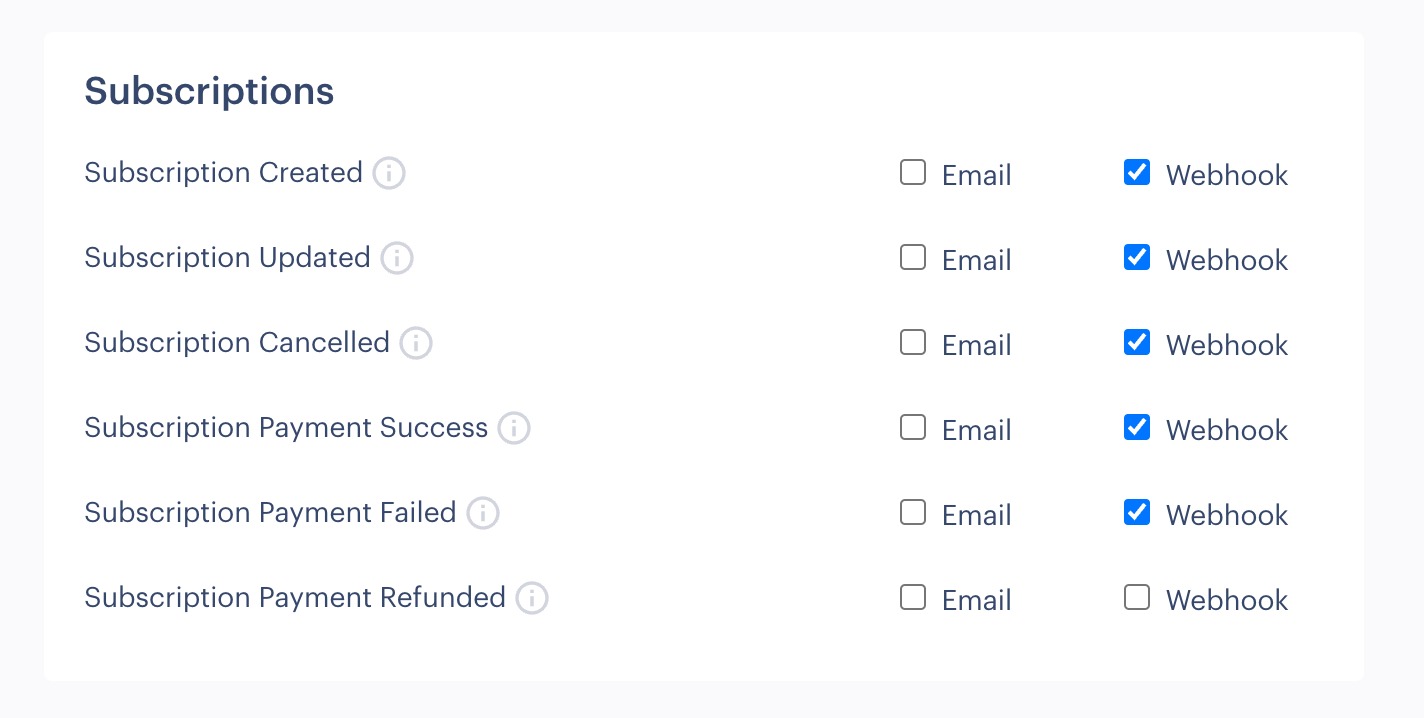
- Scroll down to the event's configuration and select Webhook for the following events:
- Subscription Created
- Subscription Updated
- Subscription Cancelled
- Subscription Payment Success
- Subscription Payment Failed
- Save Changes
6. Add pricing plans
We are adding all the necessary pricing plans in both Paddle and Mixpost Enterprise.
- In your Paddle Dashboard, navigate to the "Catalog".
- Click on "Subscription Plans"
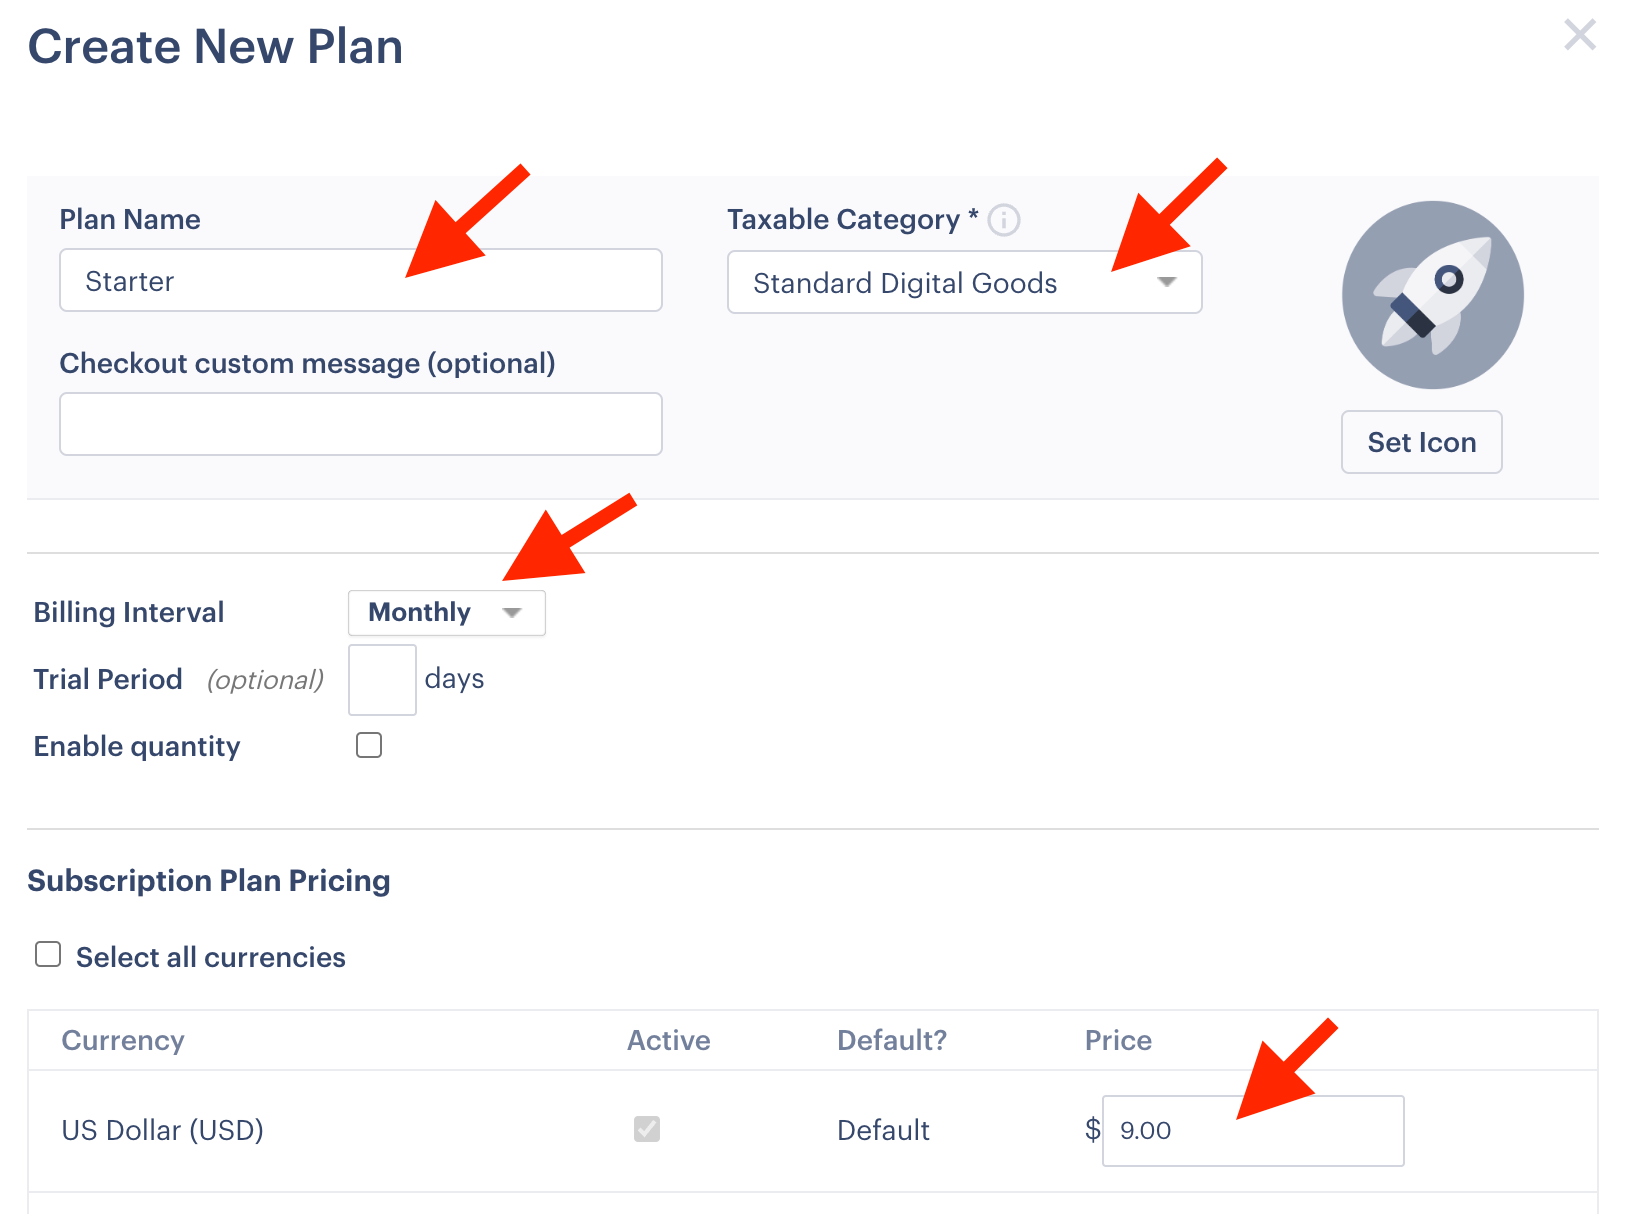
- Here, you'll see the “+ New Plan” button. Click on it.
- Give a plan name, for example: "Starter"
- Taxable Category, select "Standard Digital Goods"
- Select "Billing interval". Mixpost only accepts Monthly or Yearly billing periods.
- Scroll down to the "Subscription Plan Pricing" section
- Select the "Standard pricing" model.
- Input the default plan price, for example: "$9.00"
- Save plan
If you want to support Monthly and Yearly billing periods for plans, you should add the same Plan twice, first select "Billing Interval" under "Monthly" and then select "Yearly".

After the plans have been created in your Paddle dashboard. You should copy the Plan ID of each subscription plan to your created plans in the Mixpost Dashboard. See the instructions.
7. Test the Integration
- Try to register a user and subscribe to a plan.
- Use Paddle's test card numbers to make sure the subscription is done correctly.
8. Go Live
If you have integrated with your Paddle's sandbox account, and you're confident in the integration:
- Repeat the integration process for your Production Paddle account.
- Ensure you've added any necessary pricing plans in both Paddle and your Mixpost Enterprise console.
- Start onboarding users and generating revenue!
Paystack
Paystack is a modern payment platform for Africa. Here's a step-by-step guide to help you integrate Paystack with Mixpost Enterprise and get started with processing payments:
1. Sign up for a Paystack Account
If you haven't already, head to Paystack's website and sign up for an account.
2. Access the Paystack Dashboard
Once you've registered, log in to your Paystack account and access the Dashboard. This will be your primary interface for managing payments.
3. Get Your API Keys
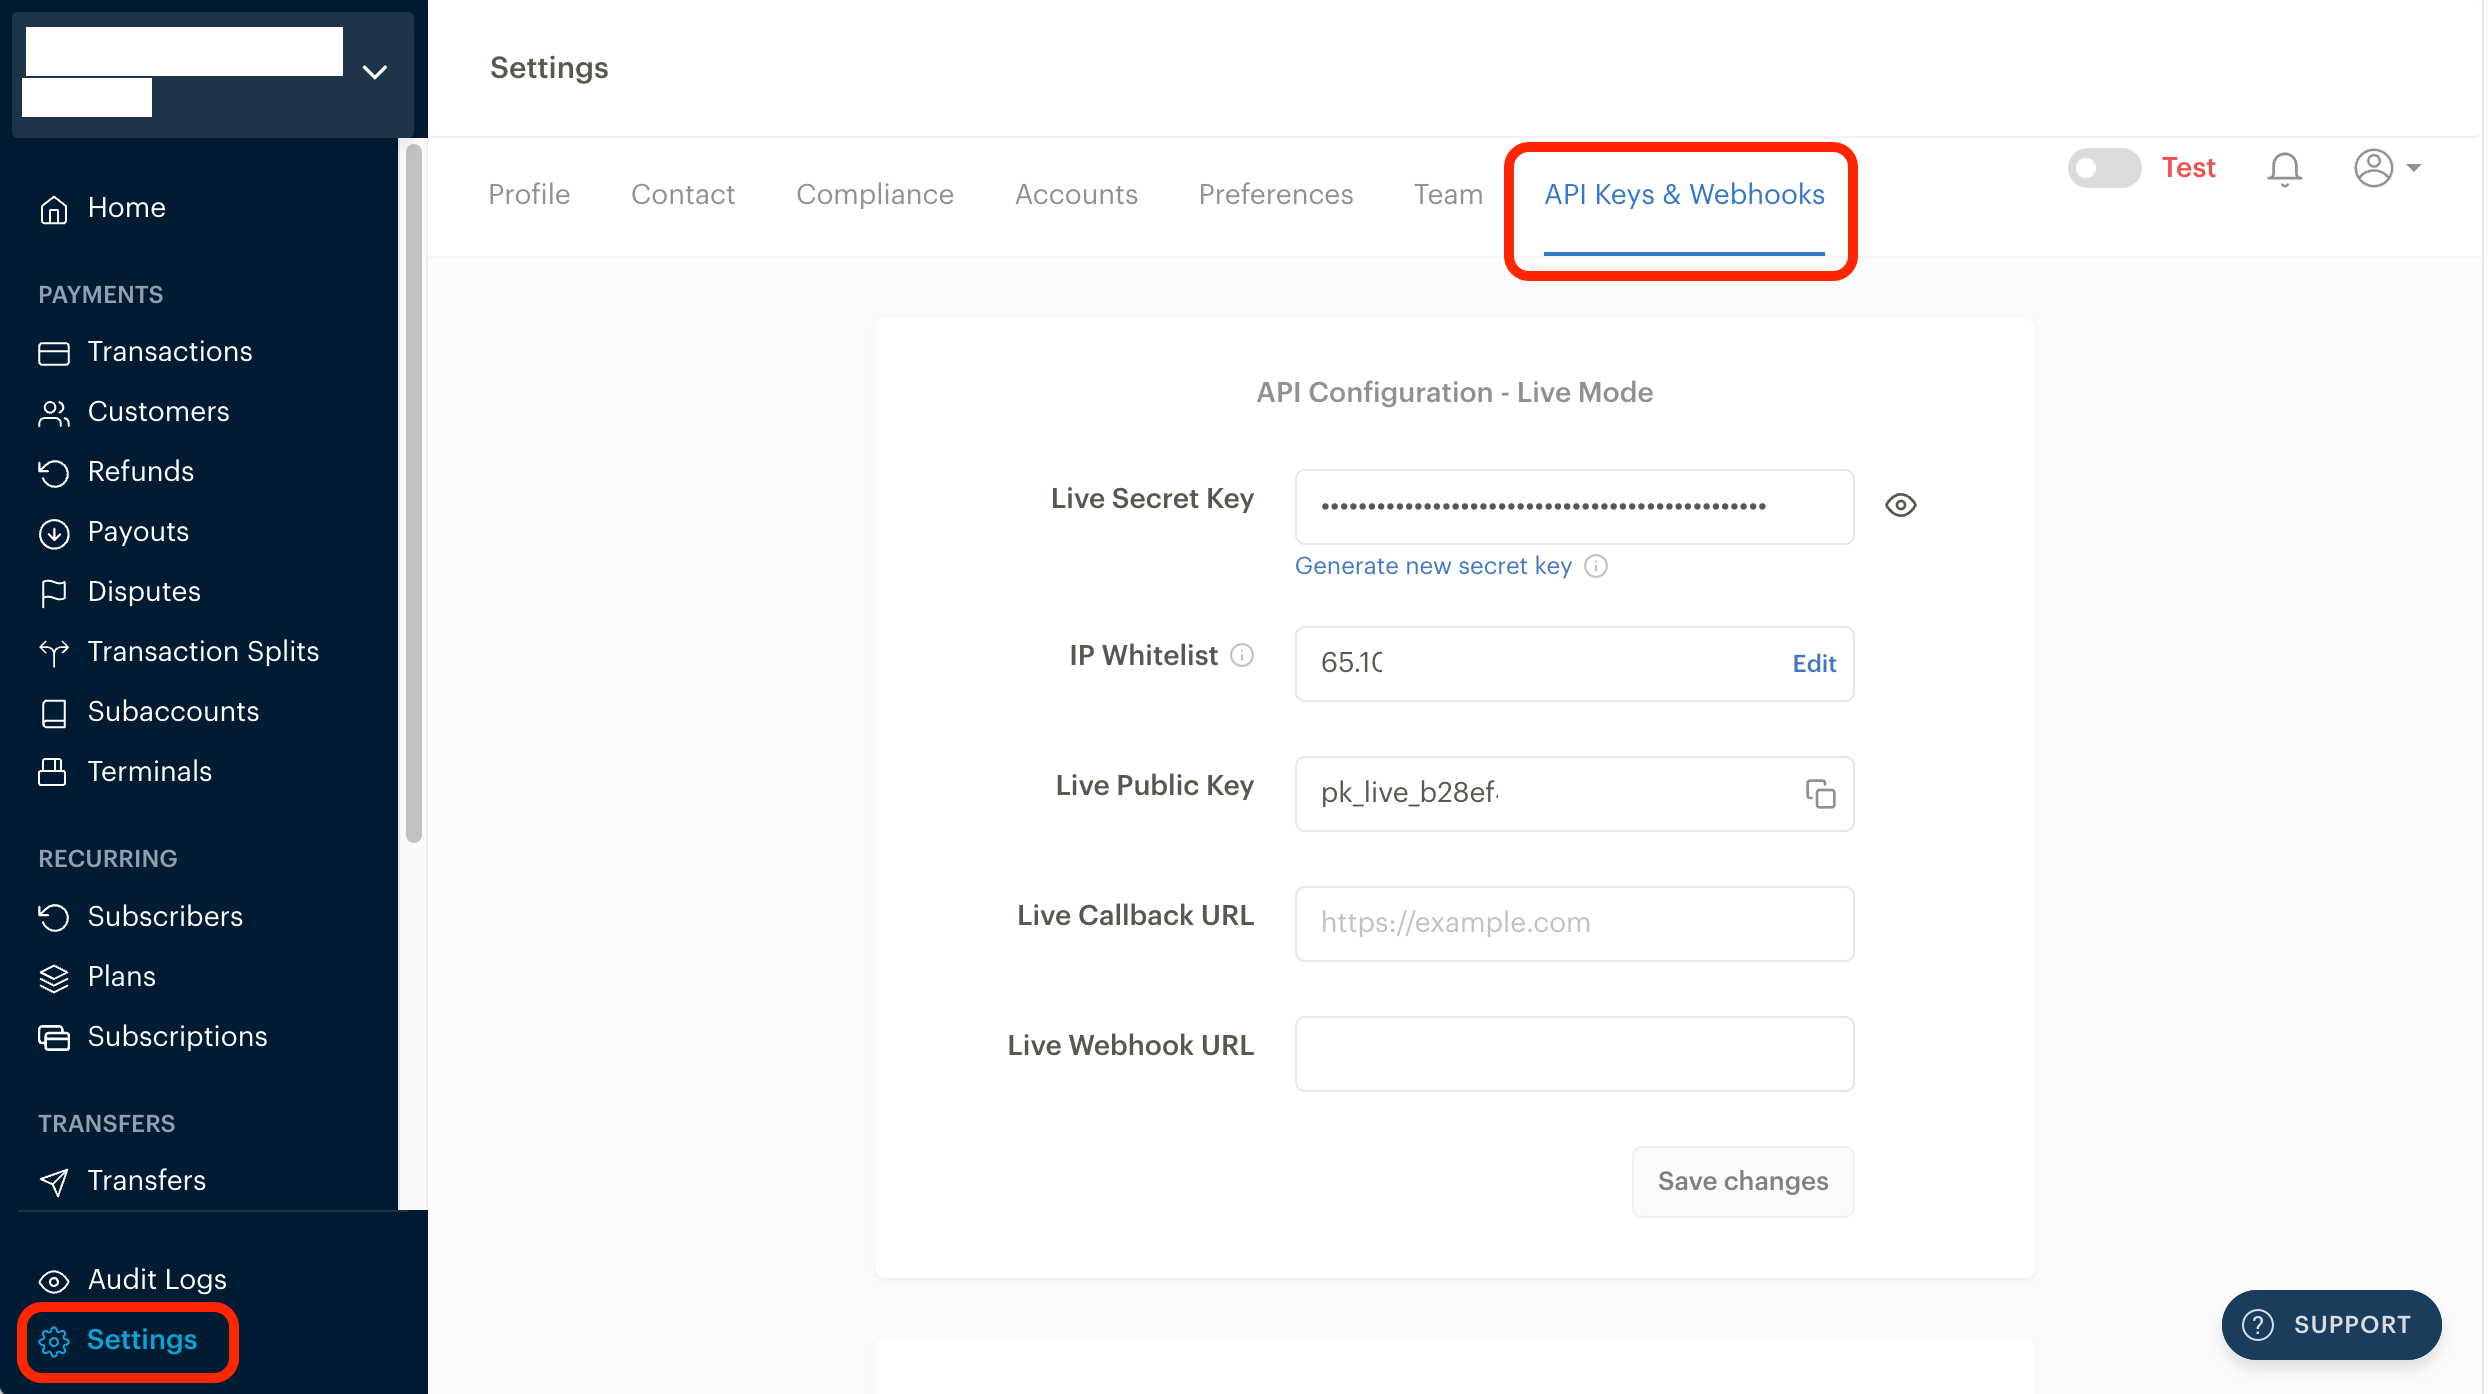
From the Dashboard:
- Go to the “Settings” section.
- Click on "API Keys & Webhooks".
- You'll see two keys: a Live Secret Key and a Live Public Key. You'll need both for integration.
- Set your server IP to the whitelist.
- Input Live Webhook URL "https://your-app-url.com/mixpost/payment-webhook".
- Click the "Save changes" button.
Note: Always keep your Secret Key confidential. Make sure your dashboard is in Live mode (top right switch).
4. Integrate API Keys into Mixpost Enterprise
Once you have your API keys:
- Open the Enterprise Console from the user menu.
- Navigate to Settings ->
- Click on Paystack
- Choose "Enabled" radio input
- Input your Live Secret Key to the Secret Key field and Live Public Key to the Public Key field.
- Save
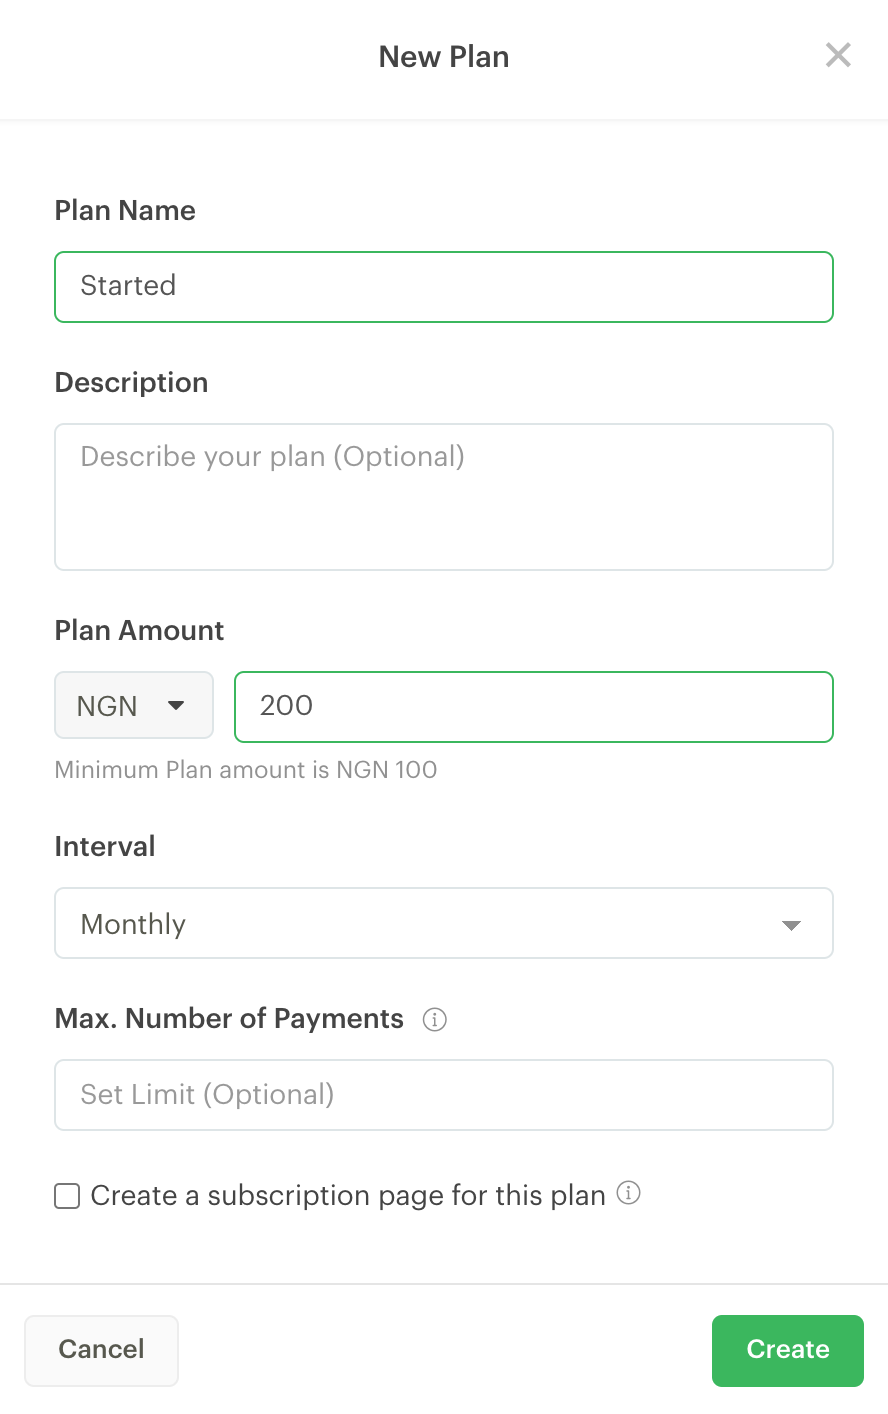
5. Add pricing plans
We are adding all the necessary pricing plans in Paystack and Mixpost Enterprise.
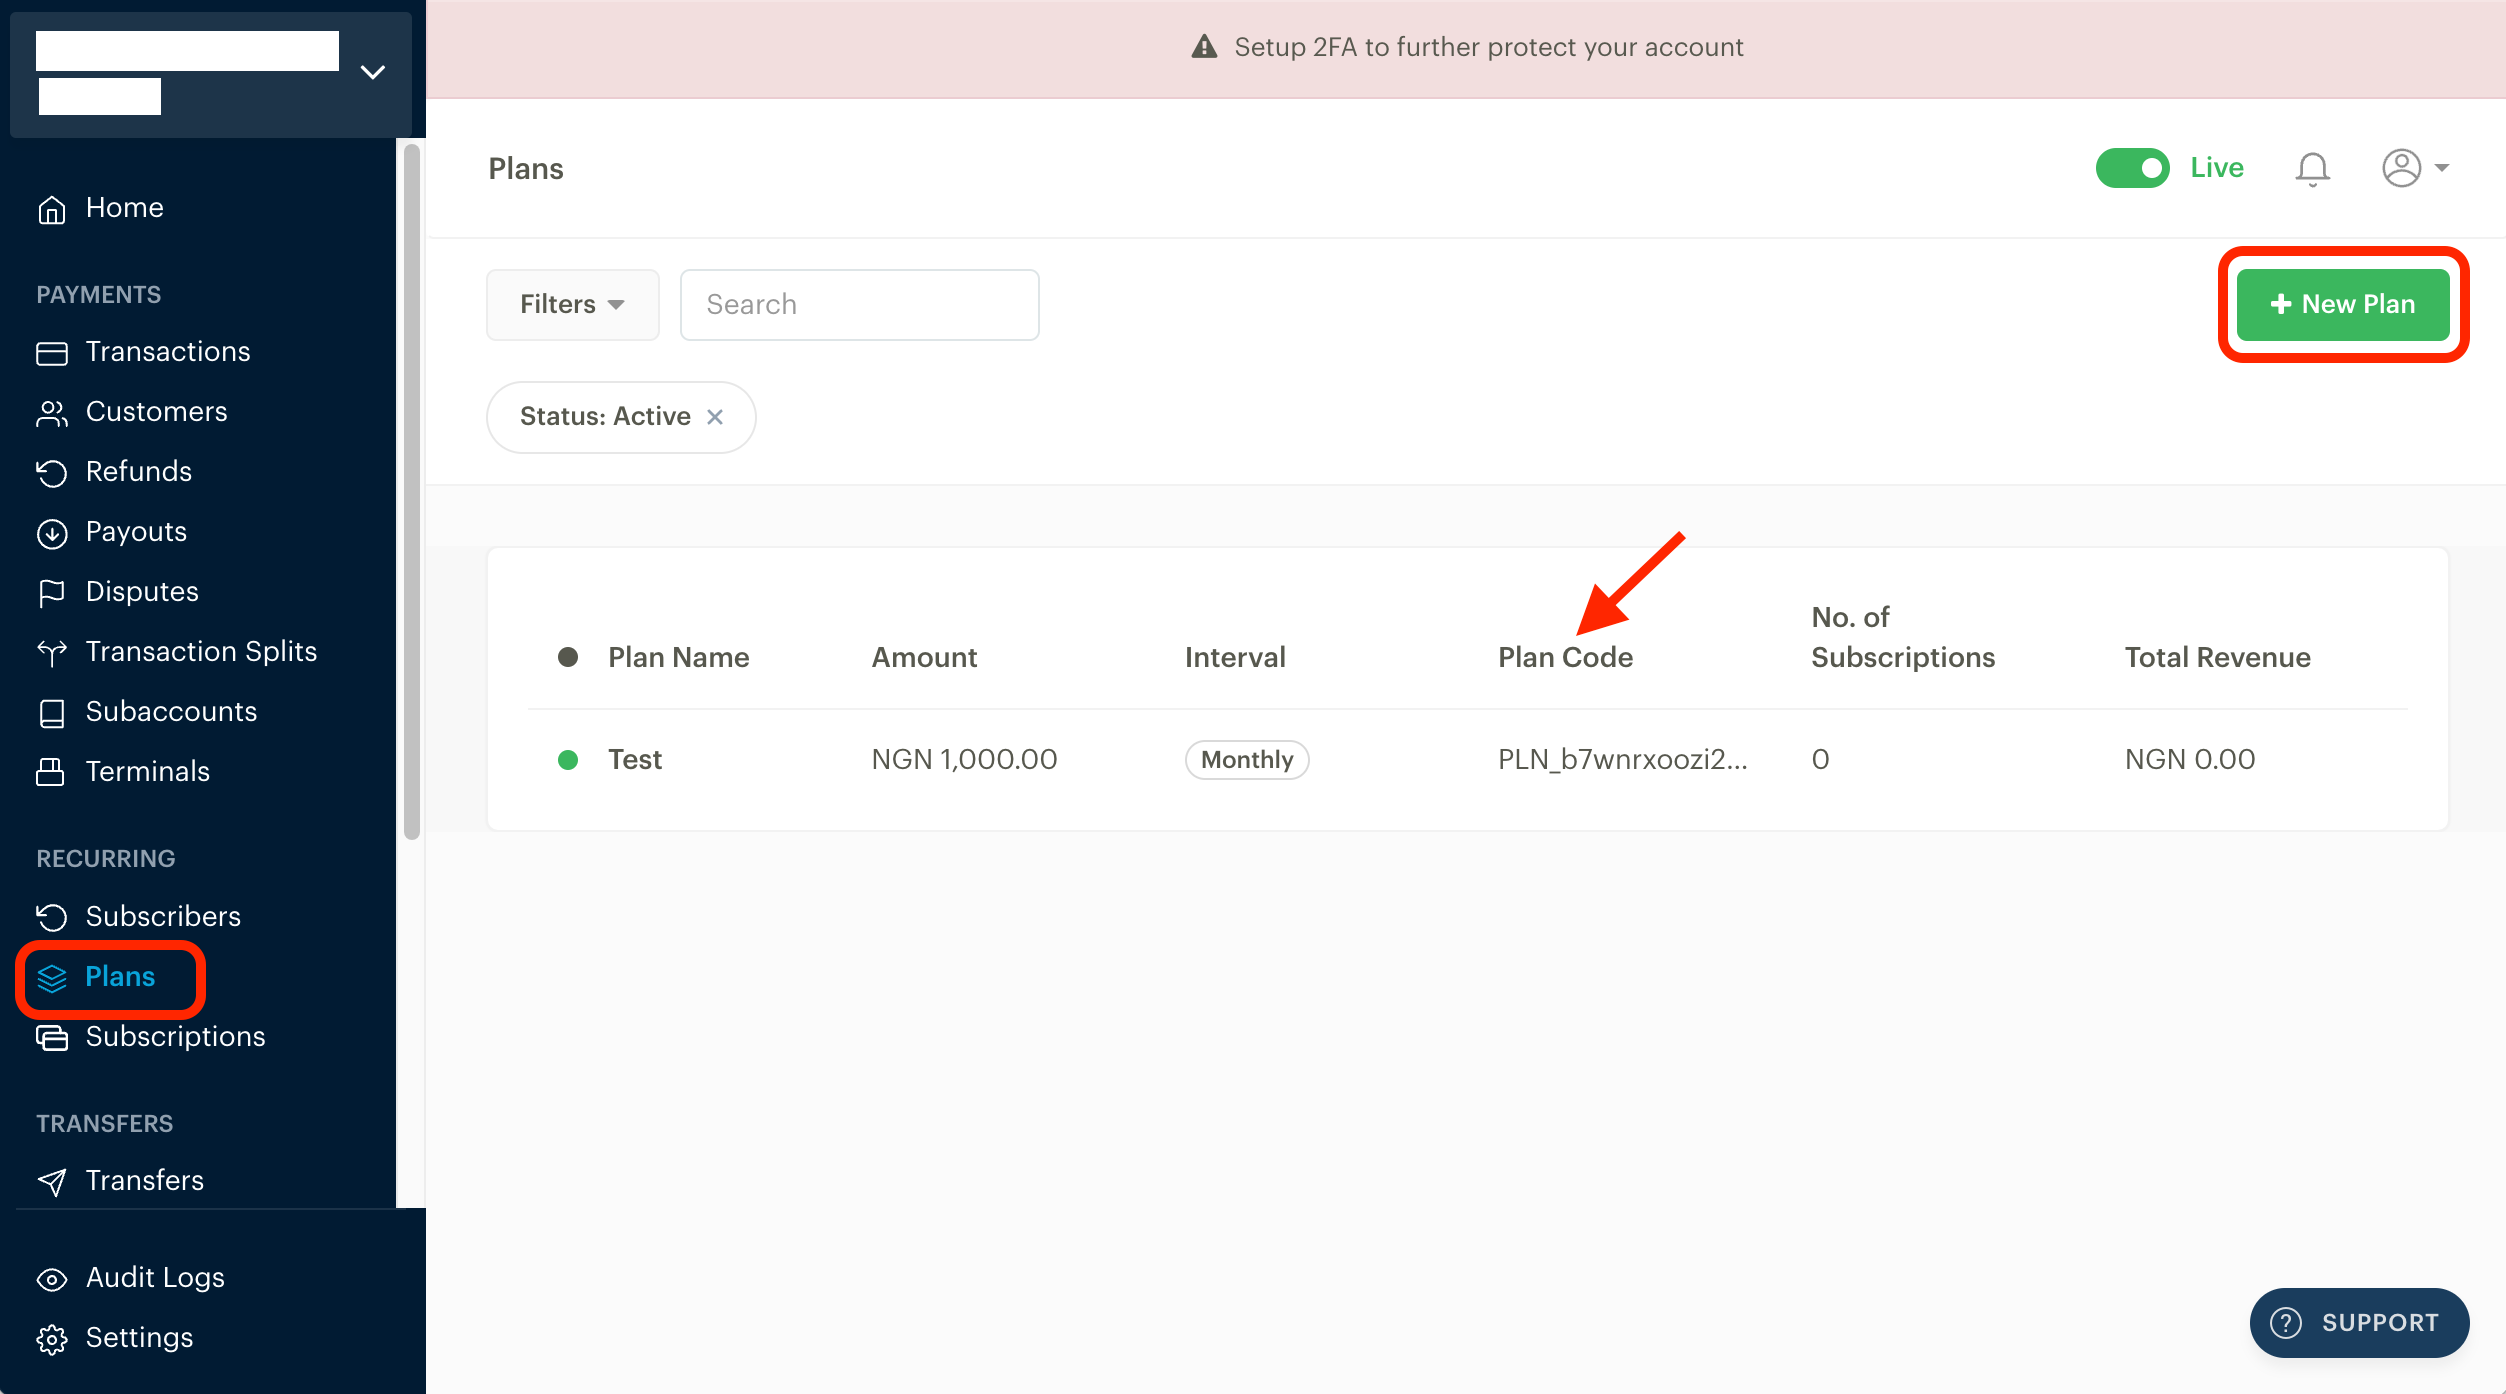
- In your Paystack Dashboard, navigate to the "Plans".
- Here, you'll see the “+ New Plan” button. Click on it.
- Give a plan name, for example: "Starter"
- Input the default plan price, for example: "NGN 200"
- Select "Interval". Mixpost only accepts Monthly or Yearly billing periods.
- Save plan
If you want to support Monthly and Yearly billing periods for plans, you should add the same Plan twice, first select "Interval" under "Monthly" and then select "Annually".
After the plans have been created in your Paystack dashboard, you should copy the Plan Code of each plan to your created plans in the Mixpost Dashboard. See the instructions.
7. Test the Integration (optional)
- Switch to Test mode from your Paystack dashboard.
- Back to step 4 and input your Test Secret Key to the Secret Key field and Test Public Key to the Public Key field.
- Try to register a user and subscribe to a plan.
8. Go Live
If you skipped step 7. Mixpost is ready to receive payments.
If you did not skip step 7 and did tests in the Test mode, back to step 4 and make sure you input your Live Secret Key to the Secret Key field and Live Public Key to the Public Key field.