Integration of Social Platforms
Mixpost uses official API from social platforms that support them. For this, you must register on these platforms and create the applications to get access to their API. On some social platforms, you will get access faster, others need a few days to review the API access request. Social networks are fighting spammers. If you intend to use Mixpost and their platforms in a fair way and prove it to them, then access to their API will be accepted. 🔗 Terms of use: https://mixpost.app/terms-of-use
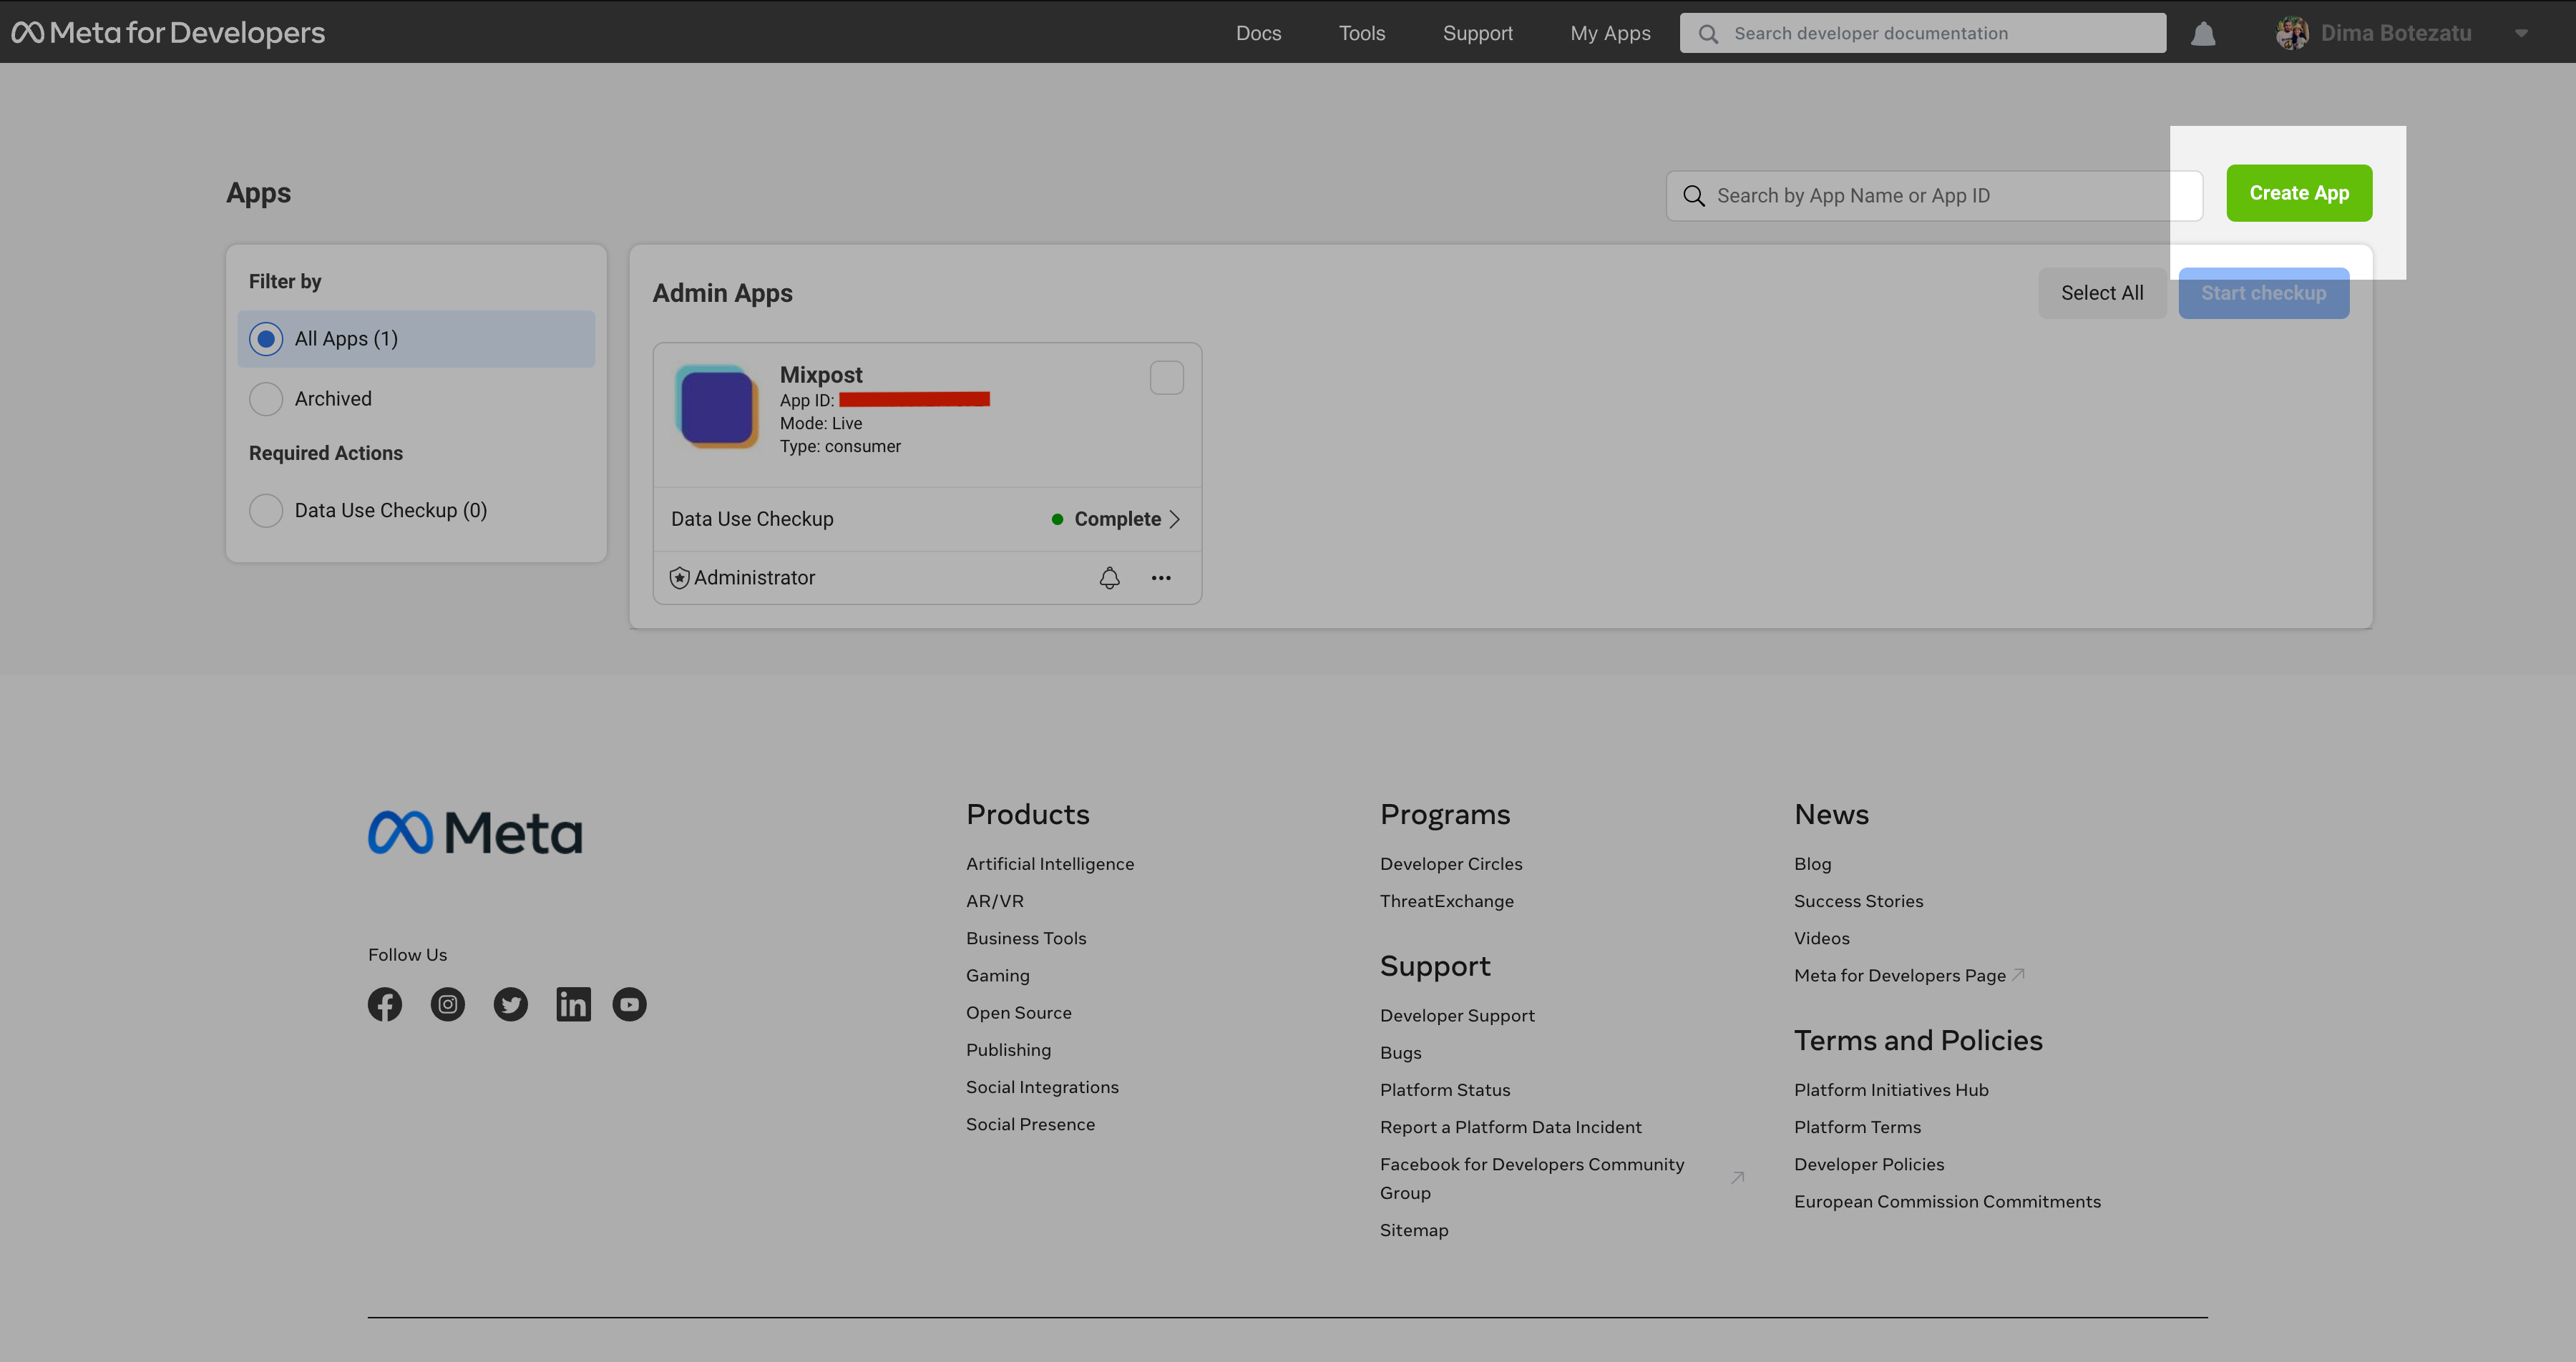
To be able to post on Facebook and Instagram, you must create and configure a Facebook application. Because Facebook and Instagram belong to the same company Meta.
Step 1: Create a Developer Account
To create a Facebook app, you must first have a Facebook developer account. If you don't already have one, go to the Facebook for Developers website and click "Get Started" in the top right corner. Follow the instructions to sign up for a developer account.
Step 2: Create a New App
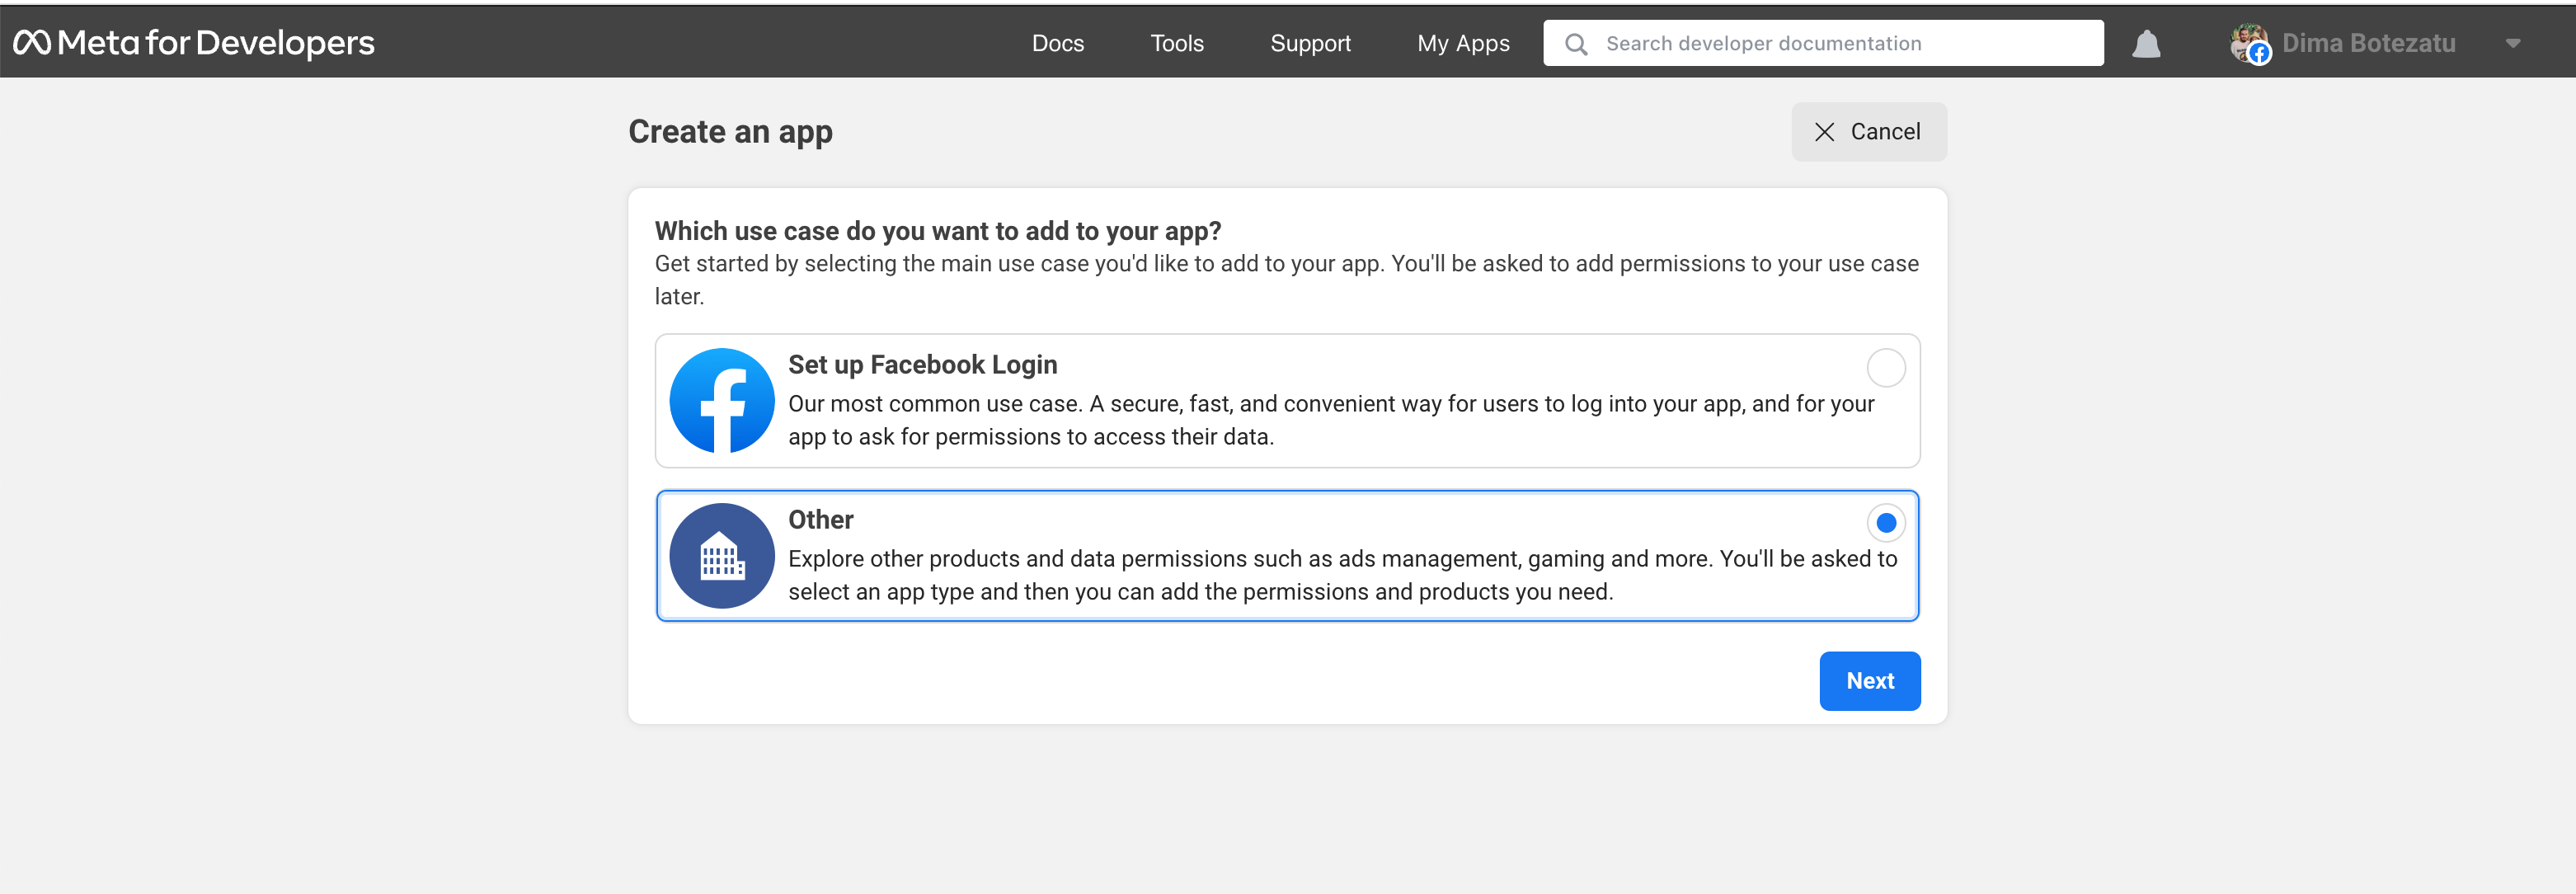
Once you have a developer account, go to the Facebook Developer Dashboard and click "Create App" in the top right corner. Choose "Business" as the app type and give your app a name.


Step 3: Configure Basic Settings
After creating your app, you'll be taken to the app dashboard. Here, you can configure your app's basic settings, such as the app icon and description. You'll also need to configure the "App Domains" and "Privacy Policy URL" settings.
With Mixpost you can generate Terms, Privacy policy pages in seconds.
Navigate to "Admin Console -> Pages" and click on the right-top "Generate Samples" button.

Step 4: Copy the App ID and App Secret to Mixpost
After creating the App, you will see the App ID and hidden App Secret. Copy them, open your Mixpost dashboard, and paste the keys to the Facebook third-party service form.
- Mixpost Lite: From the left sidebar->Services.
- Mixpost Pro/Enterprise: User Menu->Admin Console->Services

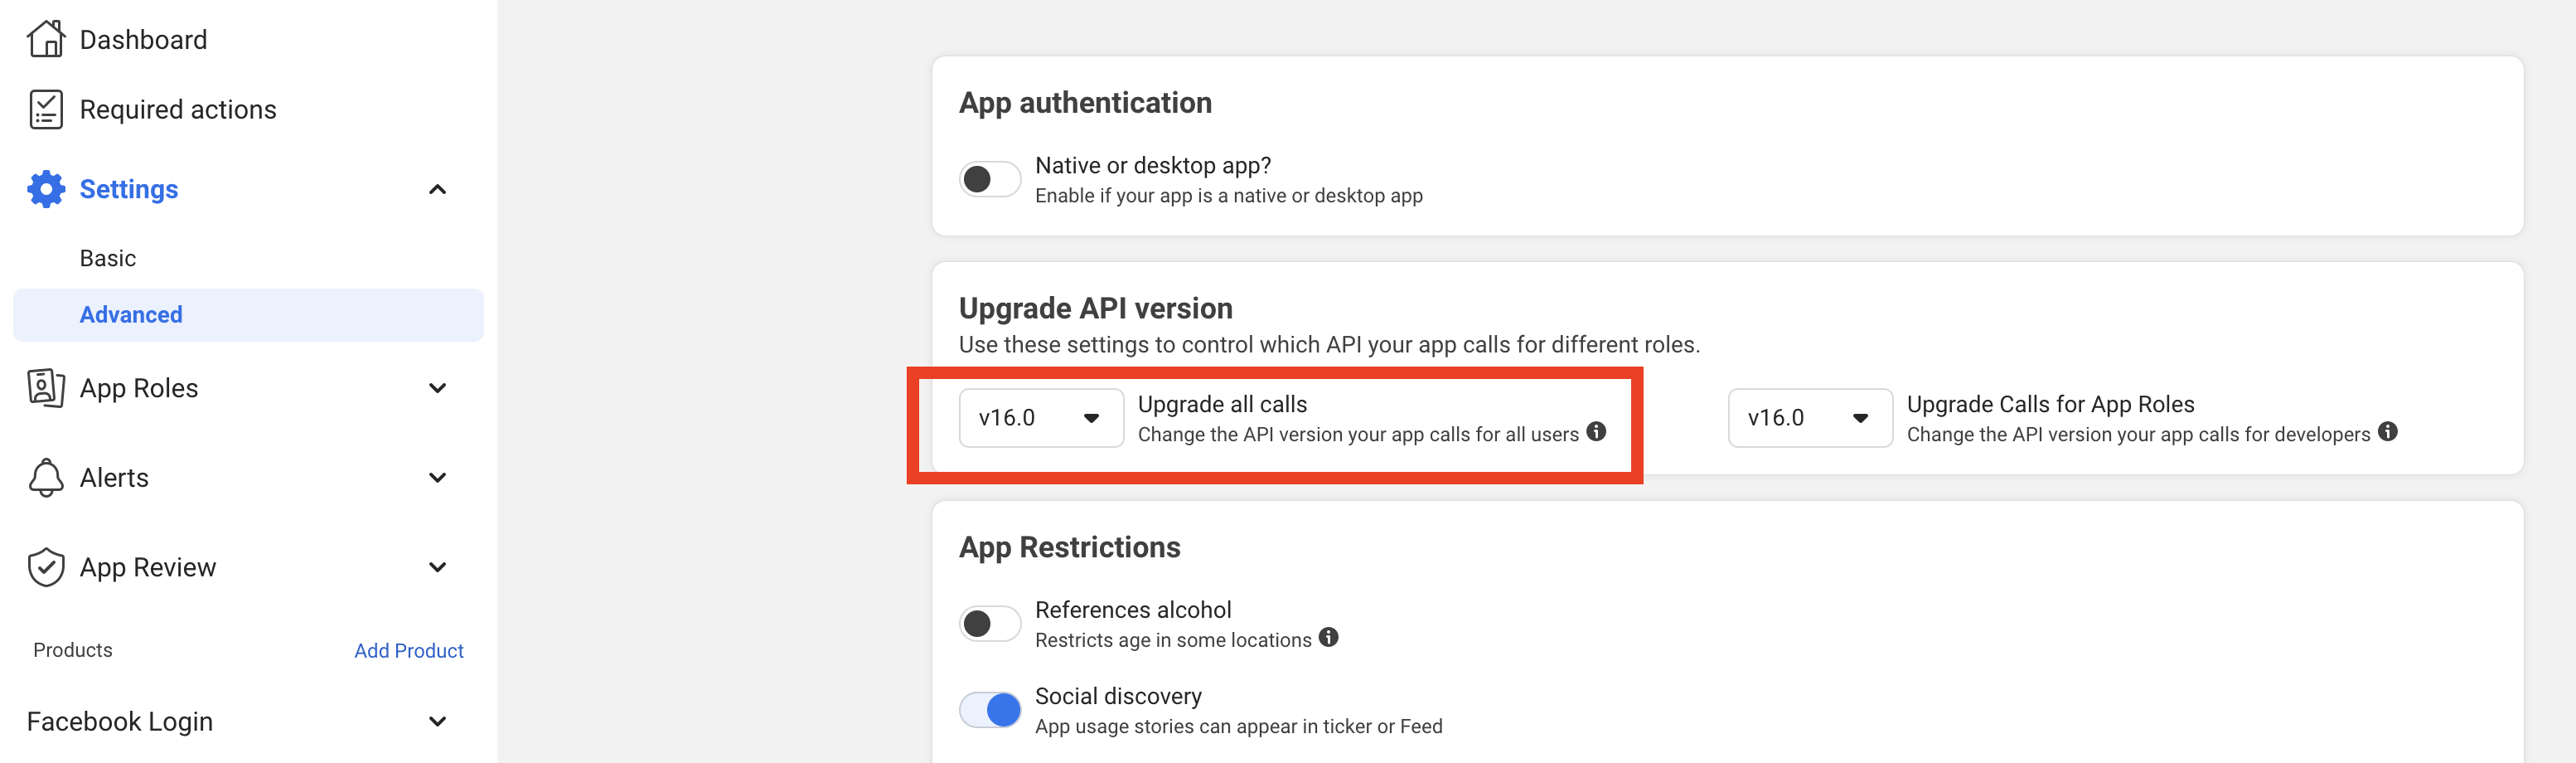
Select the version of your Facebook application: Your Facebook app->Settings->Advanced
Step 5: Setting callback links
Next, you need to do some essential configurations.

Step 6: Testing
You can test your app by adding your Facebook account to the Mixpost. We recommend creating a few test posts using the app in Development and then switching to Live mode.
Accounts→Add account
Unfortunately, if you have version v19.0 of the Facebook application, you cannot connect groups because the Facebook Groups API is deprecated in this version. We are looking for a solution as quickly as possible.
Conclusion
Any data generated while an app is in Development mode, such as posts, can only be seen by role users. However, the data will be visible to non-role users once the app is switched to Live mode.
Your Facebook app can only request data from users with an app role. For users who do not have a role in the application, your Facebook app must have Advanced Access permissions.
Note that the app in Live mode can not post to Facebook groups. If posting to a group, requires your app to be installed in the group. Your app will be visible in the list of Facebook applications only if you have requested advanced access and it was successfully verified.
App Review (Advanced Access permissions)
If your app is used by app users who do not have a role on your app or a role in a Business that has claimed your app, you have to request approval for advanced access permissions via App Review. This step is recommended for those who have Mixpost Enterprise.
Note that Business Verification is required to gain advanced access.
Create a test user(non-admin) account from your Mixpost account. With this account, the Meta team will be able to test your application.
Navigate to "App Review > Permissions and Features"

If your Facebook App is using v19.0, you must request permissions for the following scopes:
-
business_management
-
pages_show_list
-
read_insights
-
pages_manage_posts
-
instagram_basic
-
instagram_content_publish
-
instagram_manage_insights
If your Facebook App is using v17.0, or v18.0, you must request permissions for the following scopes:
-
business_management
-
pages_show_list
-
read_insights
-
pages_manage_posts
-
publish_to_groups
-
instagram_basic
-
instagram_content_publish
-
instagram_manage_insights
If your Facebook App is using v16.0, you must request permissions for the following scopes:
-
pages_show_list
-
read_insights
-
pages_manage_posts
-
publish_to_groups
-
instagram_basic
-
instagram_content_publish
-
instagram_manage_insights
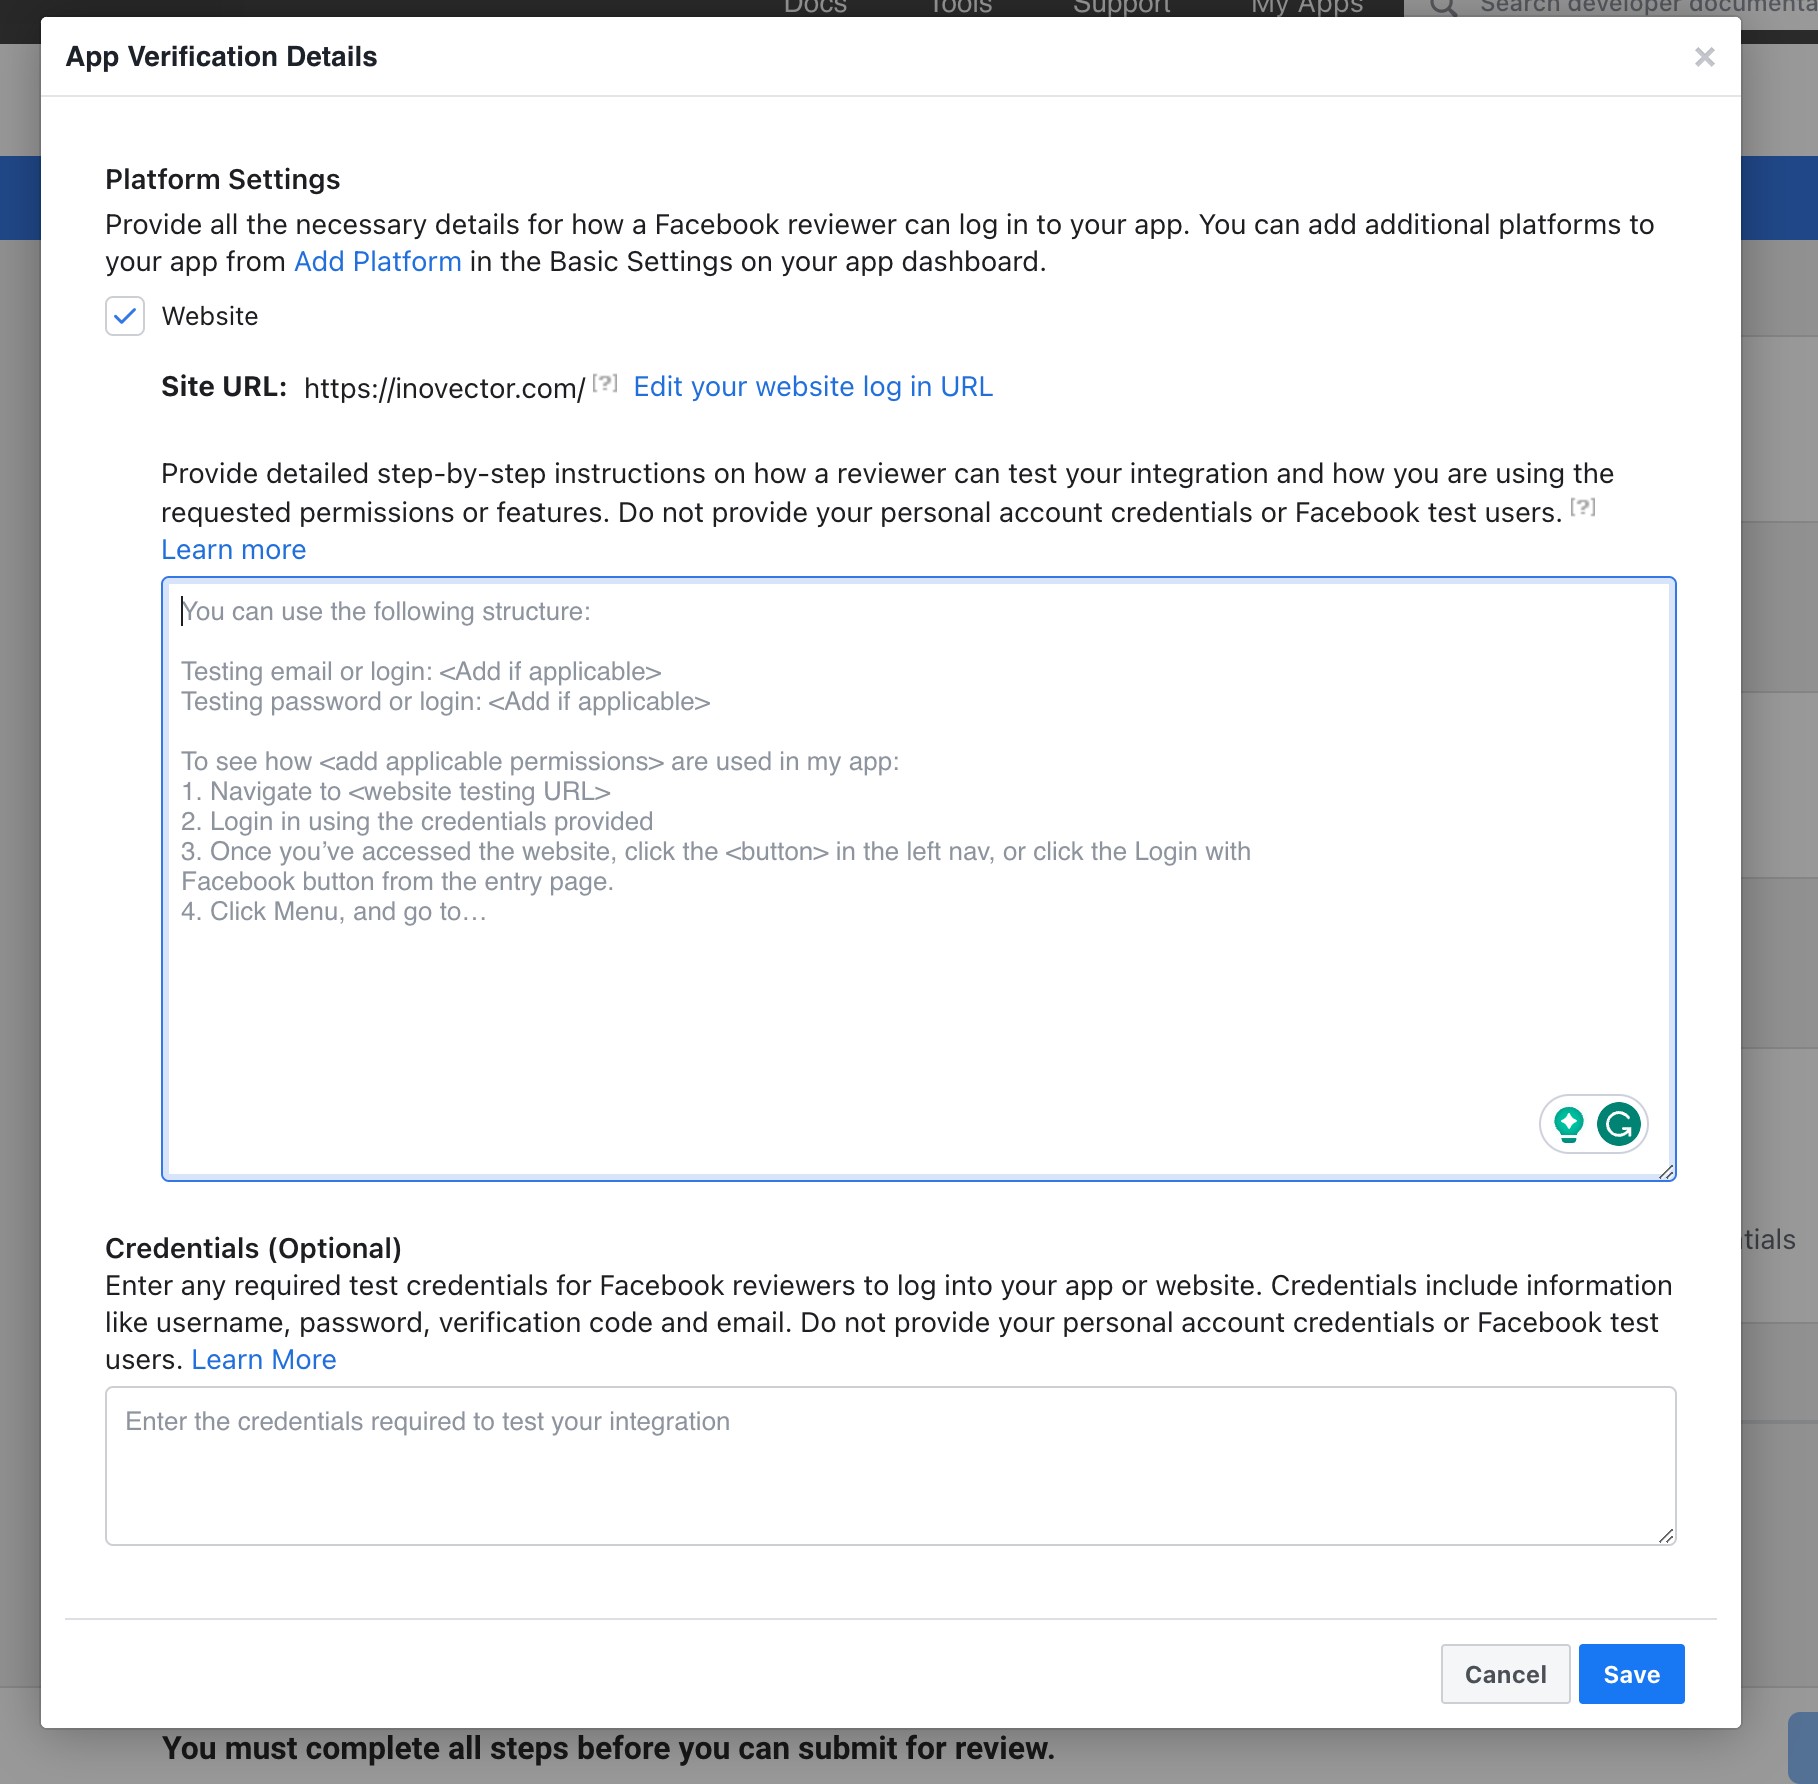
The text for "App Verification Details"
Testing email: meta-test@example.com
Testing password: test-password
To see how these permission are used in my app:
1. Navigate to https://your-domain.com
2. Login in using the credentials provided
3. Once you’ve accessed the website, click “Accounts” in the left sidebar.
4. Click on the “Add account” button
5. Click the “Facebook page”
6. Login with your Facebook account and accept all the permissions
7. Select your pages and click on the “Choose” button
8. Your Facebook pages have been added to my app. This way you can connect a Facebook page, Facebook Group, or Instagram account.
Then click on the "Save" button.
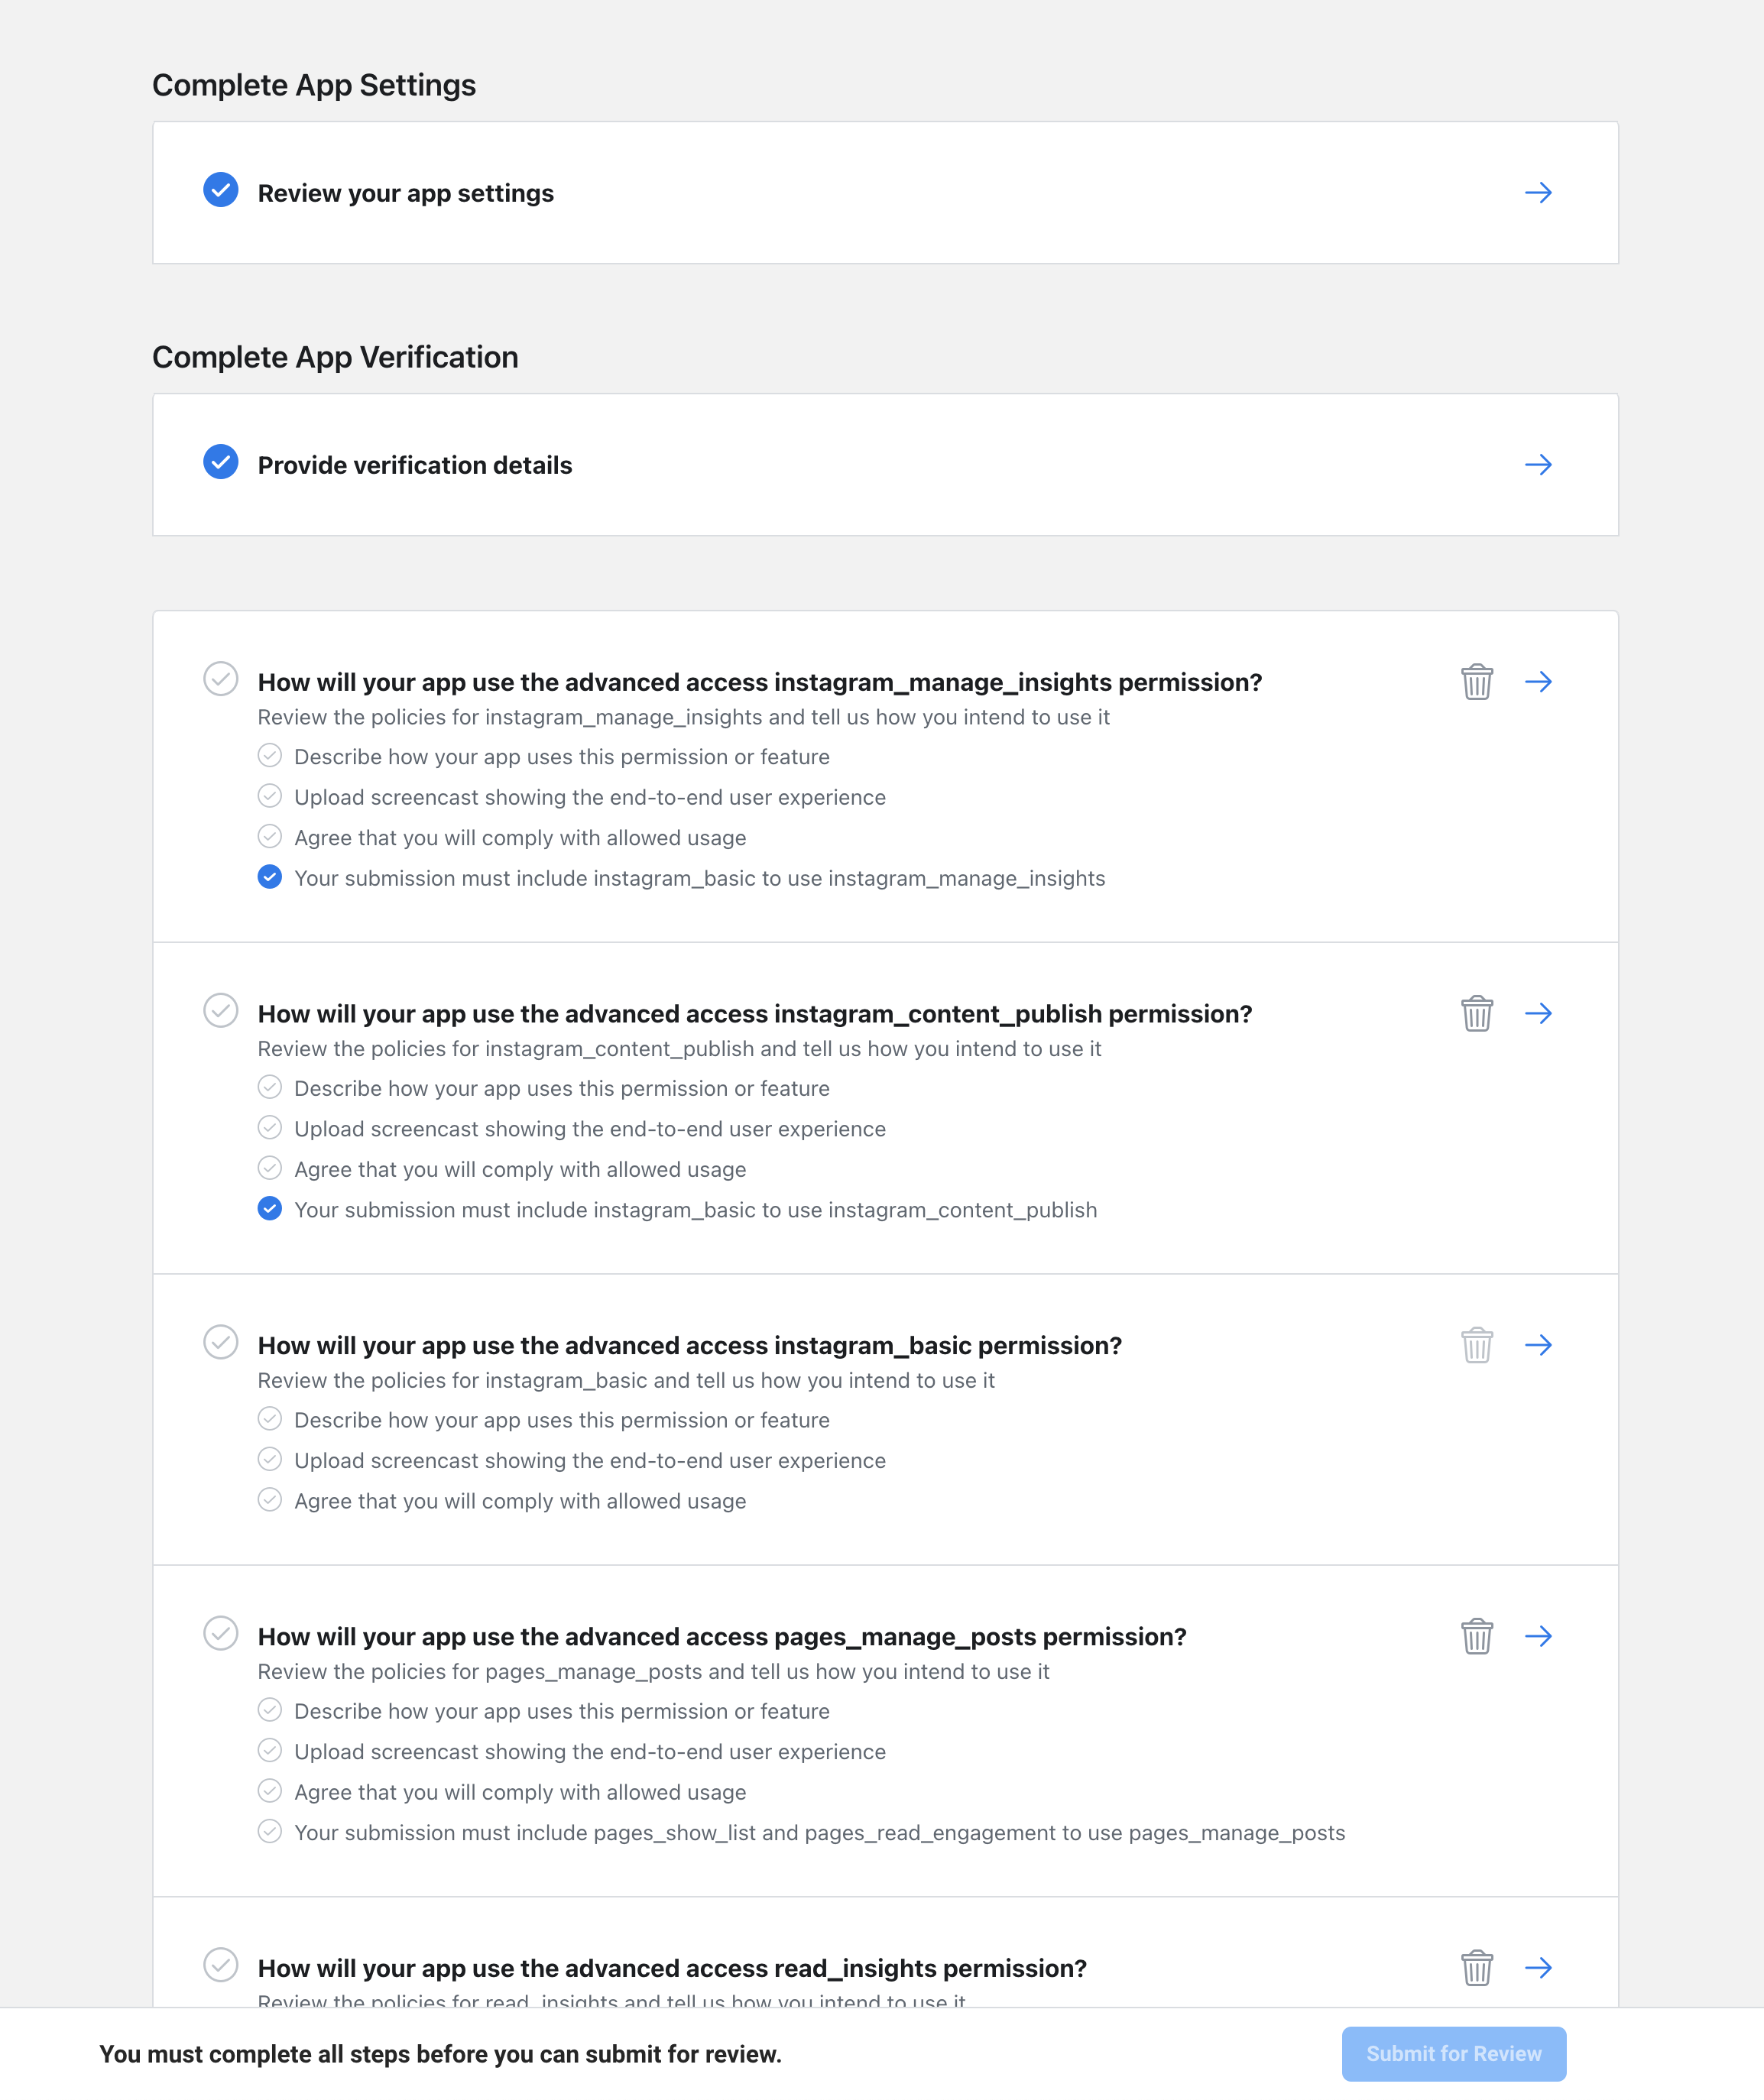
Before submitting the app for review, it is essential to finish all the required steps and provide information for each requested permission. The "Submit for Review" button located at the bottom of the page will become active only when all the review requirements, indicated by blue checkmarks, are fulfilled.
It can take several days to get a response from Facebook. You can check your pending request in the Facebook developer account in the "App Review -> Requests" section.
Example instructions for every app review scope
It will be necessary to provide a detailed description and screen recording for each permission. Screen Recordings guide.
Useful information:
|
Scope |
Use case description |
What to show in the video |
|---|---|---|
|
business_management |
We need this permission to receive access to the business admin pages and display them to connect the chosen one to my app.
To see how "business_management" is used in my app: 1. Inside my app, click "Accounts" from the left menu. 2. Click on the "Add Account" button. 3. A login dialog will open, click on "Facebook Page". |
You must show how a user can add a Facebook page, accept the permission, select the pages from the list, and show the connected pages on the Accounts page. |
|
pages_show_list |
We need this permission to read and display the list of Pages a person manages to connect the chosen one to my app.
To see how "pages_show_list" is used in my app: 1. Inside my app, click "Accounts" from the left menu. 2. A login dialog will open, click on "Facebook Page". 4. A login dialog to Facebook will open in a new window. |
You must show how a user can add a Facebook page, accept the permission, select the pages from the list, and show the connected pages on the Accounts page. |
|
read_insights |
We need this permission to read the insights data for Pages:
This permission helps our users to understand what content is resonating with their audience and what to post to maximize their audience engagement.
To see how "read_insights" is used in my app: 1. Inside my app, click "Accounts" from the left menu. 2. Click on the "Add Account" button. 3. A login dialog will open, click on "Facebook Page". 9. Click on the "Dashboard" button from the left menu and select the page you added. Here you will see all metrics. The data is collected by my app every 2 hours. |
You must show how a user can add a Facebook page, accept the permission, select the pages from the list, and show the connected pages on the Accounts page.
You must show the Mixpost Analytics page of a Facebook page. |
|
pages_manage_posts |
We need this permission to create content posted on the page (posts, videos, photos).
This permission is required for my app to provide users with the benefit of scheduling and publishing posts on their pages.
To see how "pages_manage_posts" are used in my app: 1. Inside my app, click "Accounts" from the left menu. 2. Click on the "Add Account" button. 3. A login dialog will open, click on "Facebook Page". 9. Click on the top "CREATE POST" button from the left menu. 10. Select which page you want to post on. 11. Write whatever you want to share with your audience. 12. On the right bottom, click on the "Post now" button or you can pick a time to schedule. If you click "Post now" the post should be published in a minute to the selected page. |
You must show how a user can add a Facebook page, accept the permission, select the pages from the list, and show the connected pages on the Accounts page.
You must show how you are creating the post and publishing it. Also, show that after publishing you can open the original post on the Facebook site. |
|
pages_read_engagement |
We need this permission because it is required by "pages_manage_posts" permission. We need this permission to read content(posts, photos, videos) posted by the Page.
To see how "pages_read_engagement" is used in my app: 1. Inside my app, click "Accounts" from the left menu. 2. Click on the "Add Account" button. 3. A login dialog will open, click on "Facebook Page". 9. Click on the top "CREATE POST" button from the left menu. 10. Select which page you want to post on. 11. Write whatever you want to share with your audience. 12. On the right bottom, click on the "Post now" button or you can pick a time to schedule. If you click "Post now" the post should be published in a minute to the selected page. |
You must show how a user can add a Facebook page, accept the permission, select the pages from the list, and show the connected pages on the Accounts page.
You must show how you are creating the post and publishing it. Also, show that after publishing you can open the original post on the Facebook site. |
|
publish_to_groups |
We need this permission to publish content (posts, videos, photos) into a group on behalf of a person who connected with his Facebook account in my app.
This permission is required for my app to provide users with the benefit of scheduling and publishing posts on their groups.
To see how "publish_to_groups" are used in my app: 1. Inside my app, click "Accounts" from the left menu. 2. Click on the "Add Account" button. 3. A login dialog will open, click on "Facebook Group". 9. Click on the top "CREATE POST" button from the left menu. 10. Select which group you want to post on. 11. Write whatever you want to share with your audience. 12. On the right bottom, click on the "Post now" button or you can pick a time to schedule. If you click "Post now" the post should be published in a minute to the selected group.
You can test it here: |
You need to show how to add a Facebook group and how to create and publish a post to a group. Also, show that after publishing you can open the original post on the Facebook site. |
|
Groups API |
We need this permission because it is required by "publish_to_groups" permission. We need this permission to publish content (posts, videos, photos) into a group on behalf of a person who connected with his Facebook account in my app.
This permission is required for my app to provide users with the benefit of scheduling and publishing posts on their groups.
To see how "publish_to_groups" are used in my app: 1. Inside my app, click "Accounts" from the left menu. 2. Click on the "Add Account" button. 3. A login dialog will open, click on "Facebook Group". 9. Click on the top "CREATE POST" button from the left menu. 10. Select which group you want to post on. 11. Write whatever you want to share with your audience. 12. On the right bottom, click on the "Post now" button or you can pick a time to schedule. If you click "Post now" the post should be published in a minute to the selected group.
You can test it here: |
You need to show how to add a Facebook group and how to create and publish a post to a group. Also, show that after publishing you can open the original post on the Facebook site. |
|
instagram_basic |
We need this permission to read an Instagram Business account profile's info. We need to get the basic metadata of an Instagram Business account profile: ID, Username, Profile Picture, and number of followers.
To see how "instagram_basic" is used in my app: 1. Inside my app, click "Accounts" from the left menu. 2. Click on the "Add Account" button. 3. A login dialog will open, click on "Instagram". 9. Also, you can see the number of followers of your Instagram account by visiting the "Dashboard" page, from the left menu, then select your Instagram Account. Here you will see the Audience graph. Our app collects the number of followers every 3 hours.
You can test it here: |
You must show how a user can connect an Instagram profile, accept the permission, select the Instagram profiles from the list, and show the connected profiles on the Accounts page. Also, show only the Audience graph. |
|
instagram_content_publish |
After the user adds an Instagram profile to my app, we need this permission to allow users to publish photo and video posts on behalf of a connected Creator/Business Instagram account profile.
This permission is required for my app to provide users with the benefit of scheduling and publishing posts on Instagram.
To see how "instagram_content_publish" is used in my app: 1. Inside my app, click "Accounts" from the left menu. 2. Click on the "Add Account" button. 3. A login dialog will open, click on "Instagram". 9. Click on the top "CREATE POST" button from the left menu. 10. Select which Instagram account you want to post on. 11. Write whatever you want to share with your audience. 12. Upload an image or a video from the editor menu. (the second button) 13. On the right bottom, click on the "Post now" button or you can pick a time to schedule. If you click "Post now" the post should be posted in a minute to the selected Instagram account.
You can test it here: |
You must show how a user can connect an Instagram profile, accept the permission, select the Instagram profiles from the list, and show the connected profiles on the Accounts page.
You must show how you are creating the post/reel and publishing it. Also, show that after publishing you can open the original post on the Instagram site. |
|
instagram_manage_insights |
We need this permission to access insights for the Instagram Business account profile. By accessing these insights, we can provide our users with metrics like reach, impressions, profile views, phone call clicks, and more. It helps users to understand what content is resonating with their audience and what to post to maximize their audience engagement.
By being granted the 'instagram_manage_insights' permission, our app can offer users a comprehensive, detailed, and valuable view of their Instagram Business account performance.
To see how "instagram_manage_insights" are used in my app: 1. Inside my app, click "Accounts" from the left menu. 2. Click on the "Add Account" button. 3. A login dialog will open, click on "Instagram". 9. Click on the "Dashboard" button from the left menu and select the Instagram account you added. Here you will see all metrics. The data is collected by my app every 2 hours.
You can test it here: |
You must show how a user can connect an Instagram profile, accept the permission, select the Instagram profiles from the list, and show the connected profiles on the Accounts page.
You must show the Mixpost Analytics page of an Instagram profile. |
To be able to post on Instagram, you must configure a Facebook application. Because Facebook and Instagram belong to the same company Meta.
Important info 👇
To be able to connect Instagram accounts to Mixpost, it is necessary to:
- Convert your Instagram account to a business account
- Link your Instagram account to a Facebook page.
With Google's service, you will be able to post videos on your YouTube channel.
Prerequisites
Before you start, make sure you have the following:
- A Google account
- A project in Google Console
Steps
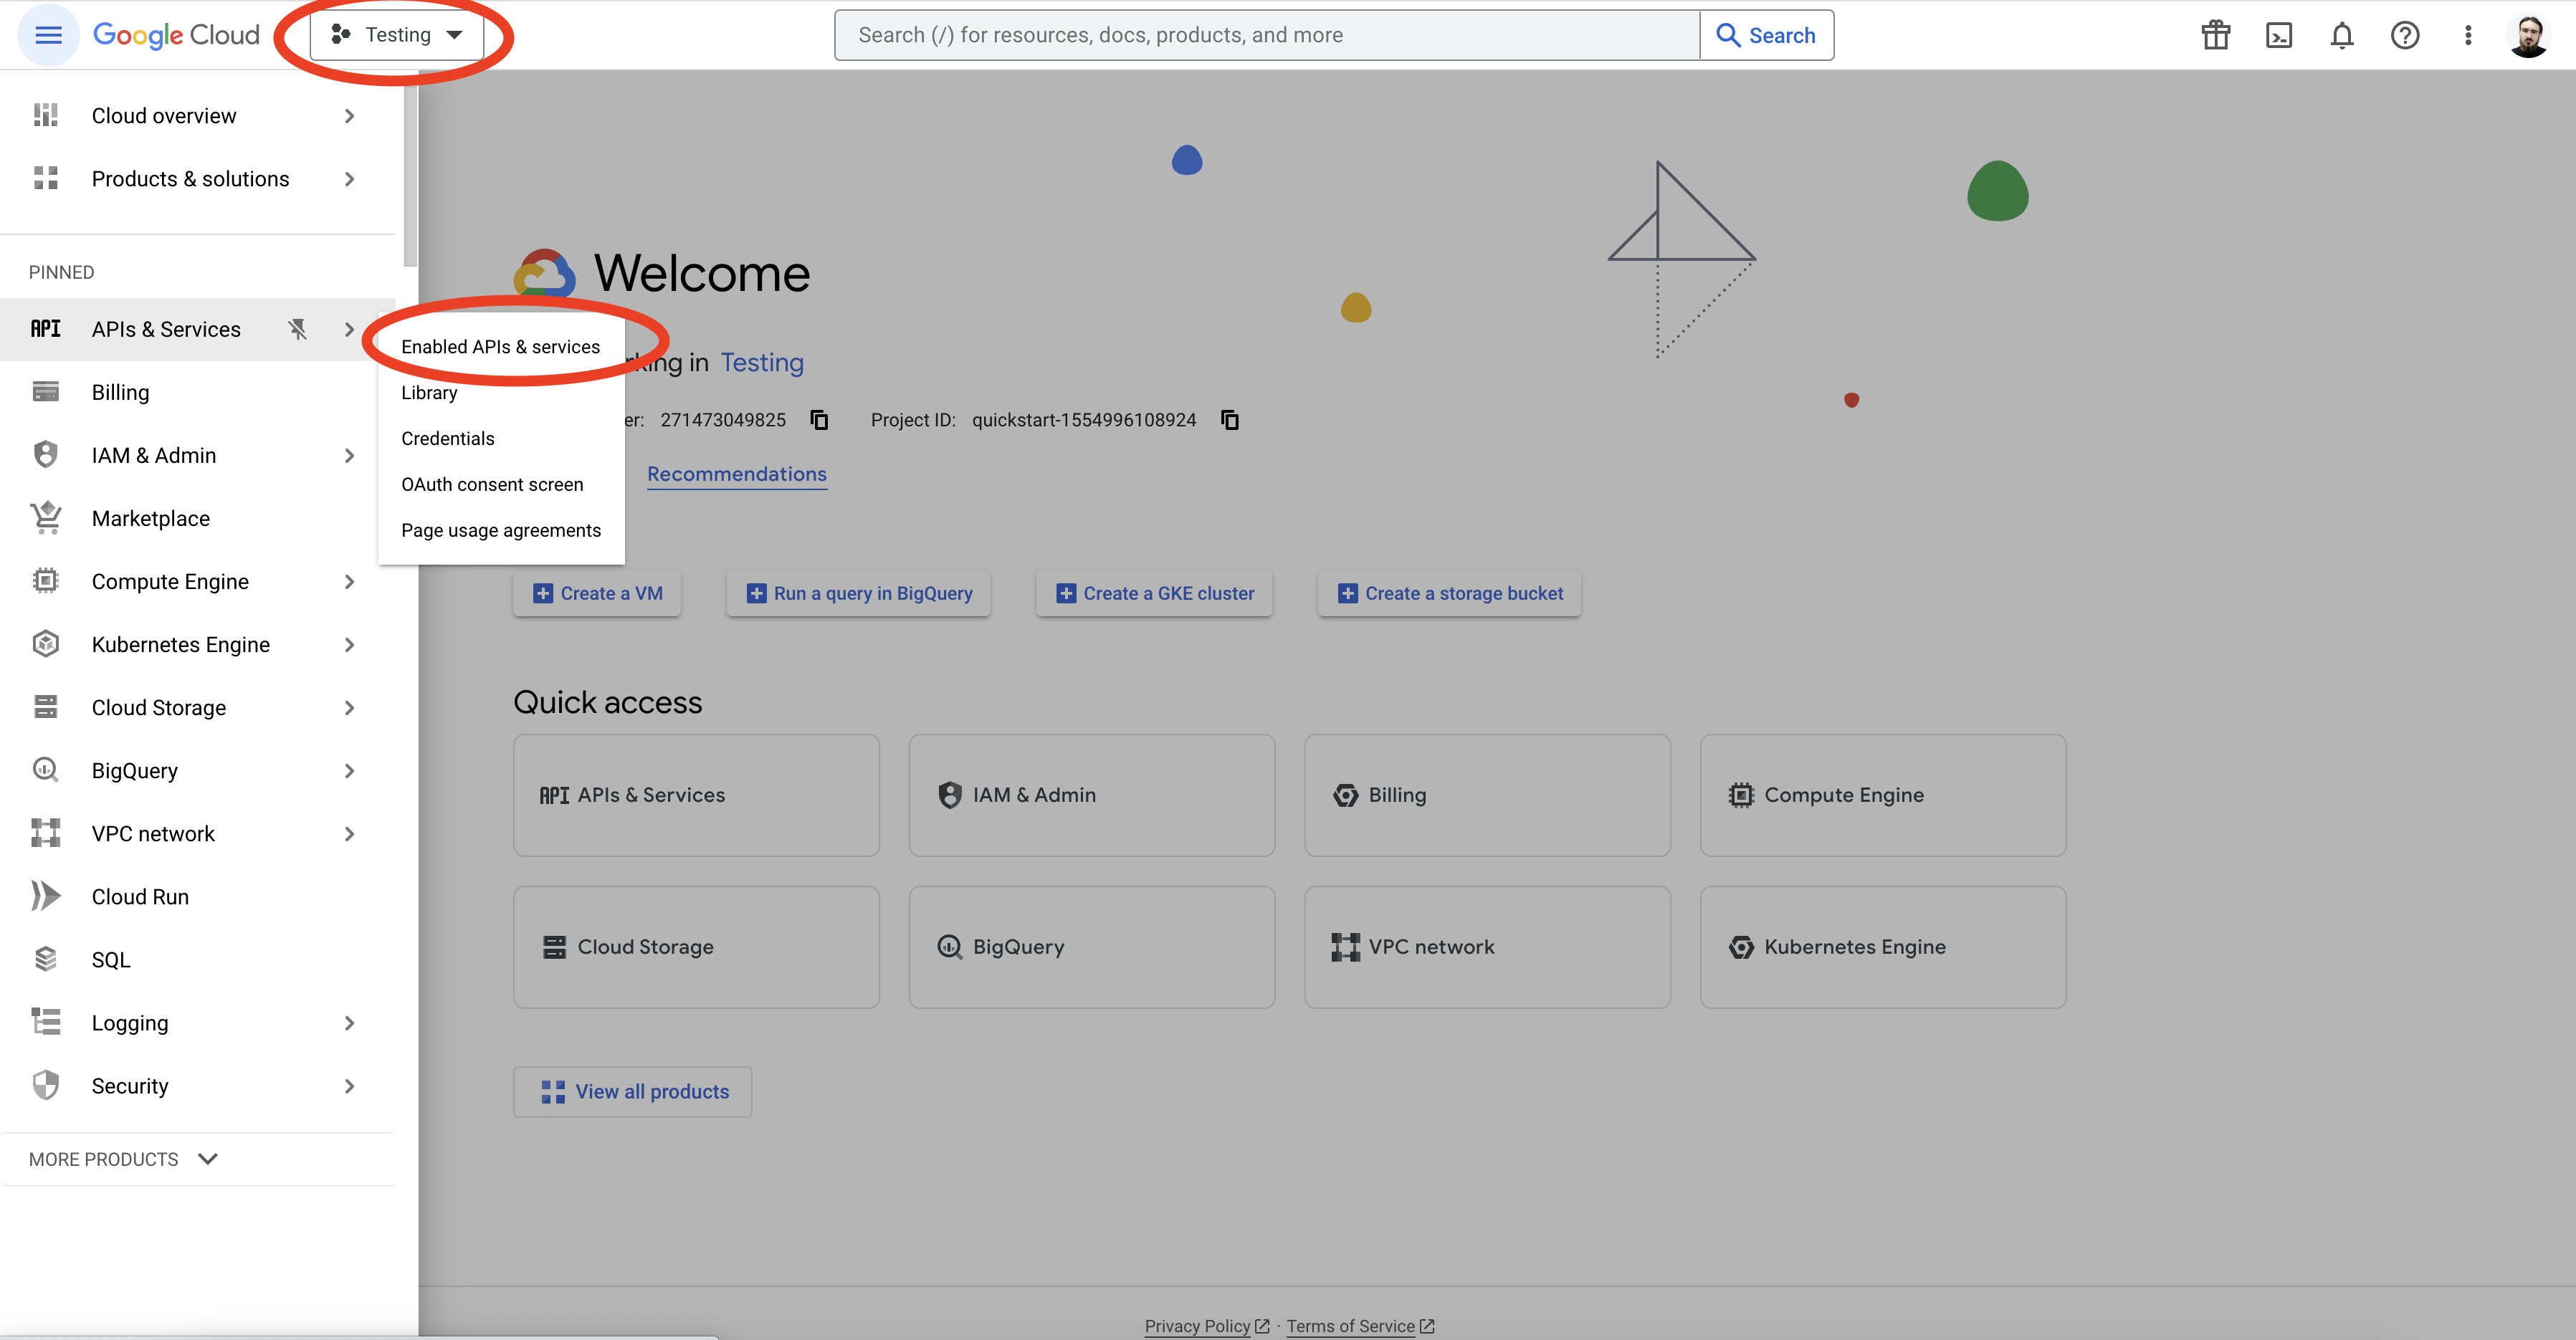
- Go to the Google Console and select your project.
- Click on the “Enable APIs and Services” button.
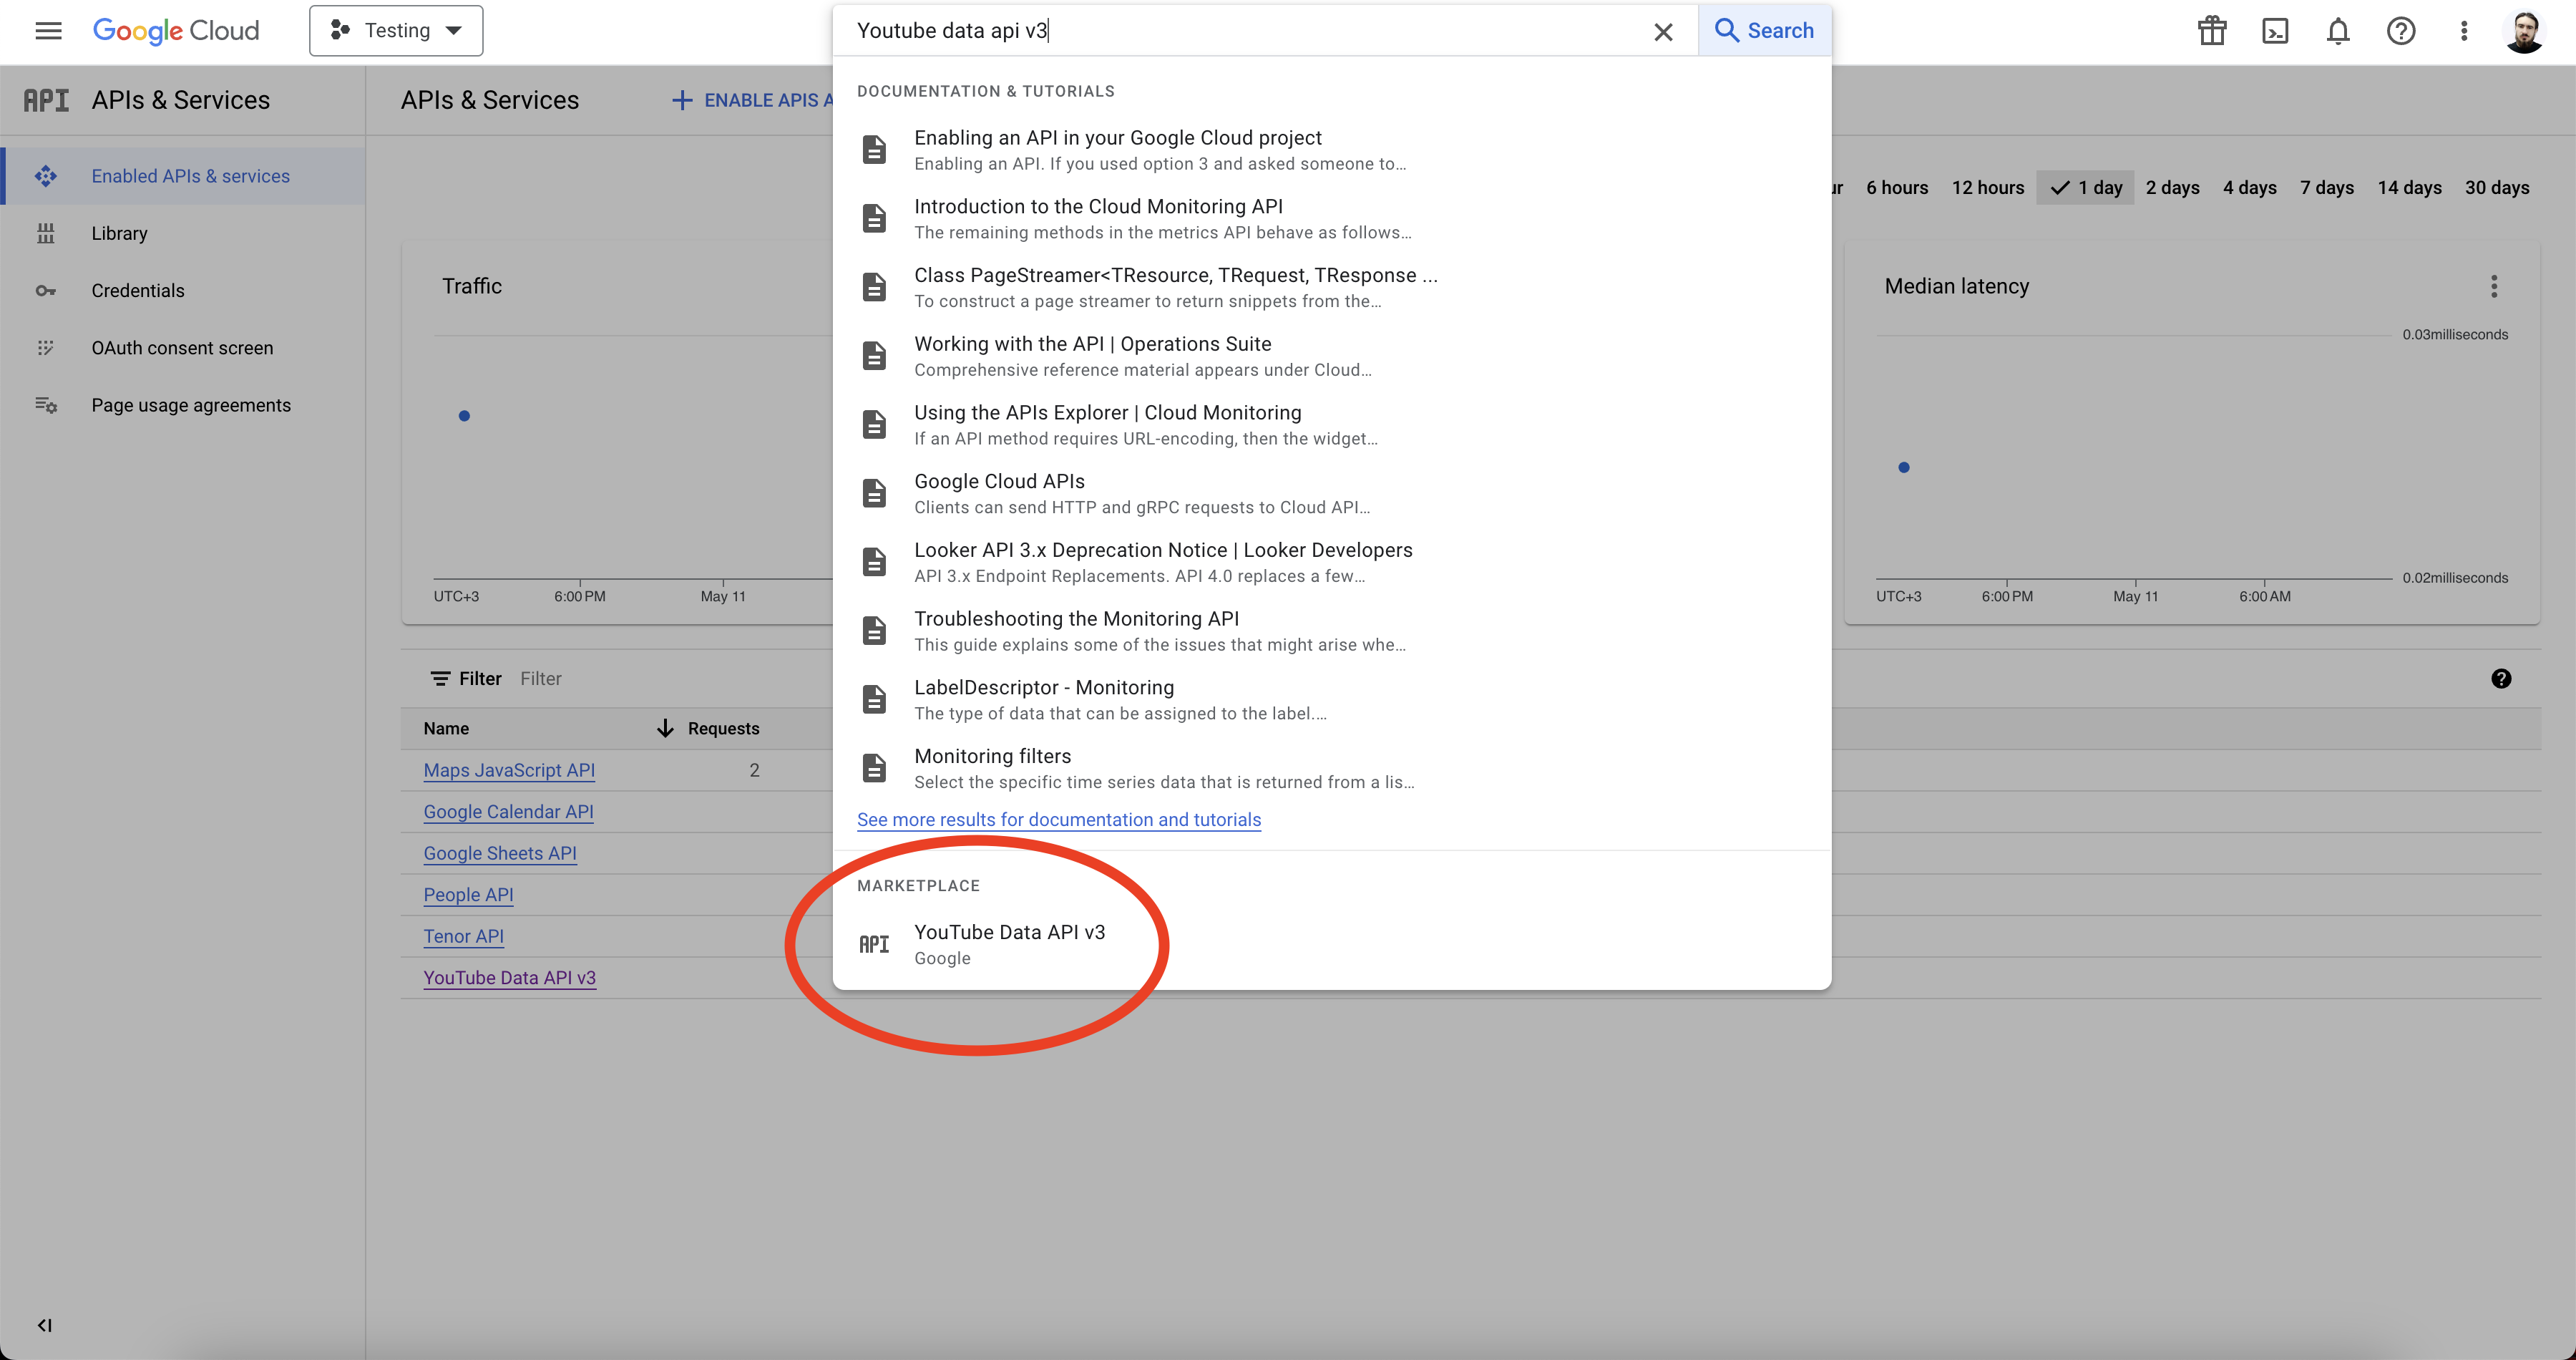
- Search for “Youtube Data Api v3” in the search bar and select it from the list.
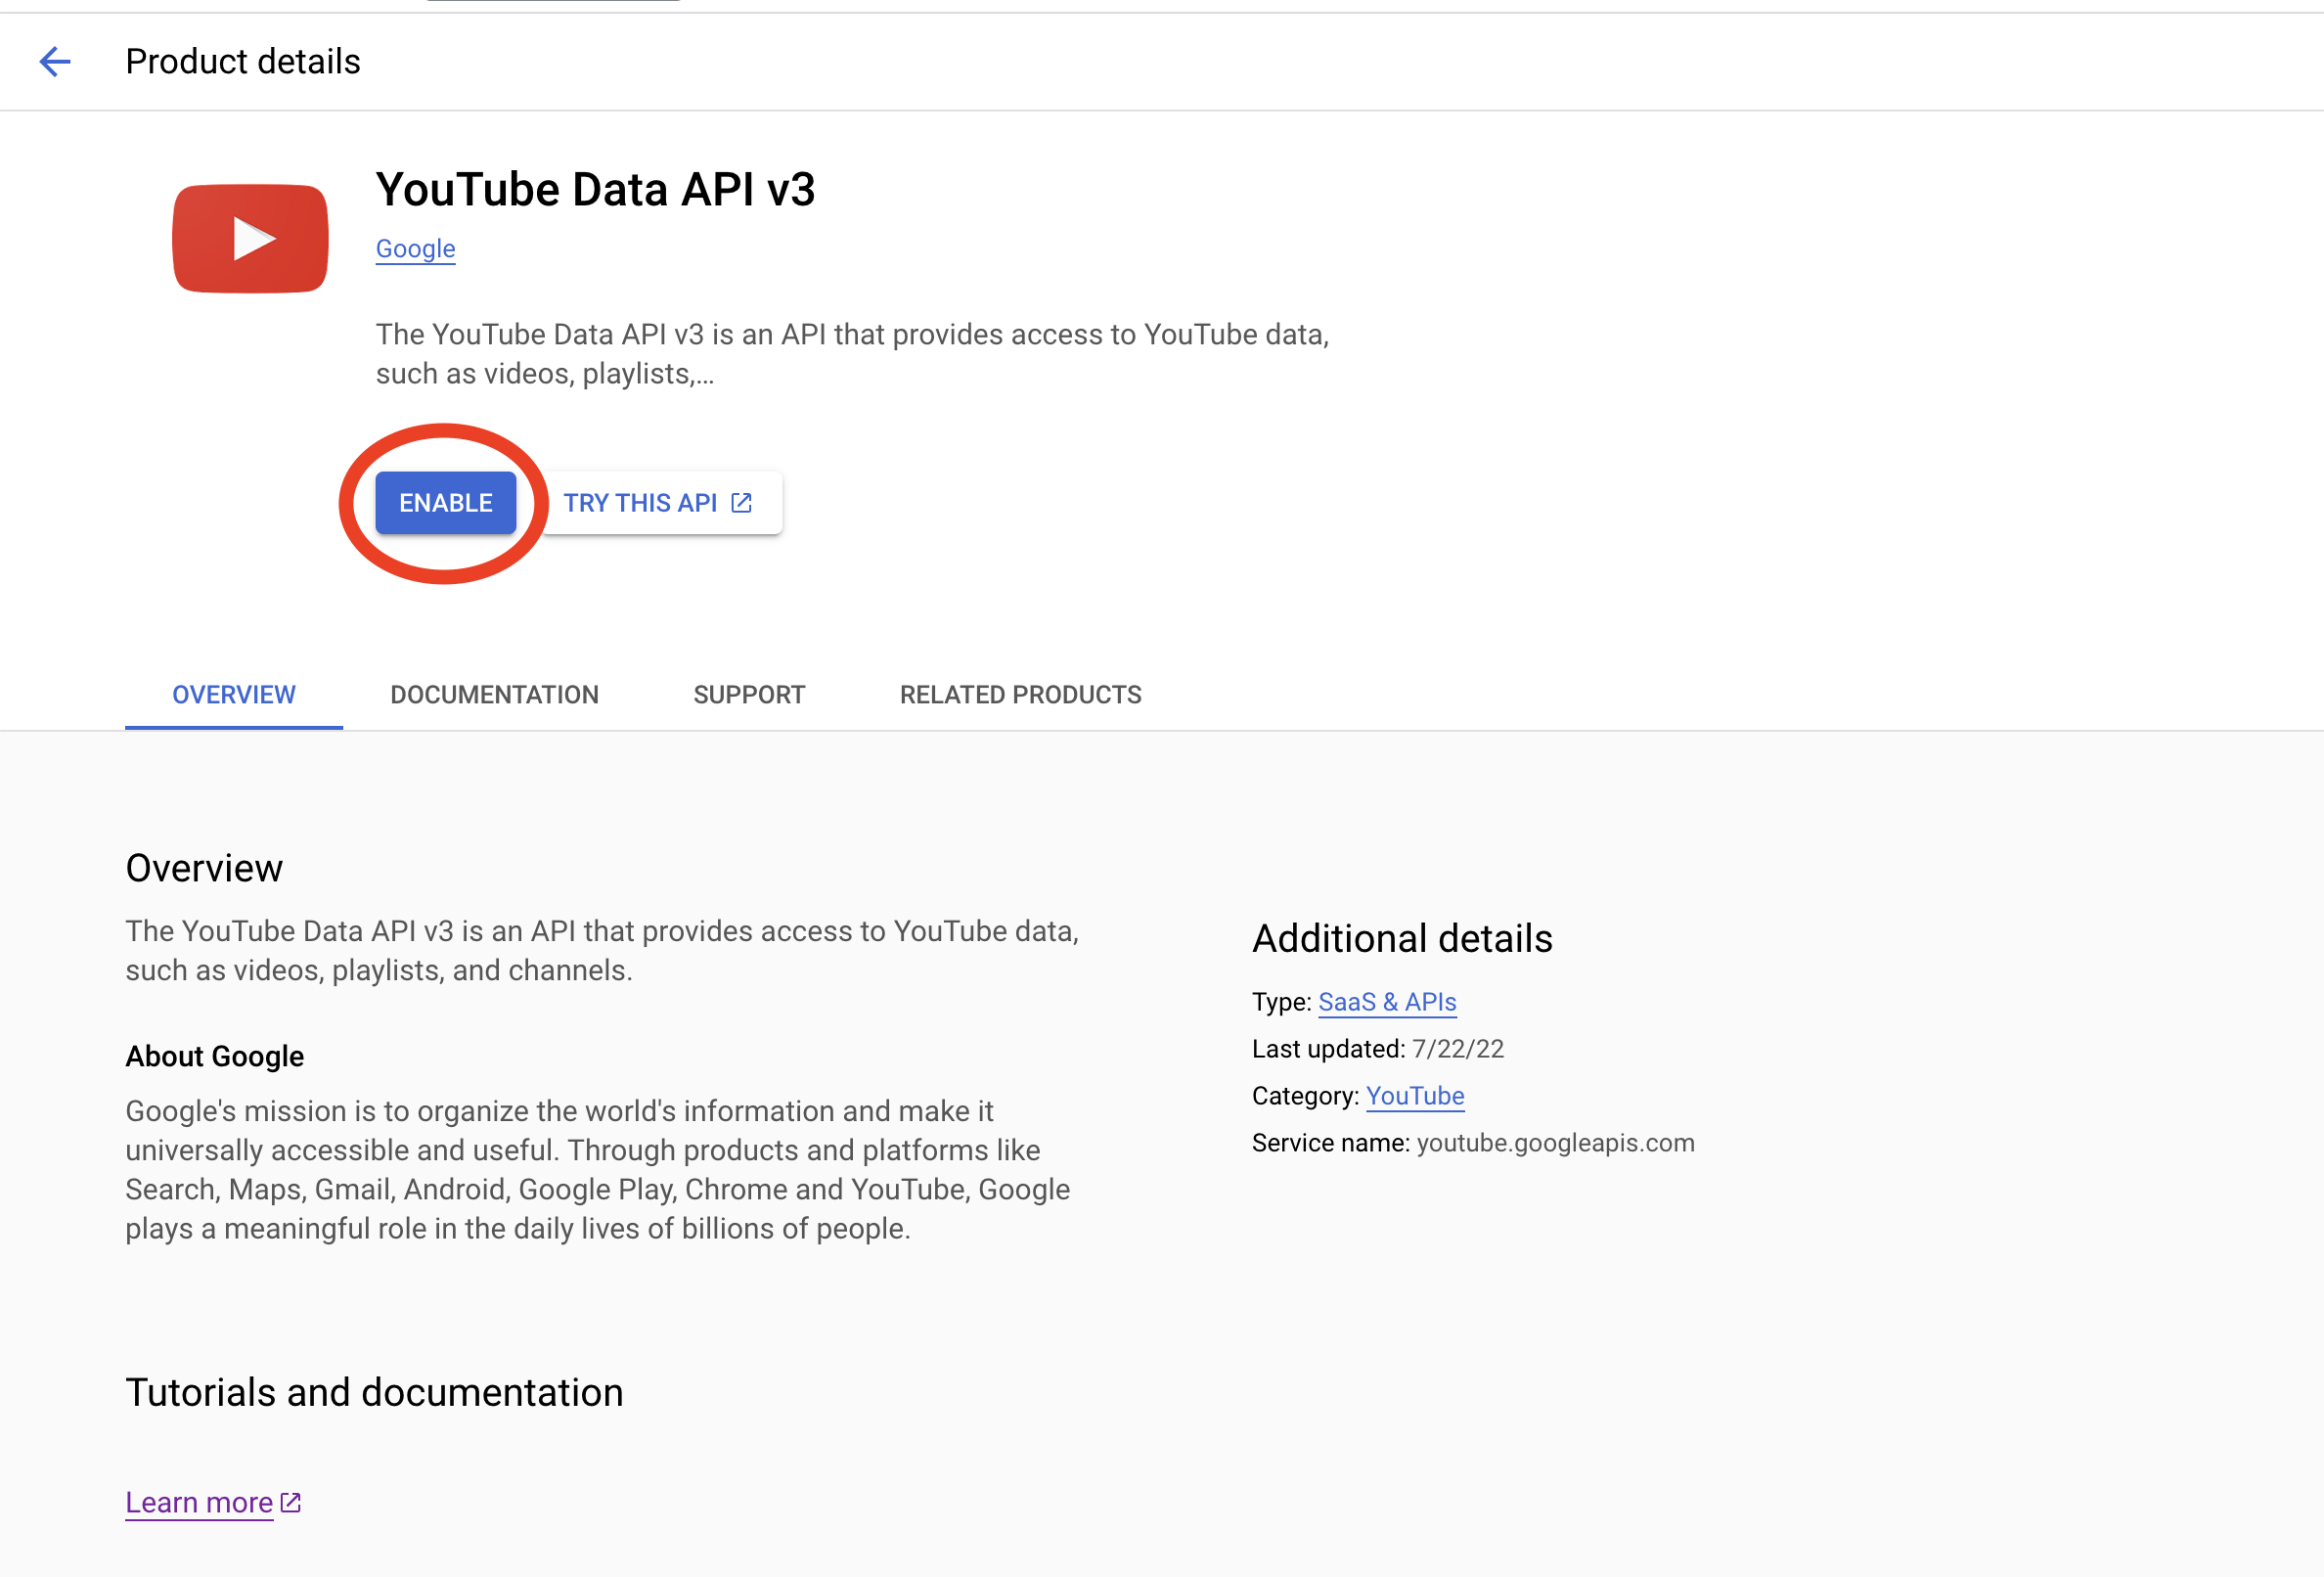
- Click on the “Enable” button to enable the Youtube Data API v3.
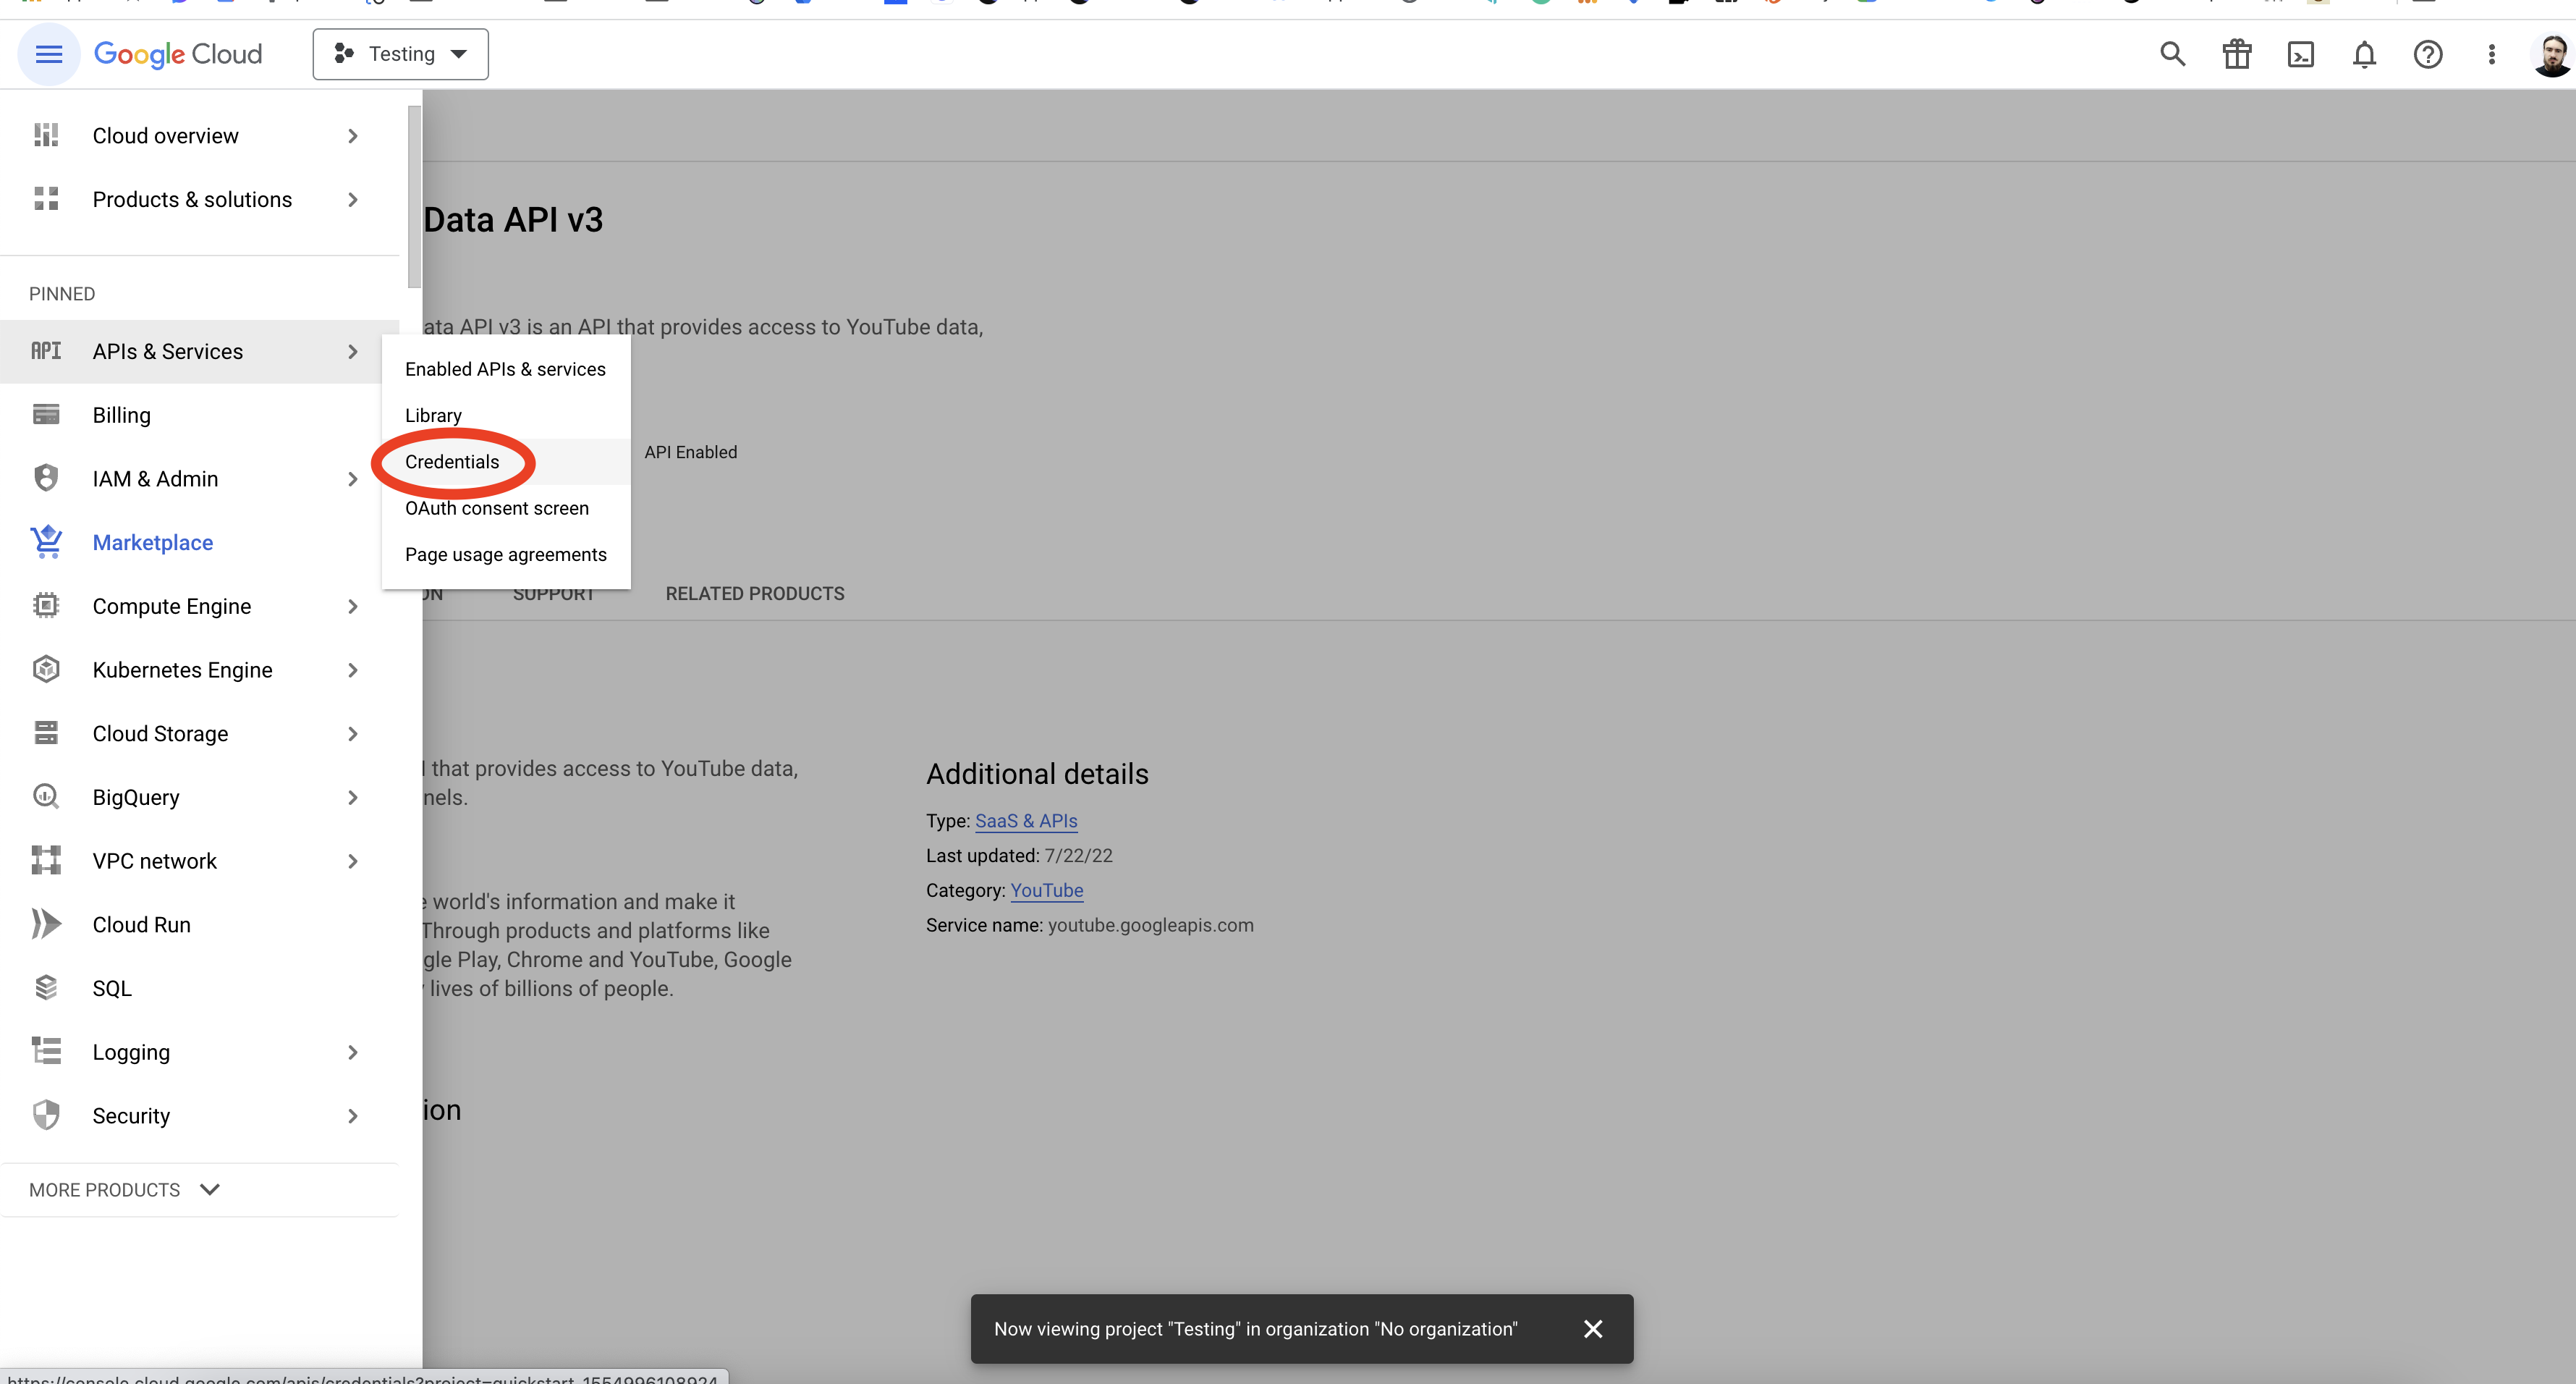
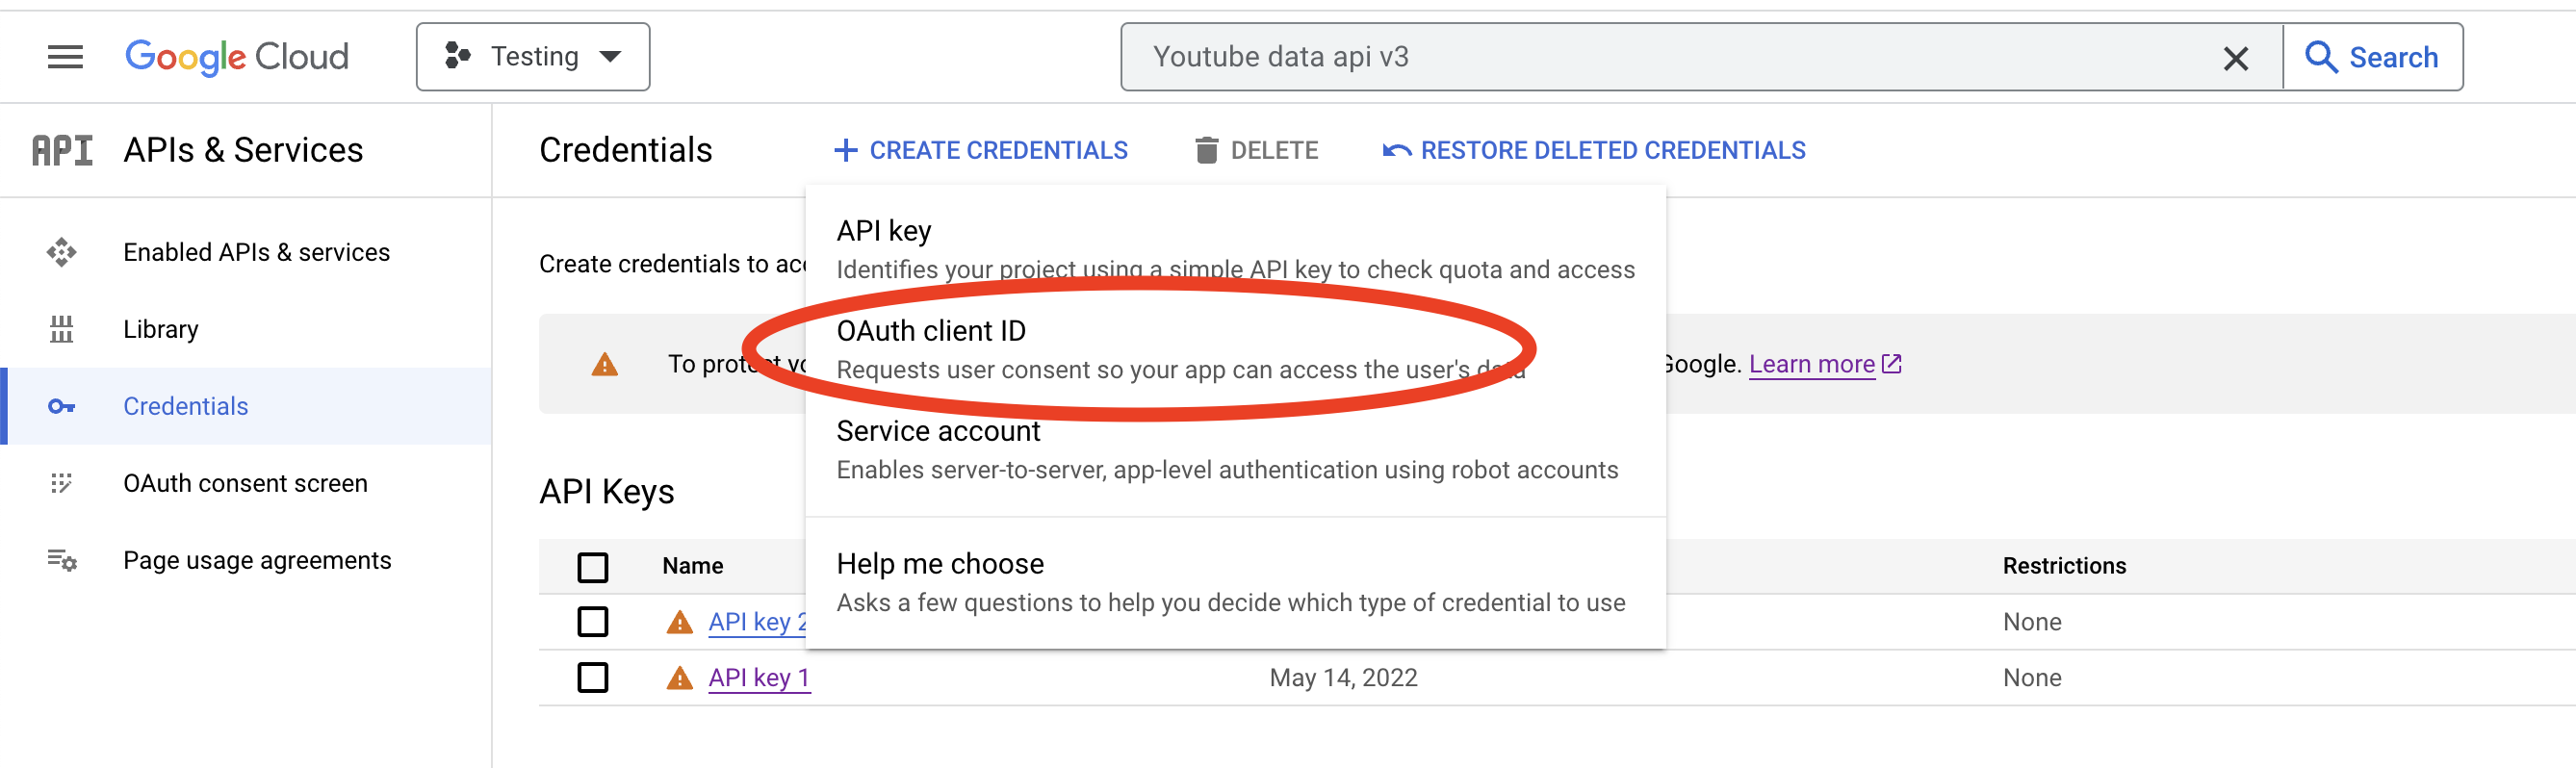
- Go to the “Credentials” tab and click on the “Create credentials” button.
- Select “OAuth client ID” from the dropdown menu.
- Google may request you to set up the "OAuth consent screen". Go to the "OAuth consent screen" and finish the setup. Then continue to add "OAuth client ID".
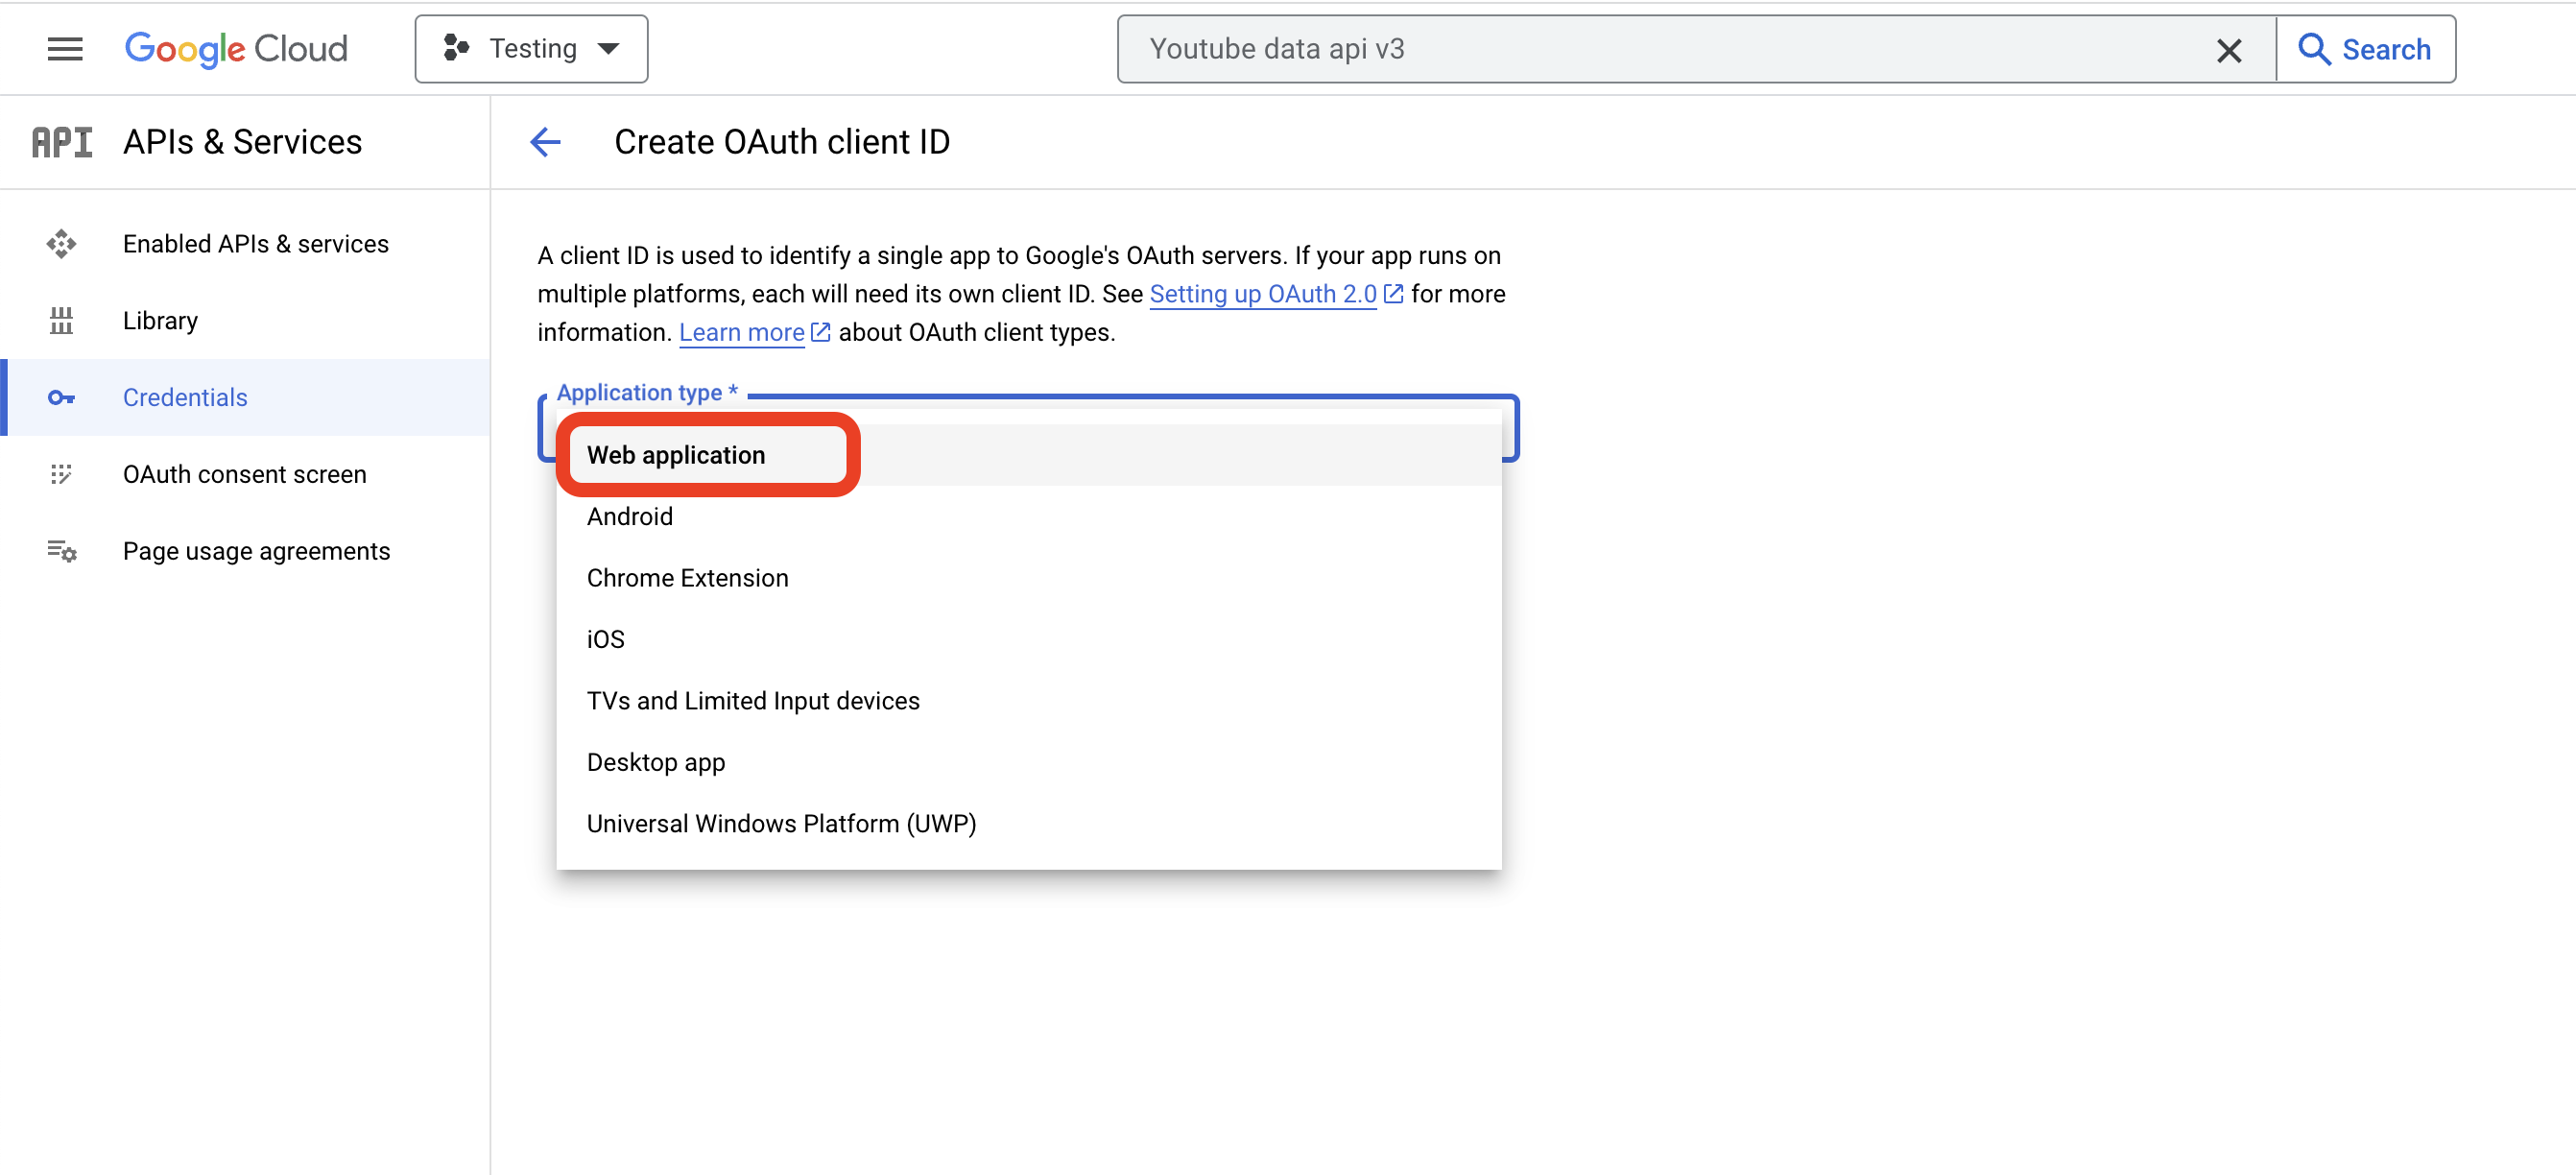
- Select Application Type -> Web application
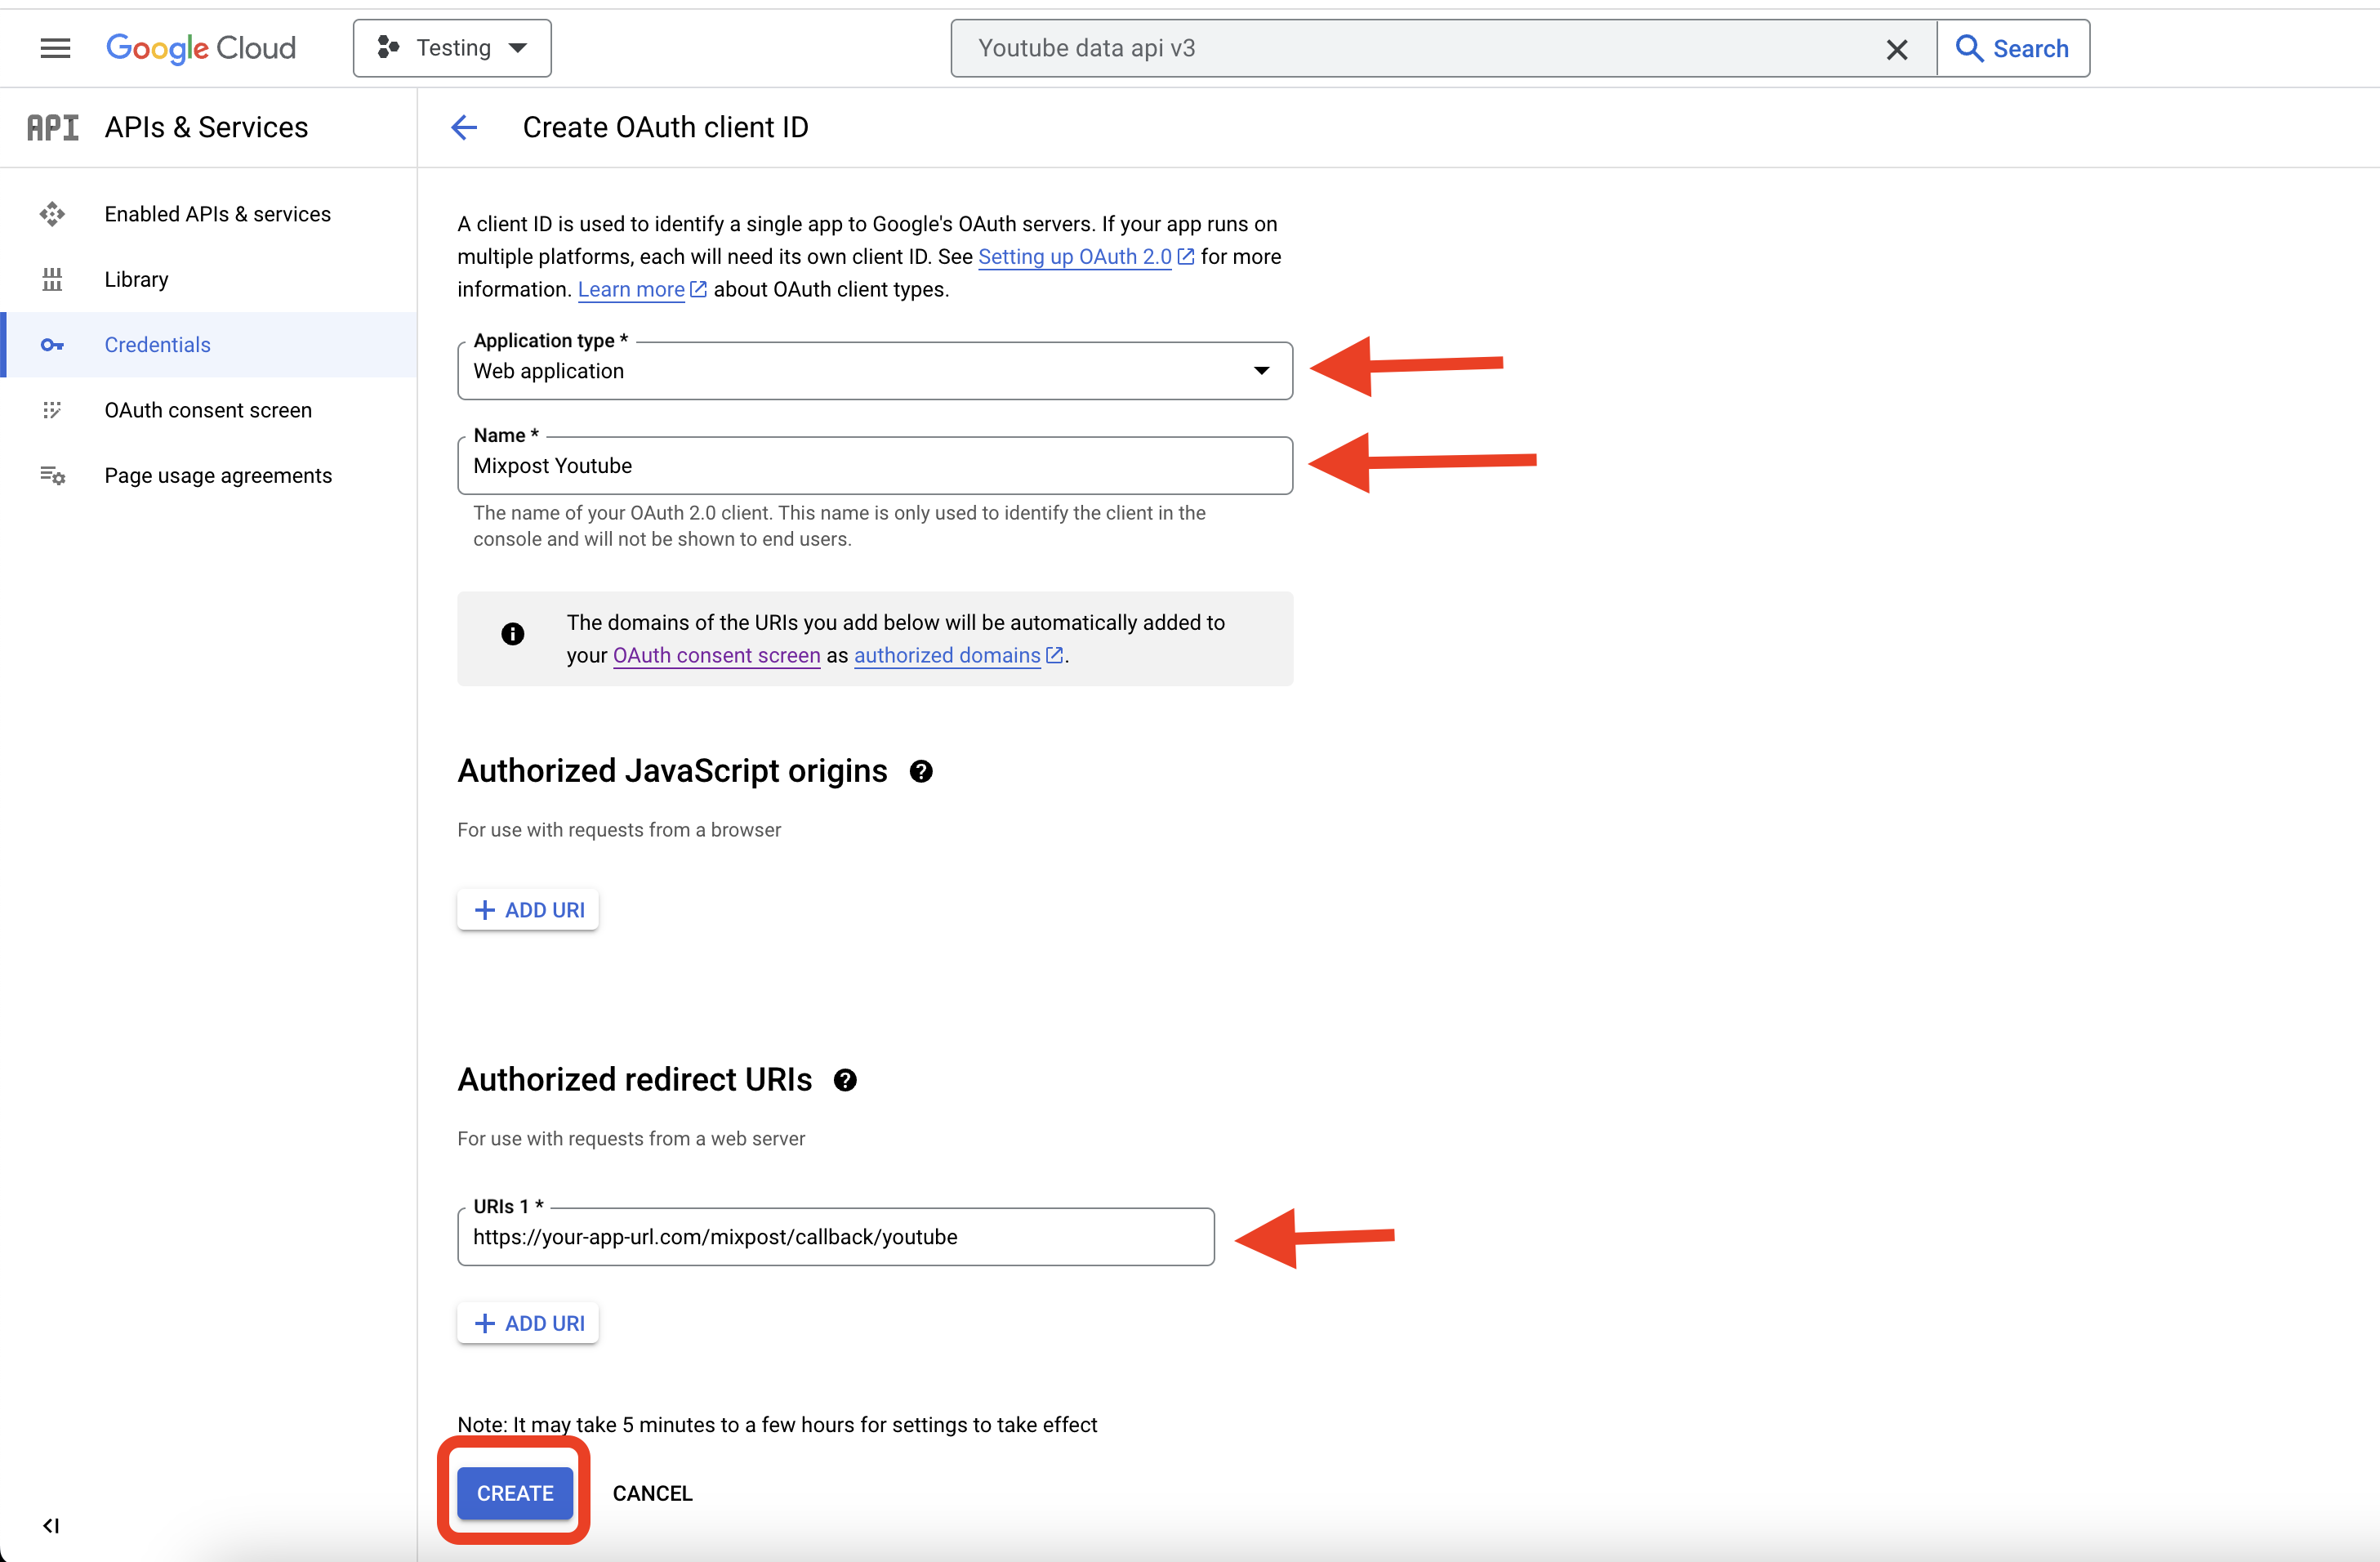
- Define a name
- Add an "Authorized redirect URIs". The pattern is: https://your-app-url.com/mixpost/callback/youtube
- Click on the "Create" button.
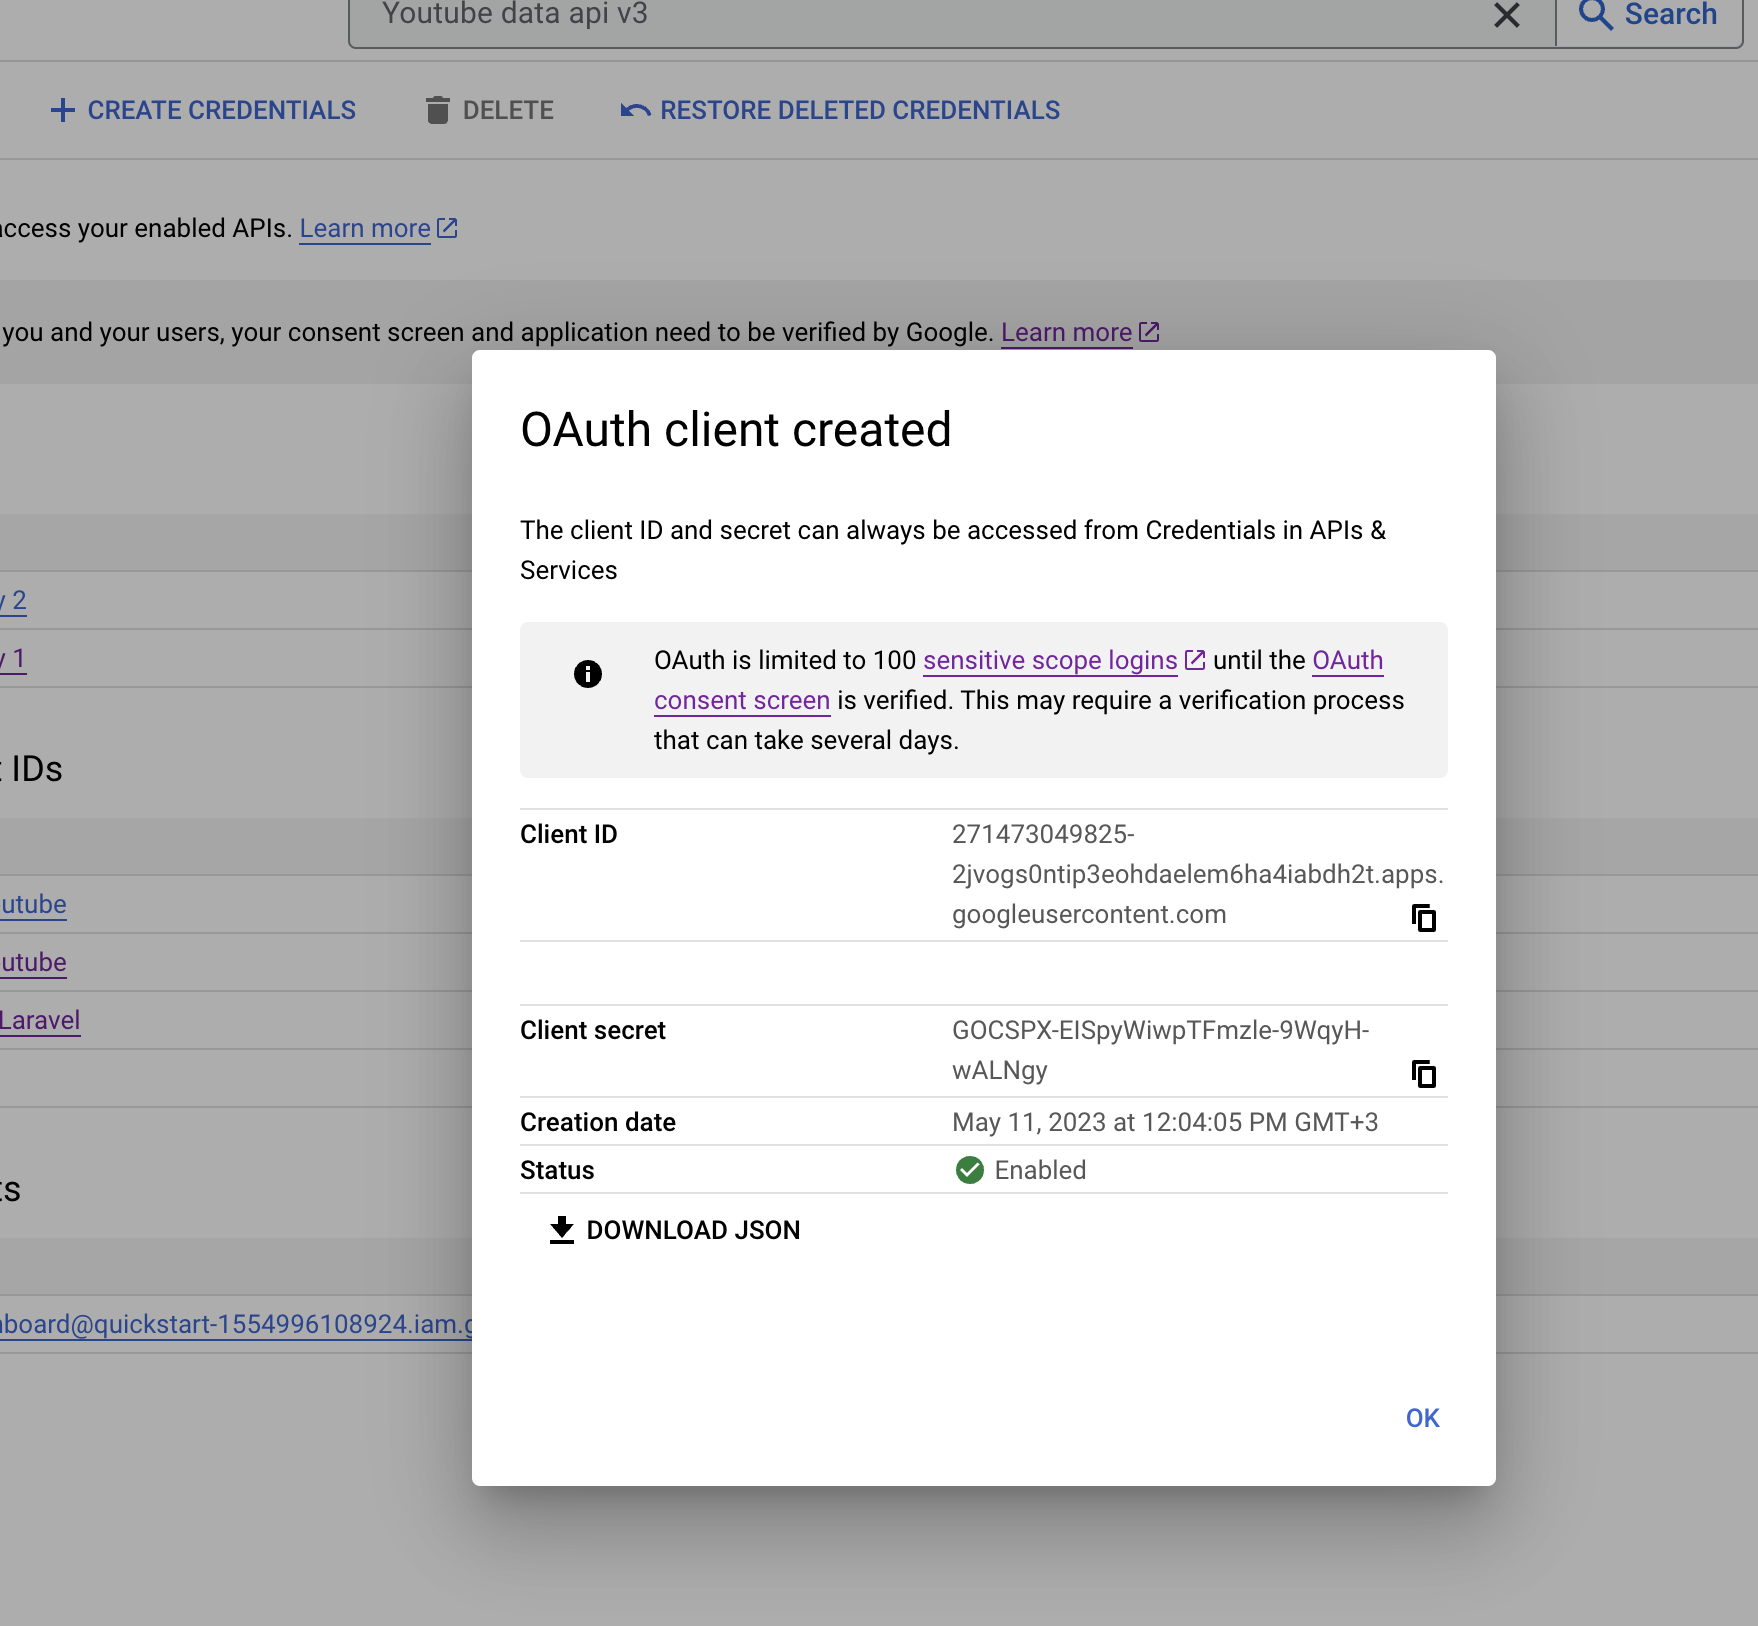
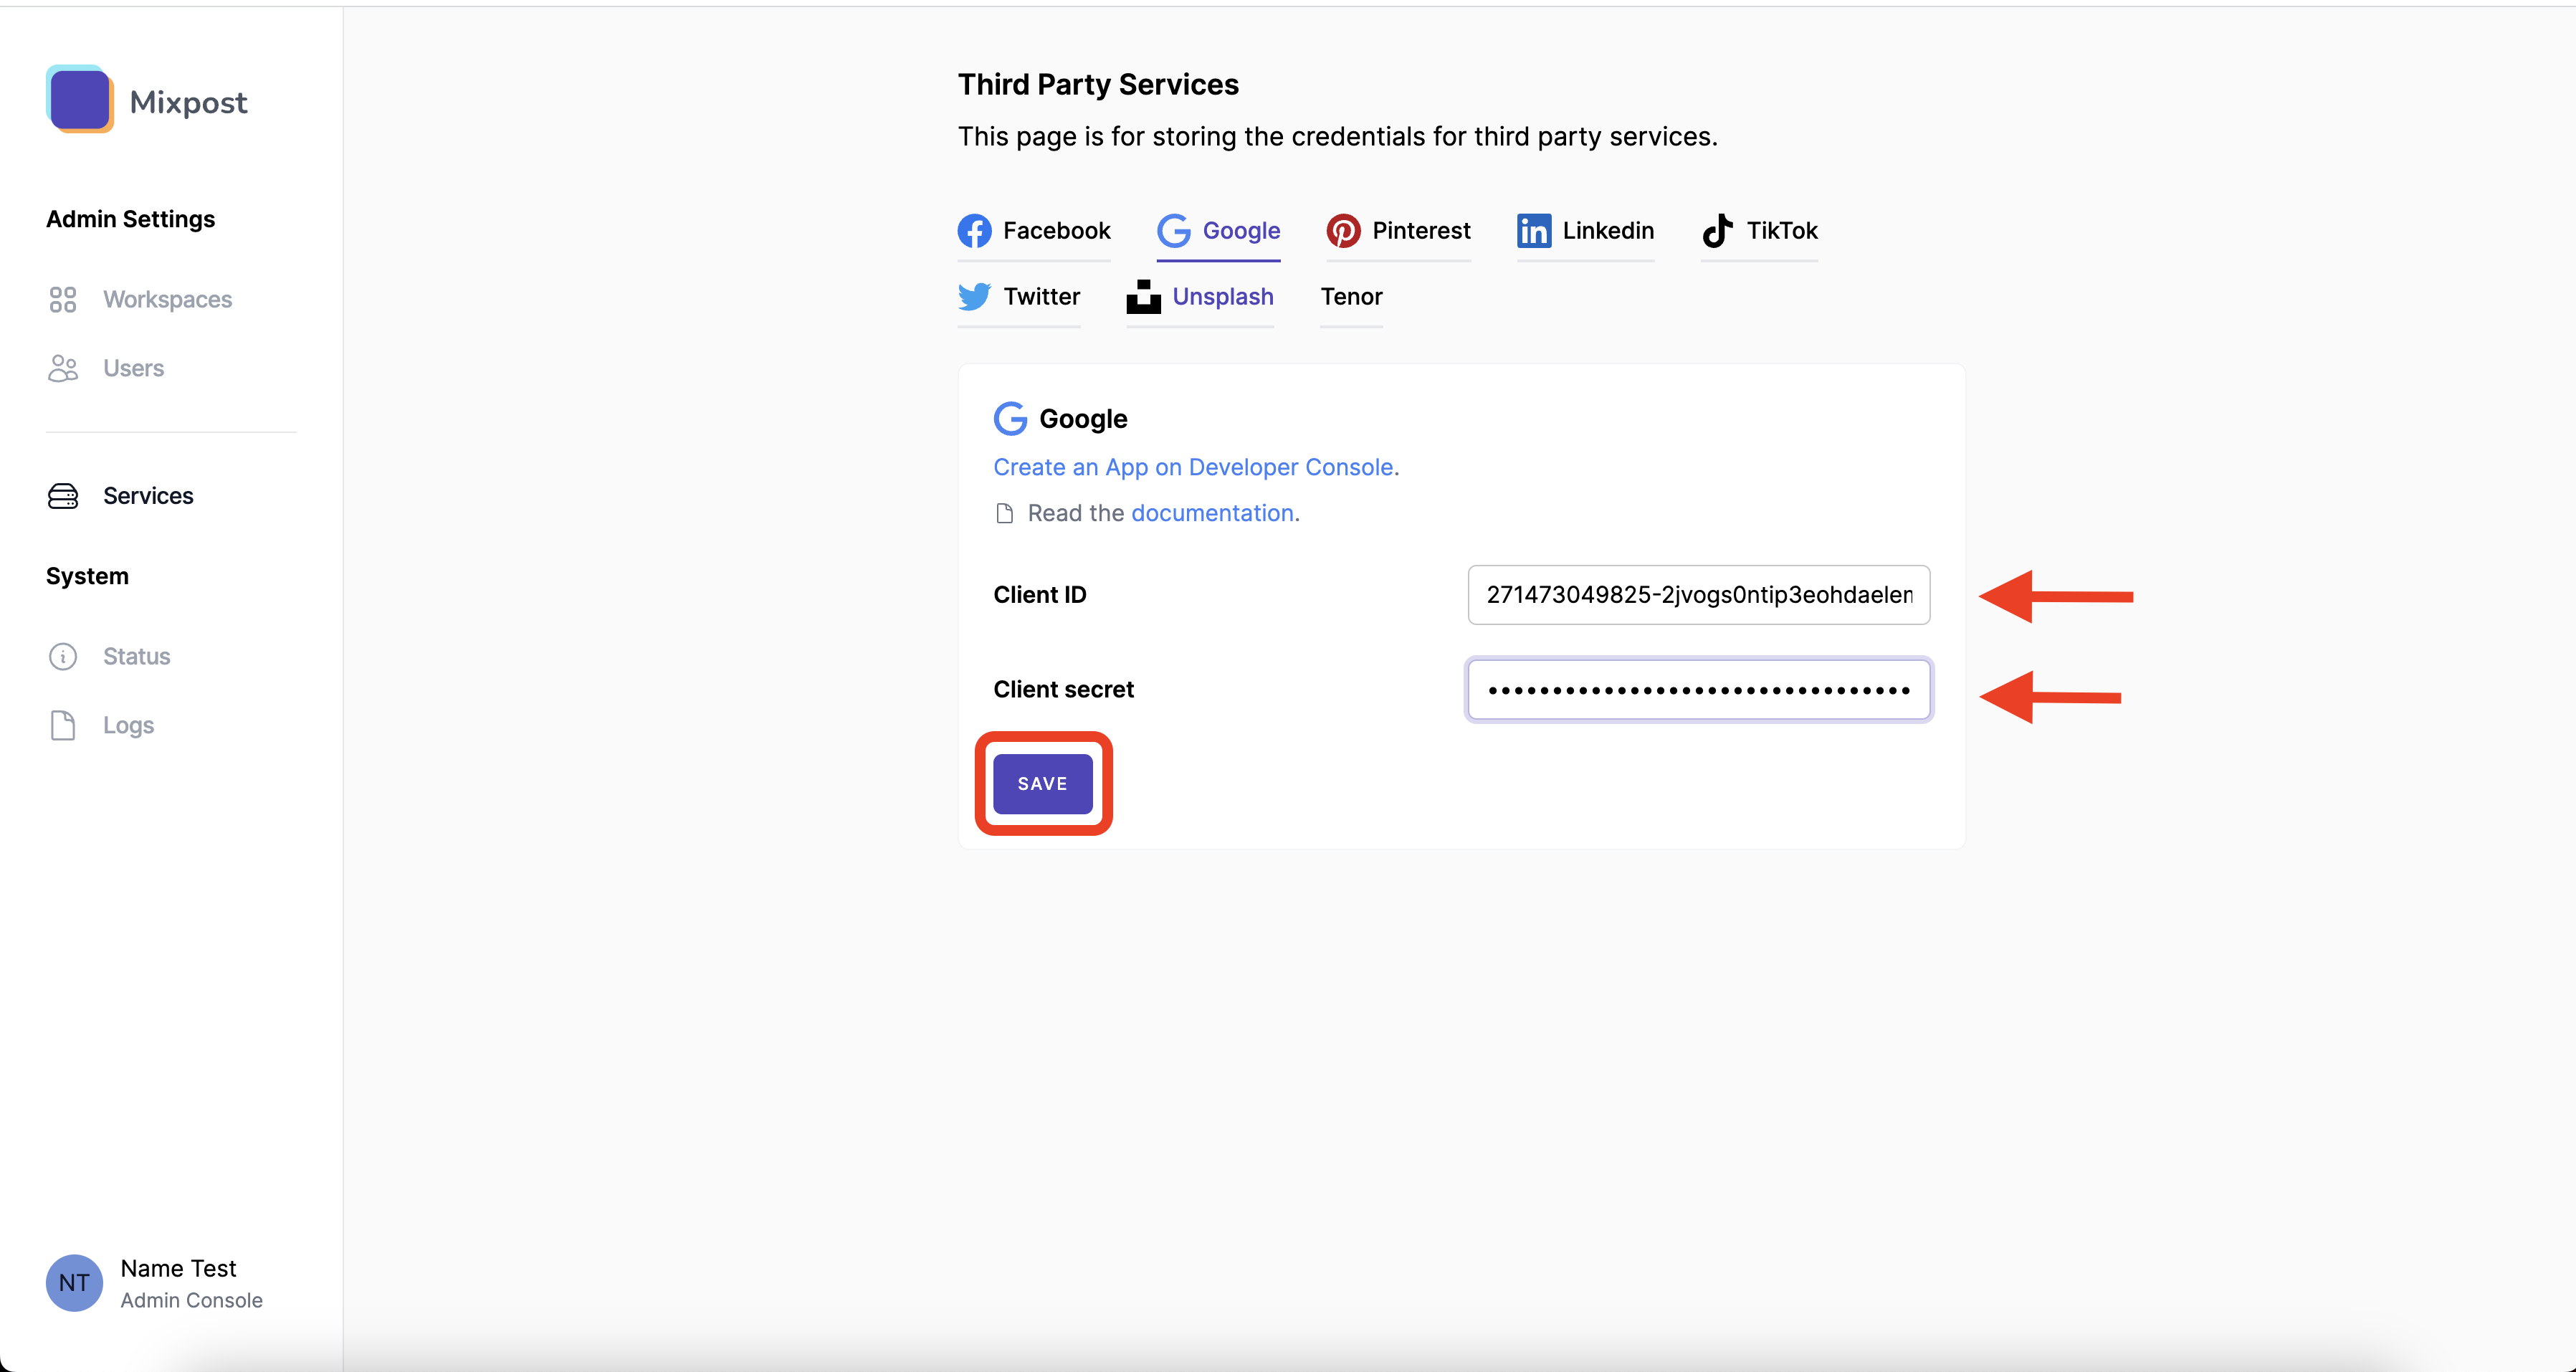
- Copy your Client Id and Client Secret and use them in your Mixpost app.
Quota
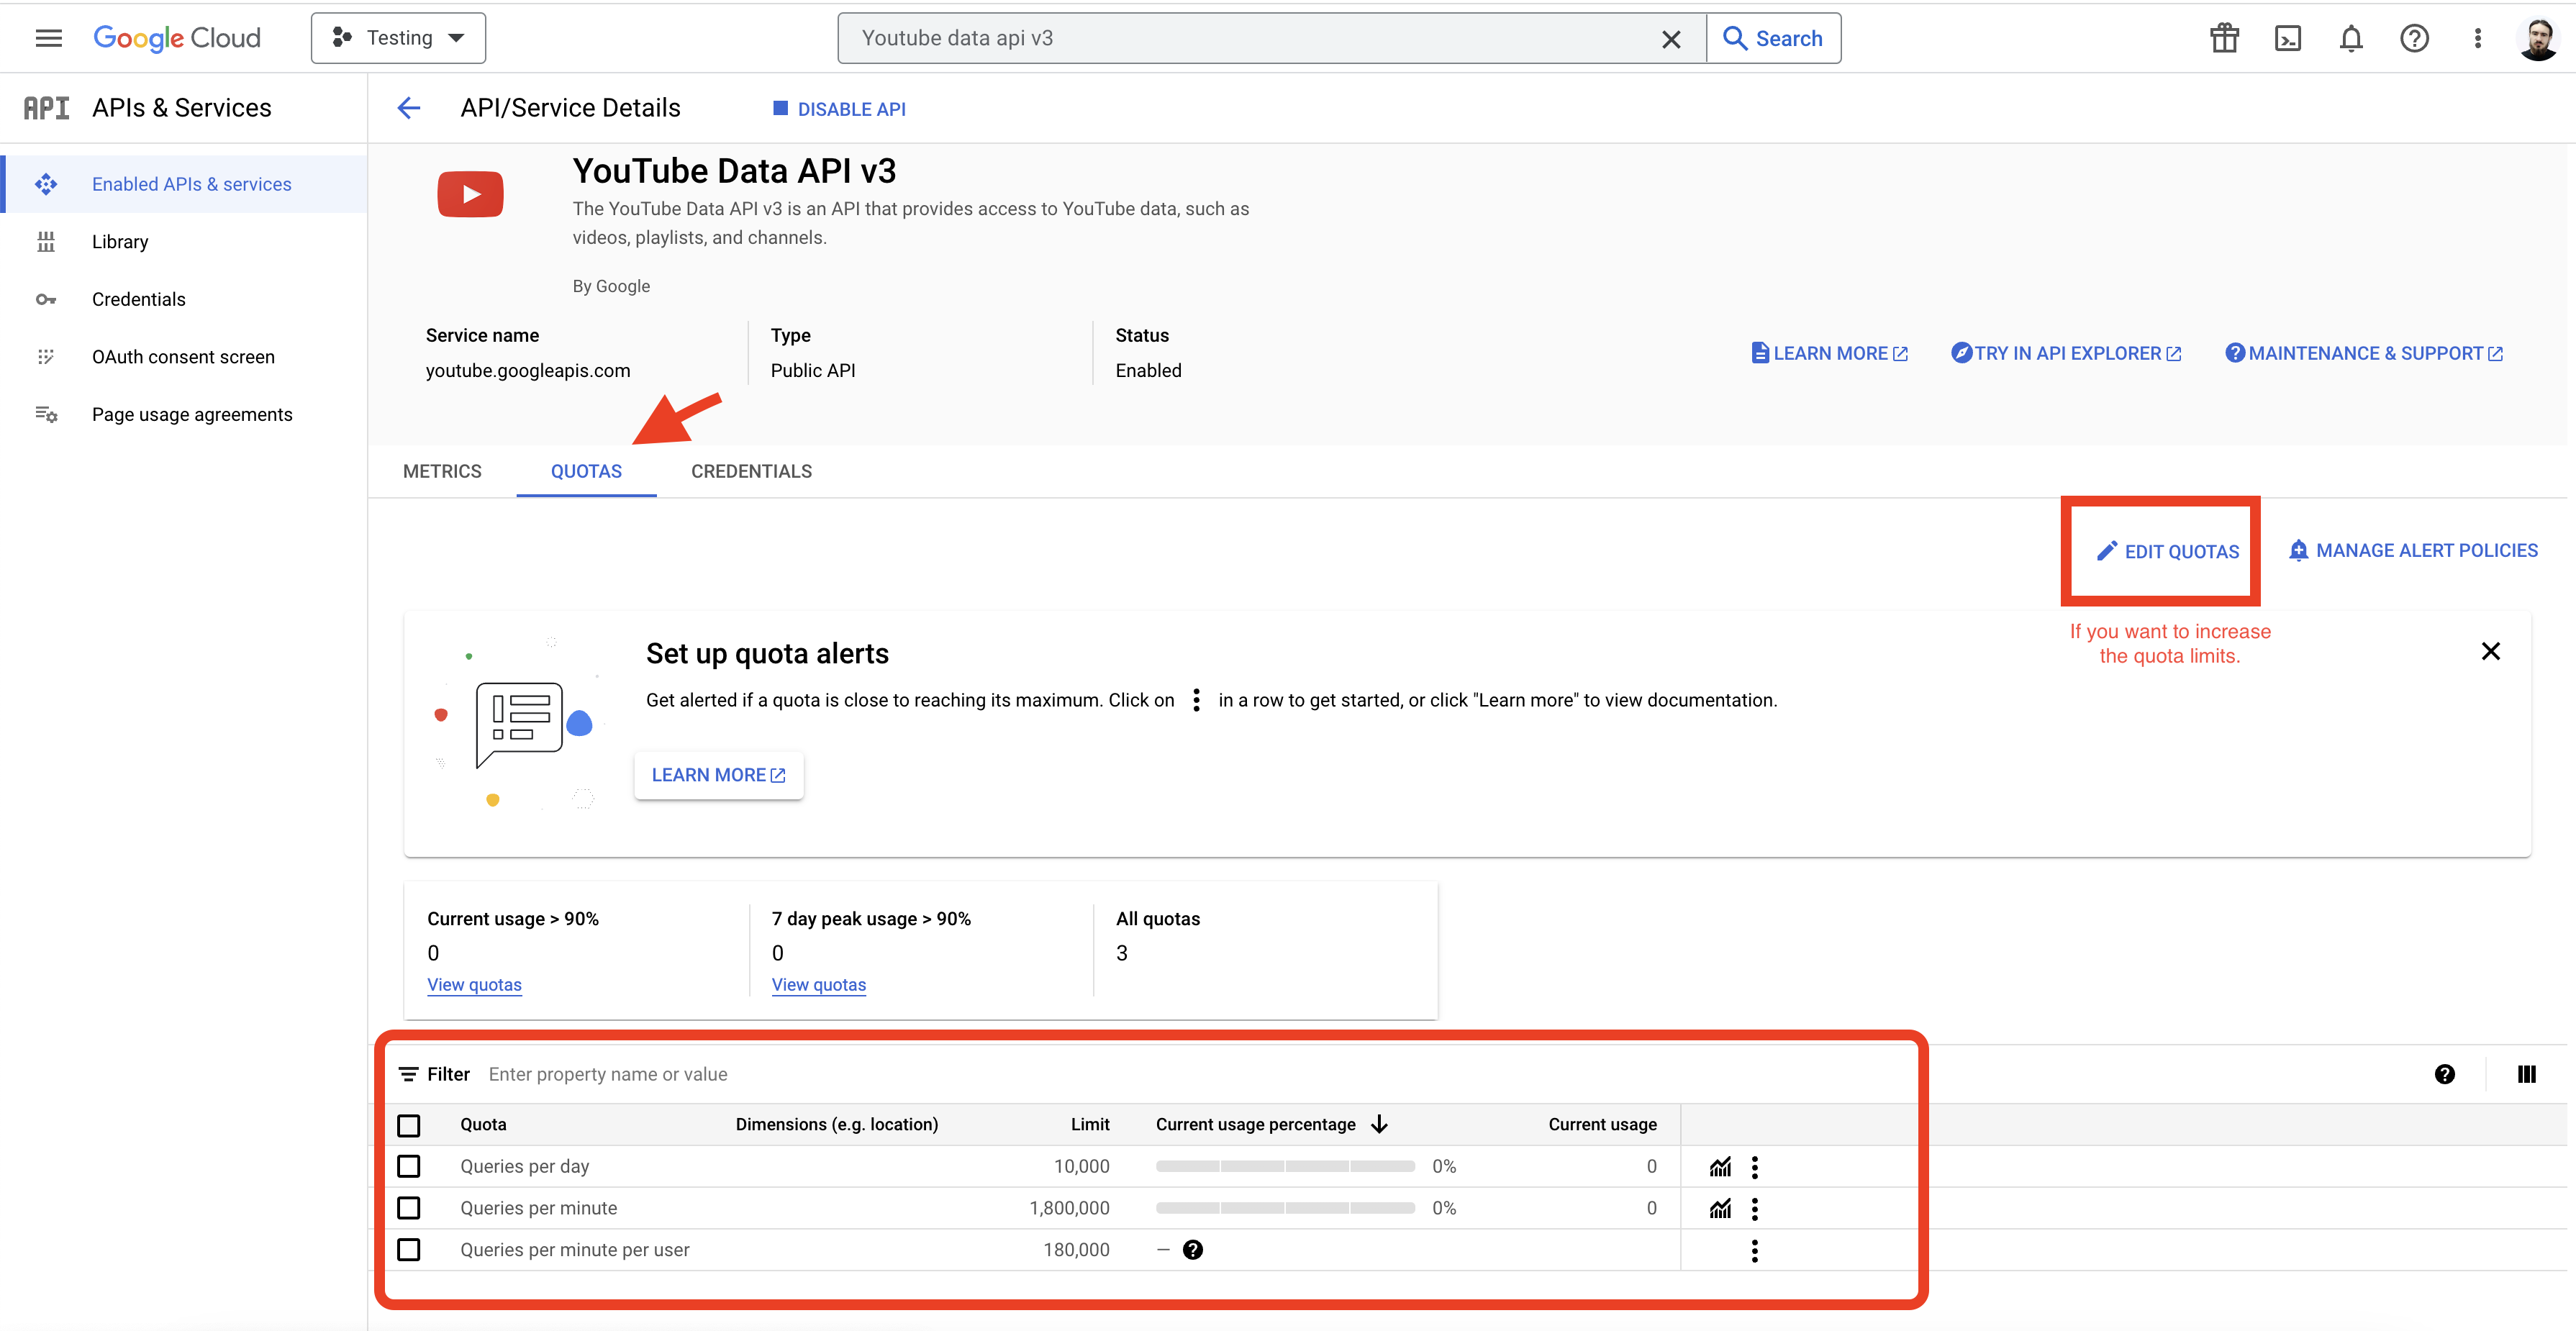
Youtube has quota limits, you can follow them on the page:
Enabled APIs & services then, look for Youtube Data API v3. 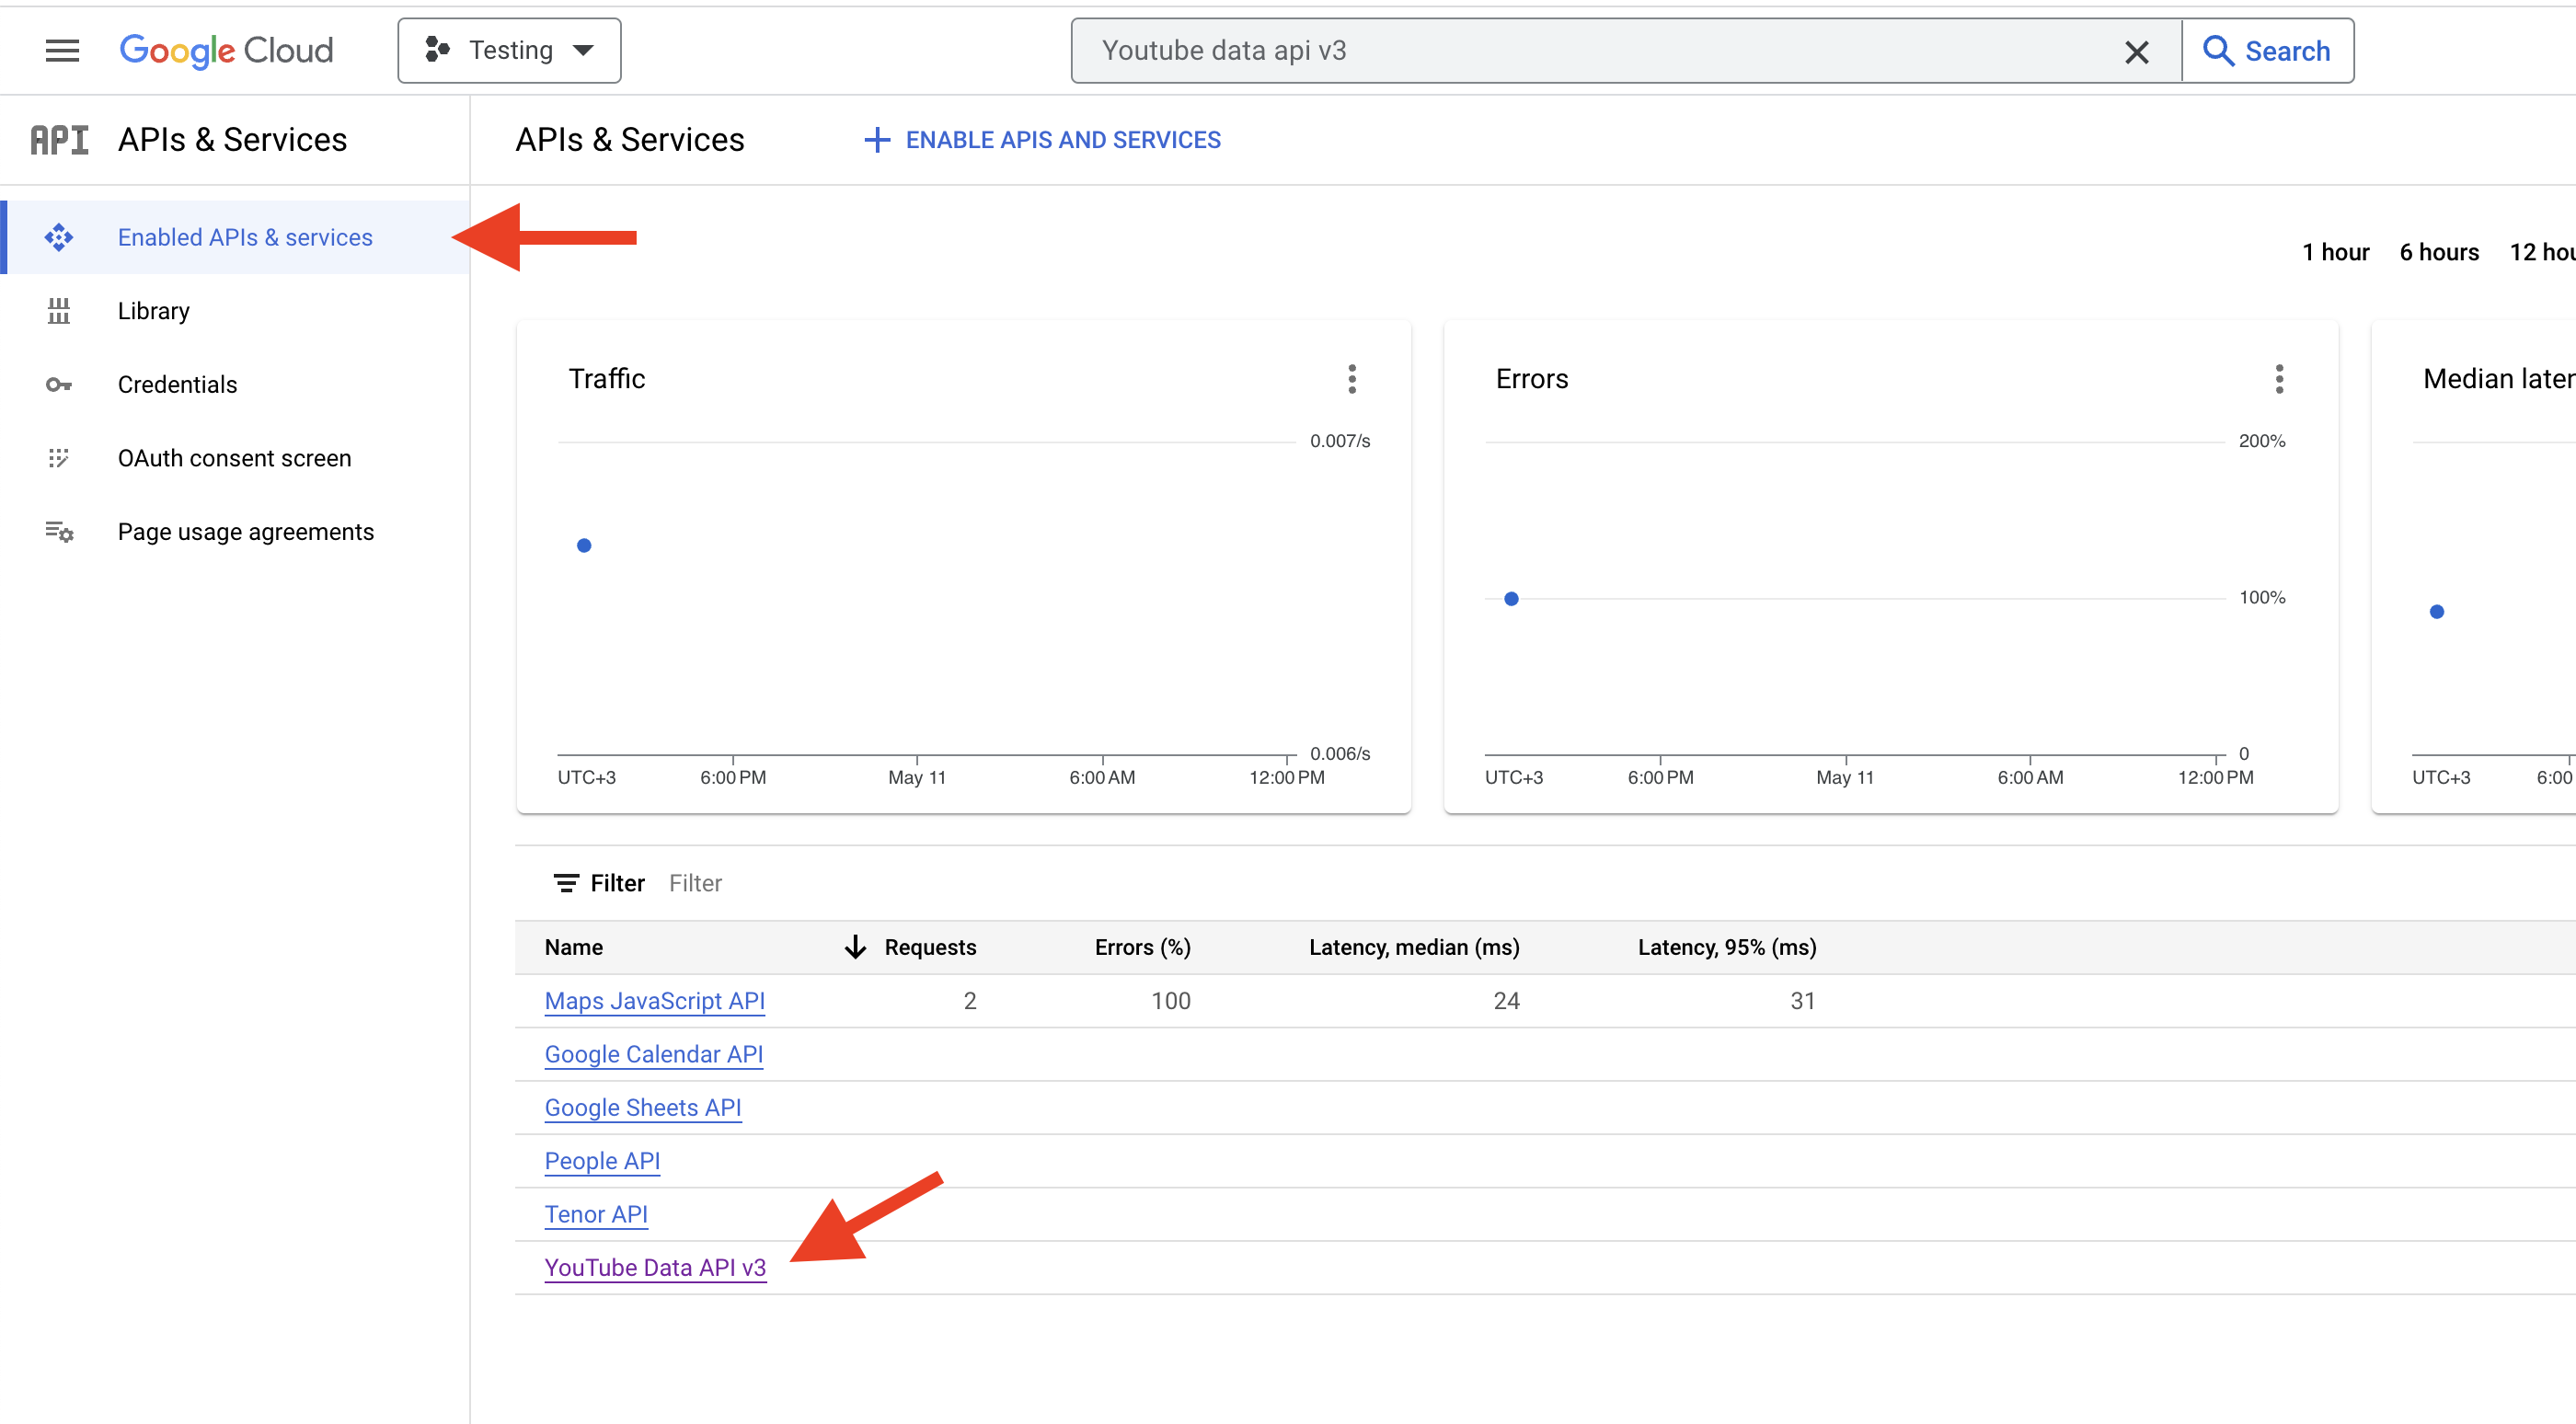
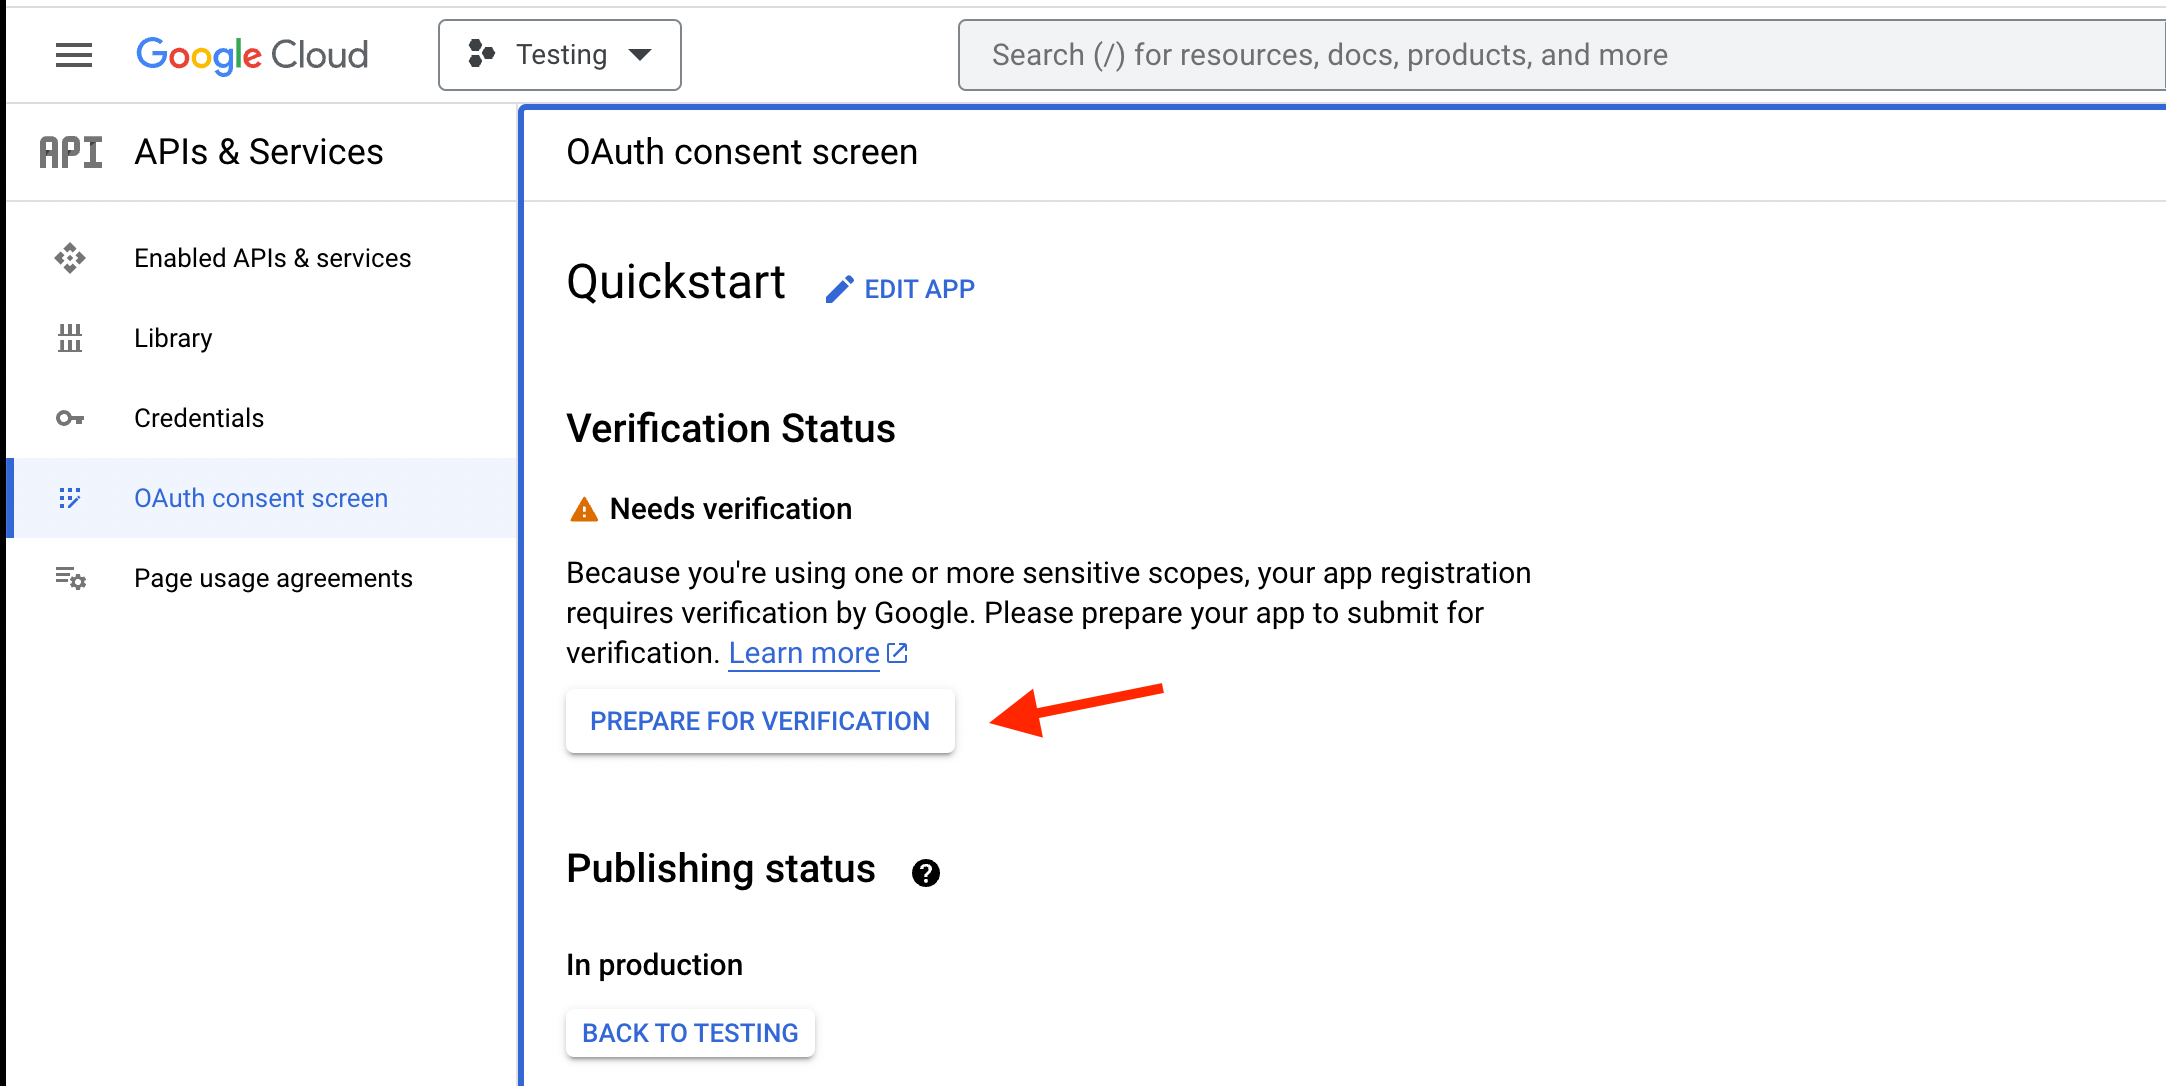
OAuth consent screen
For internal use, all the above settings are sufficient. If you only have a license for Mixpost Pro, you can skip this step. If you use Enterprise (SaaS), and you want your clients not to see this kind of alert:

You must pass the Google application verification.
Then you will complete all the necessary fields:
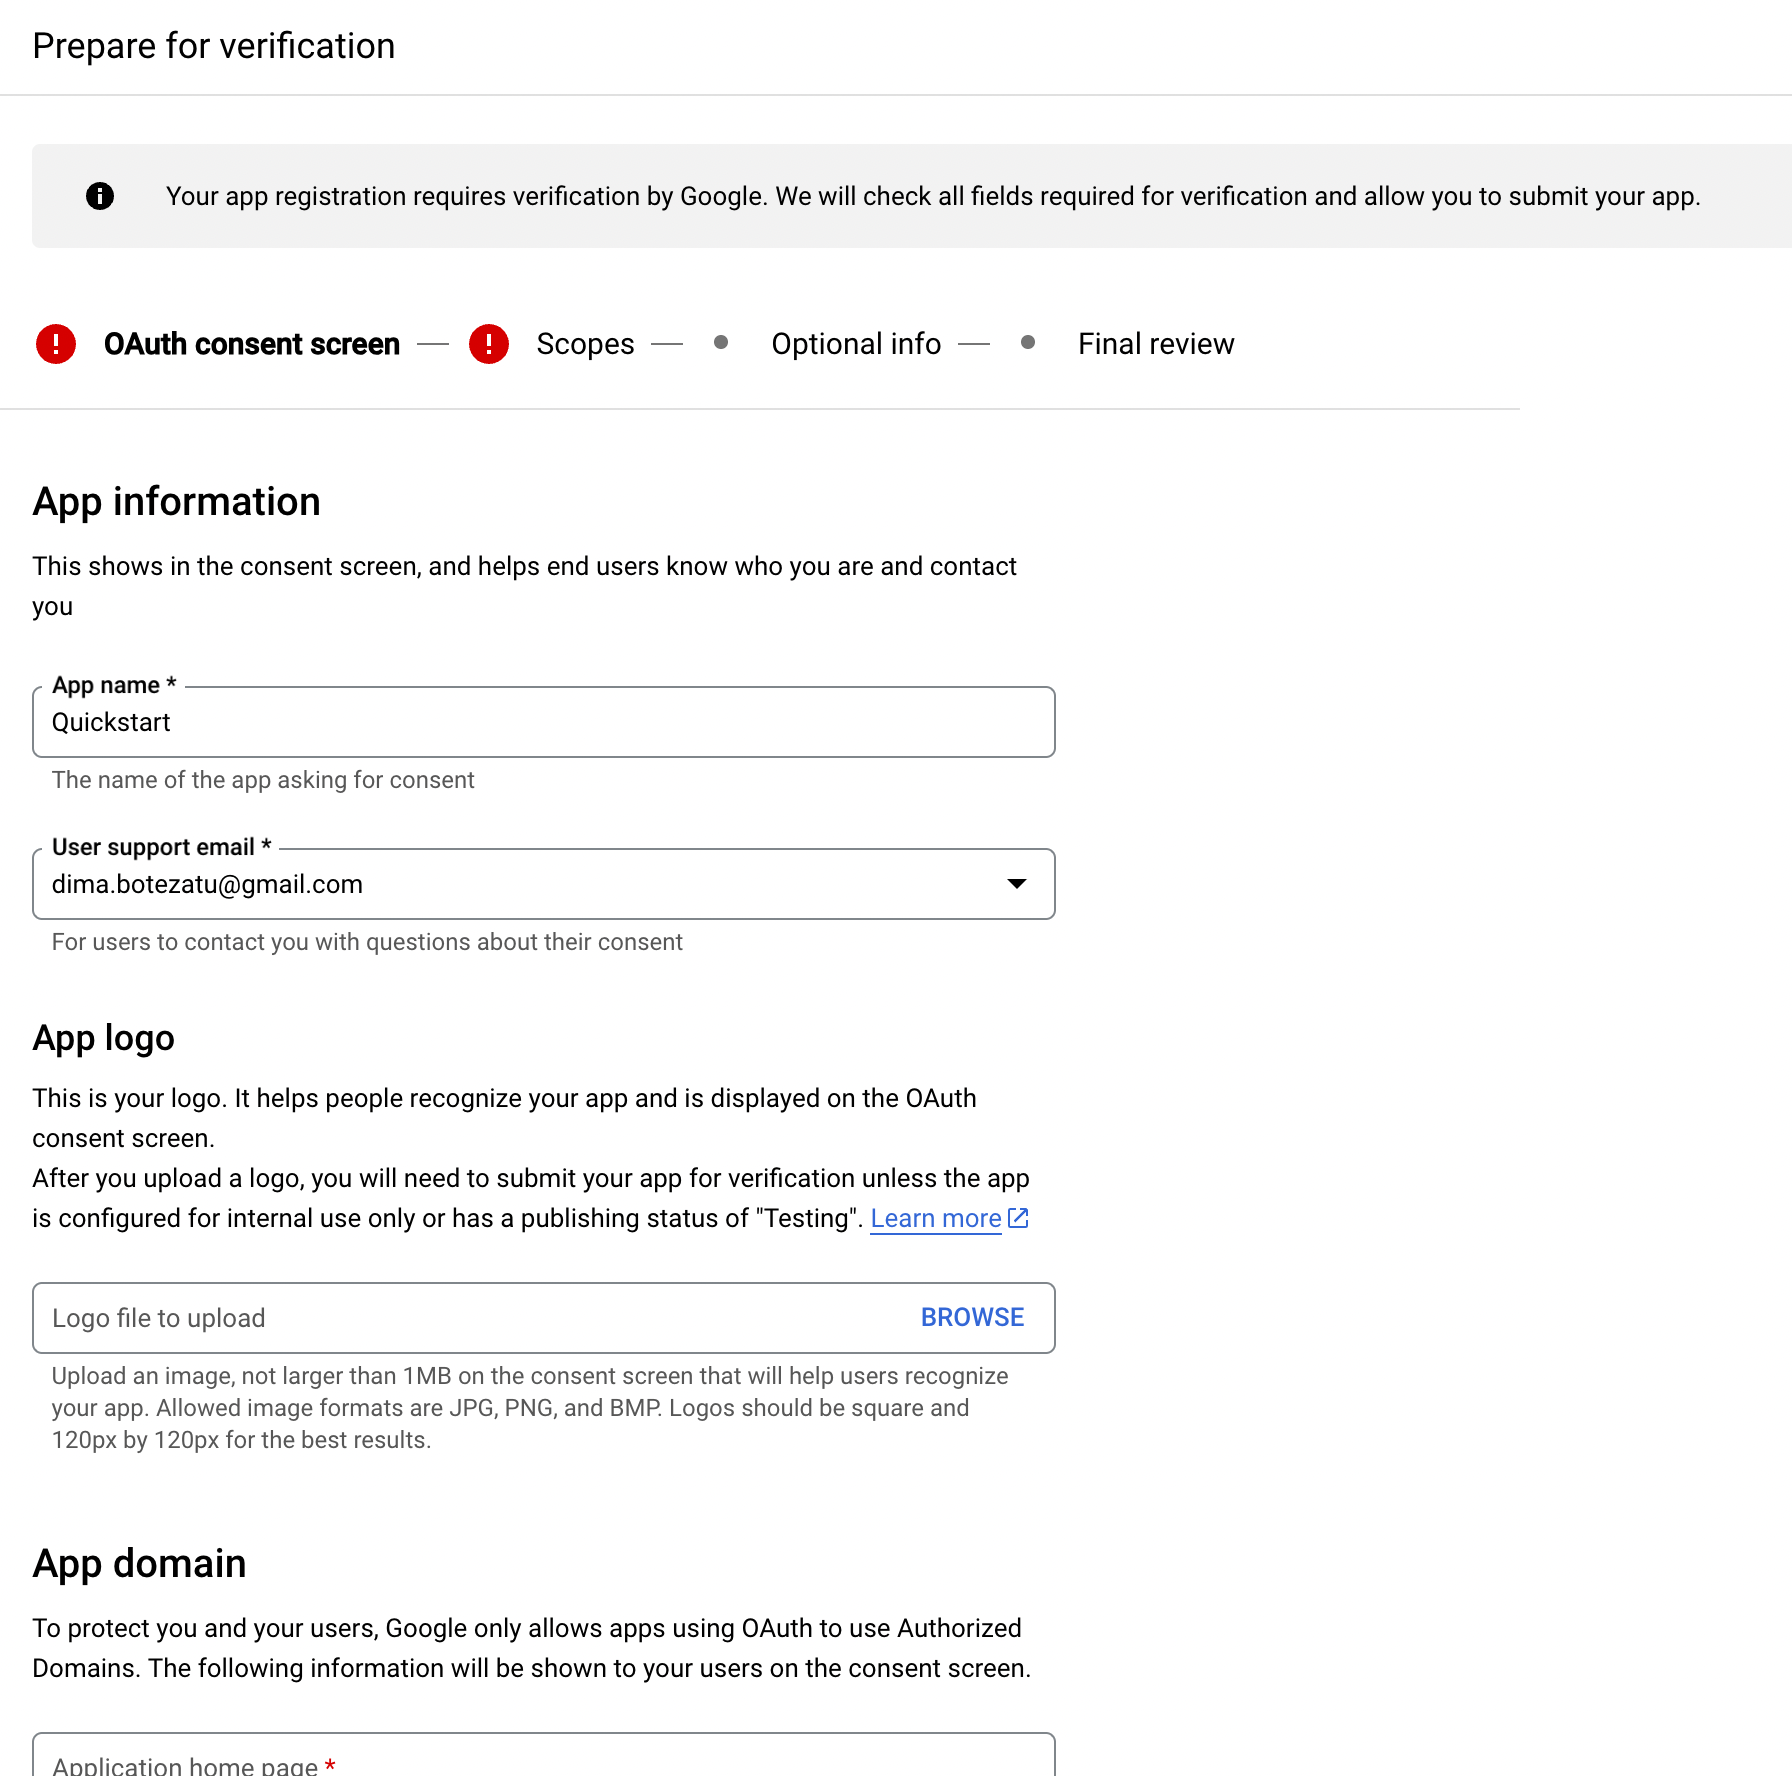
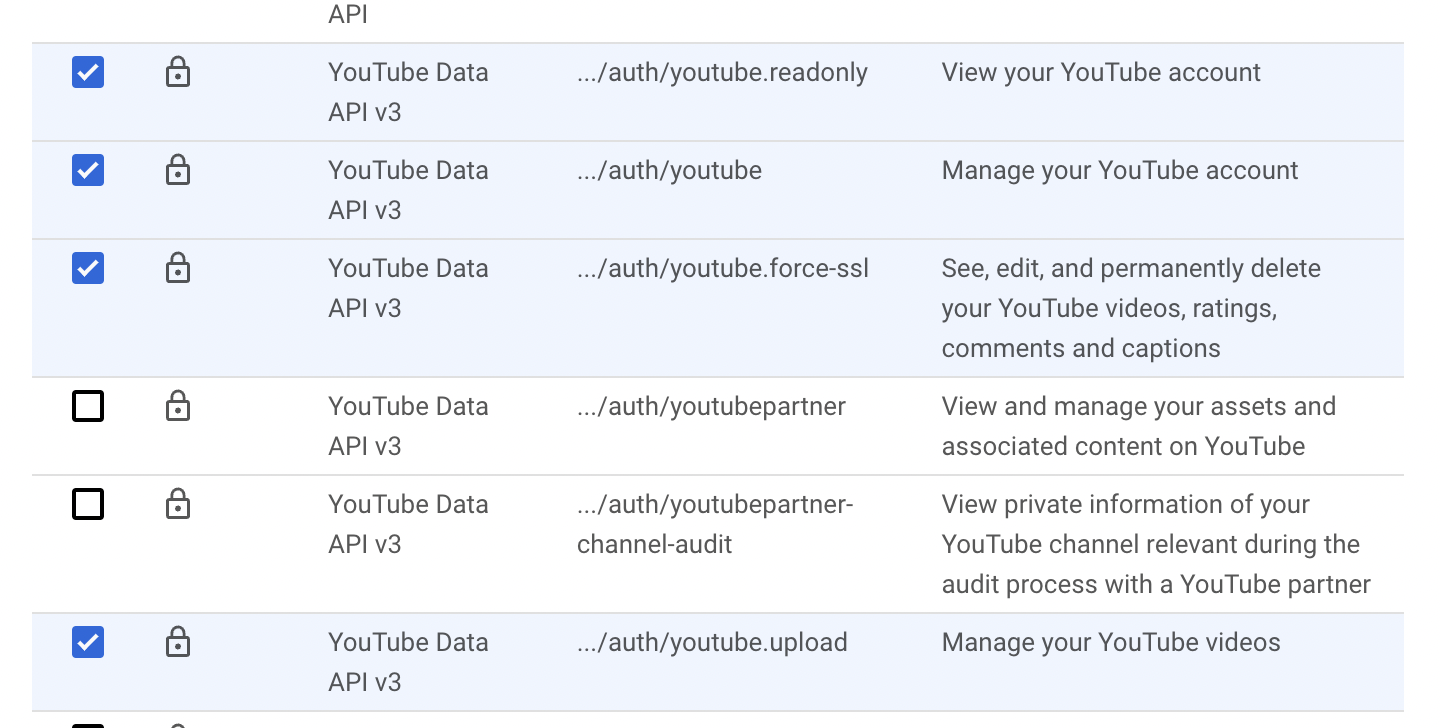
Next, you have to add YouTube Data API V3 scope:
Submit your request verification and wait for a response from Google.
Conclusion
That's it! You have successfully created and configured your Google App for using the Youtube Data API. Now you can connect to a YouTube channel.
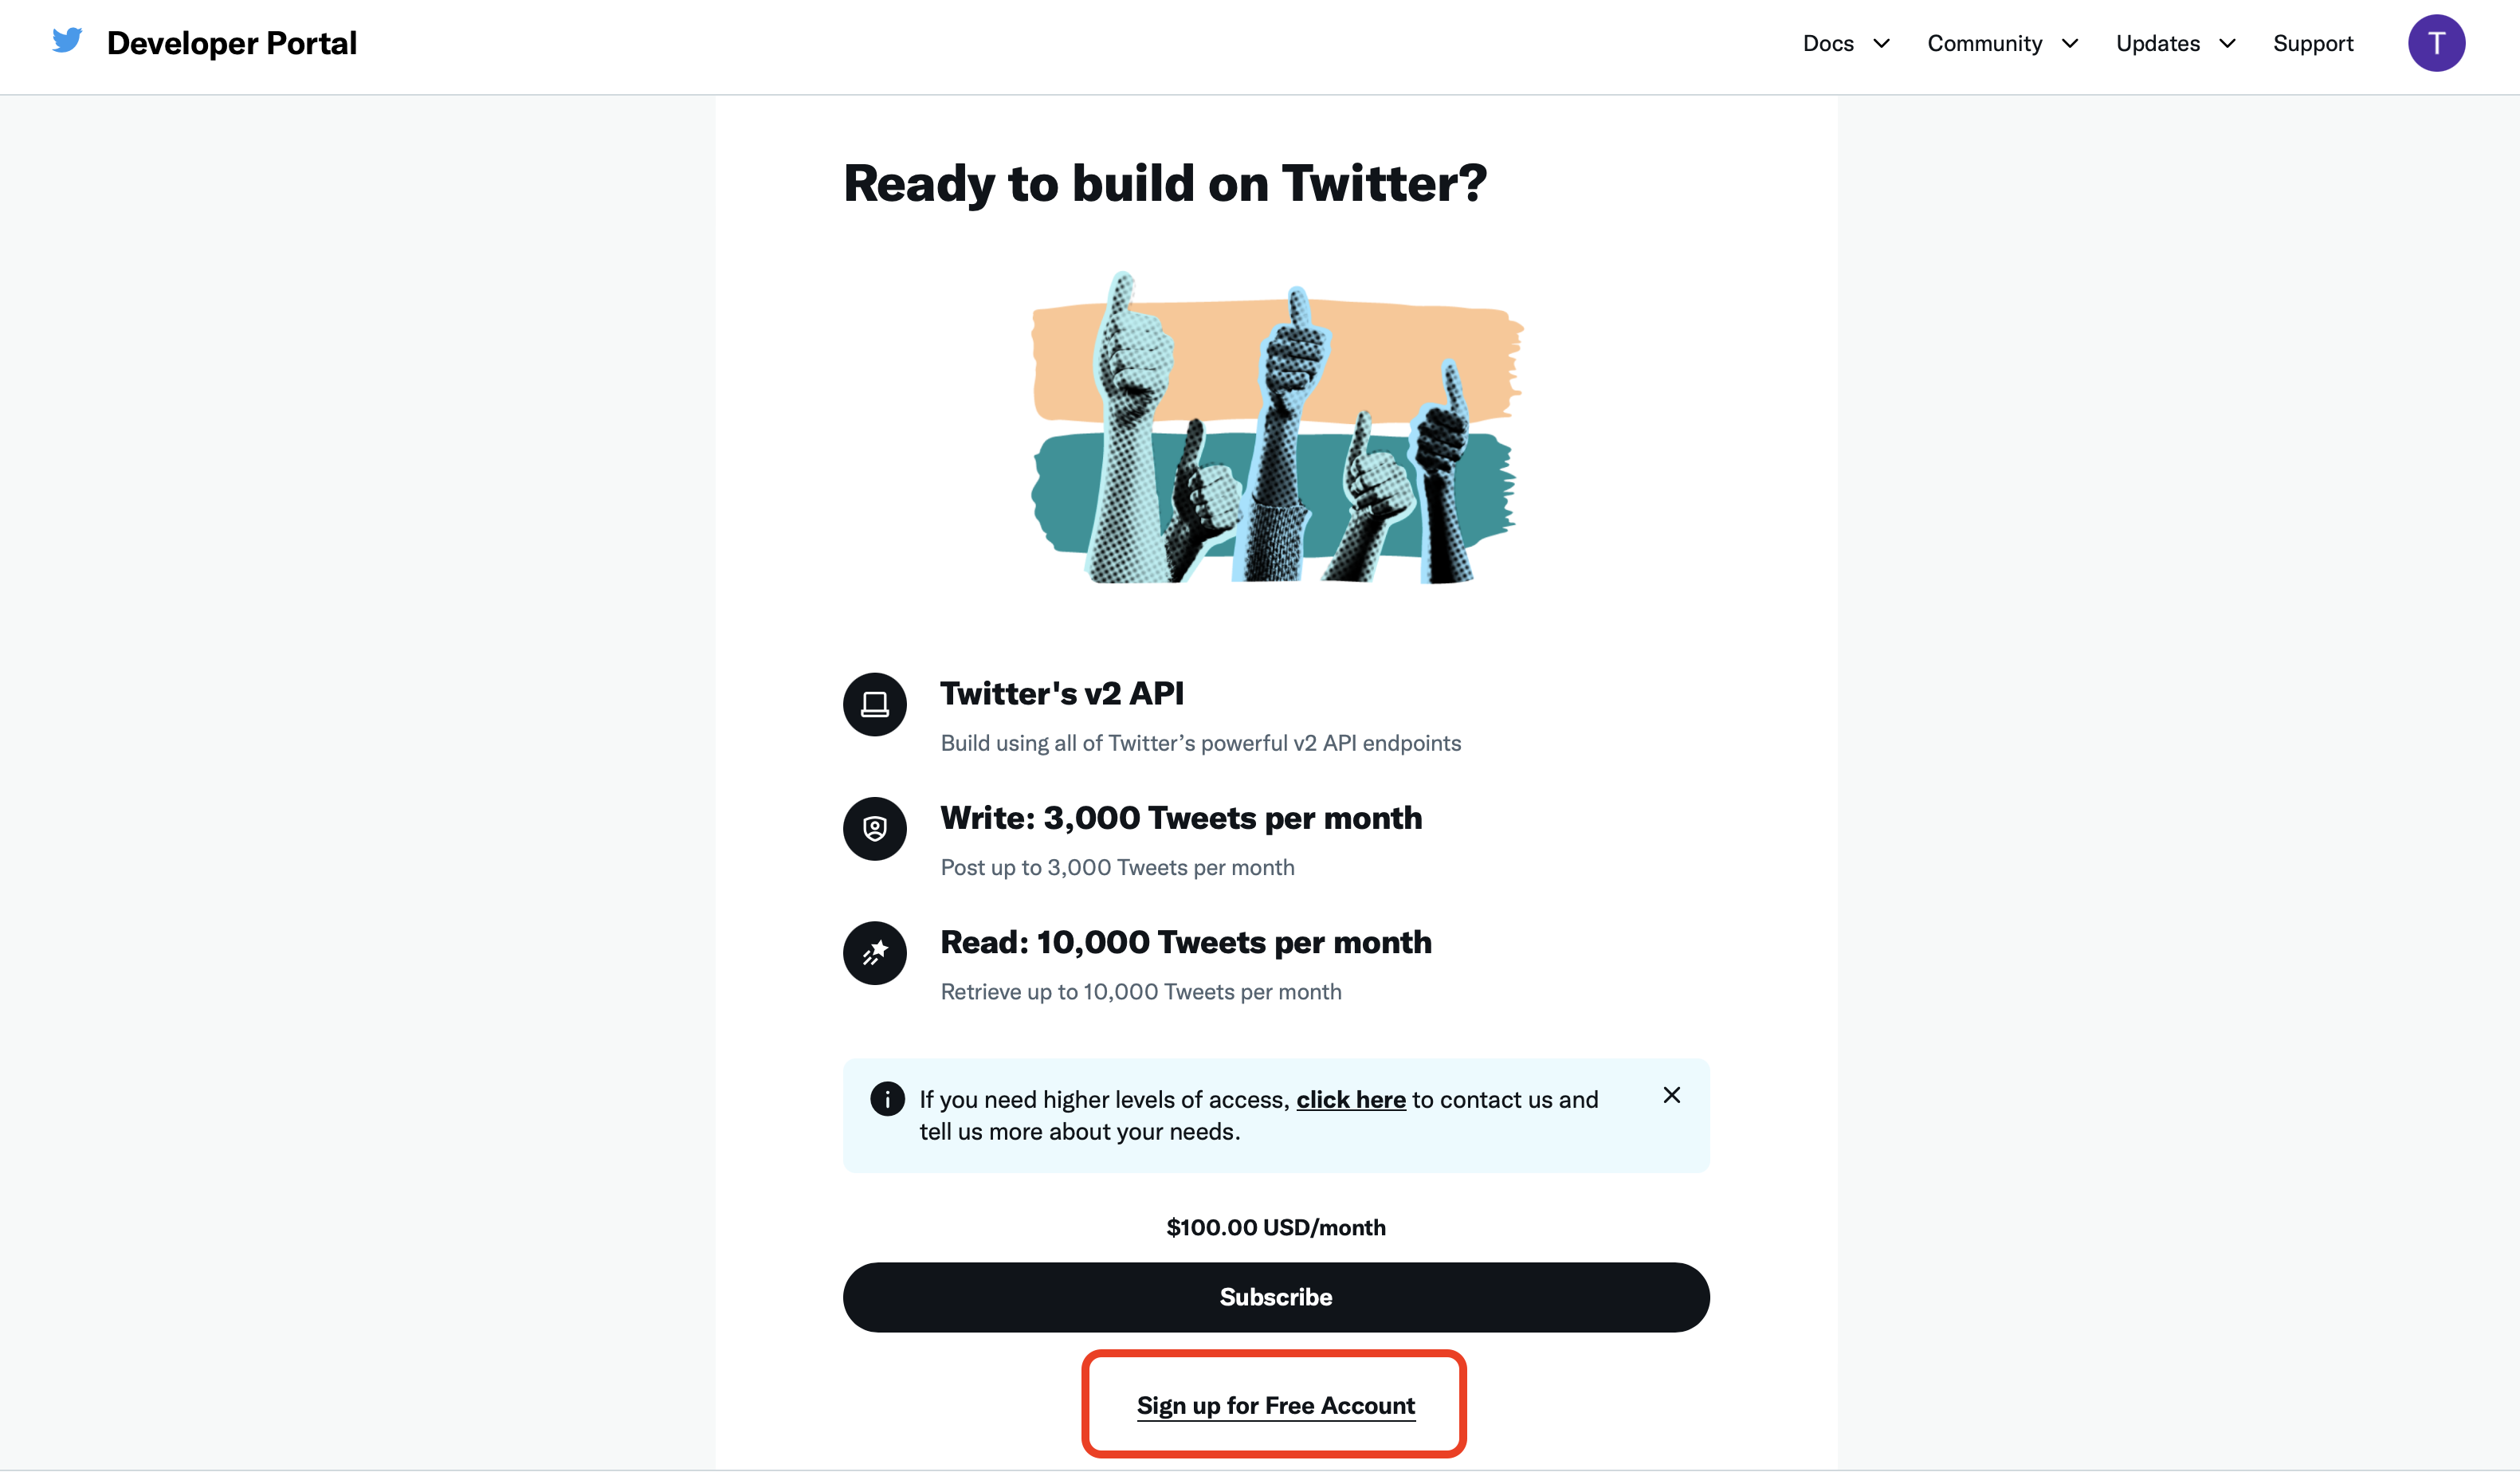
Step 1: Create a Twitter Developer Account
To create a Twitter App, you need to have a Twitter Developer Account. If you don't have one, you can create it by going to the Twitter Developer website. Click on "Sign up for Free Account" button and fill out the required information and submit the application.
You can use this text for "use cases":
We plan to use the Twitter API for the following purposes:
- Schedule tweets
- Engagement with users (Reply, Like, Retweet + Quote)
- Extract profile metrics from connected accounts
- Extract posts with their metrics from connected accounts
We will display graphics like:
- Increasing the number of followers for each day of the last 3 months
- The number of likes, retweets, comments, profile clicks, and link clicks for each day of the last 3 months
- ..etc.
The accounts that we are going to connect to the application (oAuth) with the Twitter API belong to us and are managed by our team.
We got acquainted with "Automation rules" and "Twitter Rules".You will be redirected to the automatically created application.

Step 2: Configure Twitter App (Optional)
Do this only if you want to upload a logo or enter a description for your app. Go back to your Twitter developer account and select your app from the left sidebar.
- Click on “Edit” button.
- Upload the App logo
- Enter App description
- Click on “Save” button.

Step 3: App permissions
Next, you need to do some important configurations. Select your app from the left sidebar, scroll down to “User authentication settings” section, and then click on “Set up” button.

On the “App permissions” section select: “Read and write”.
On the “Type of App” section select: “Web App, Automated App or Bot”
On the input “Callback URI / Redirect URL” of the “App info” section: https://your-app-url.com/mixpost/callback/twitter
On the input “Website URL" of the “App info” section: https://your-app-url.com
Then, click on “Save” button.


After that, Twitter will show to you Client ID & Client Secret, we don’t need them. Finally, click on “Done” button.
Step 4: Copy the API Key and Secret to Mixpost
After configuring your App, we need to generate API and Secret Key.
- Go to your Twitter App
- Open "Keys and Tokens" section
- Regenerate new Keys
- Open your URL where Mixpost is installed, and paste each key to your service Twitter form on the Mixpost→Services page.


Step 5: Testing
You can test your app by adding your Twitter account to the Mixpost.
Accounts→Add account
Mastodon
With Mastodon, it's a bit more interesting. When you add a Mastodon account from a server, Mixpost will automatically create an application for that server. Otherwise, you don't have to do anything.
But there are situations when you have to intervene manually. If we assume that you have changed APP_URL or APP_KEY and the Mastodon application on a certain server is no longer functional, you will have to create another application.
You can create it with the following command:
php artisan mixpost:create-mastodon-app {server} - where {server} is the server name.
For example:
php artisan mixpost:create-mastodon-app indieweb.social
After that, you will have to re-authenticate your accounts on this server.
For those who use Docker:
If you use docker, you will have to execute the command inside the container. For this, you need to log in to the container:
If you used our image from docker hub. You can log in like this:
docker-composer exec -it mixpost bashor docker ps, and identify the mixpost container id docker exec -it {mixpost_container_id} bash
Pinterest is one of the world's most popular social media platforms, with millions of users. If you're looking to schedule posts on Pinterest, you will need to create and configure a Pinterest app. This guide will take you through the steps to create and configure your Pinterest app.
Step 1: Create a Pinterest Developer Account
The first step in creating a Pinterest app is to create a developer account on the Pinterest developer platform. To do this, go to the Pinterest Developer Platform website and sign up for an account. If you already have a Pinterest account, you can use those credentials to sign in.
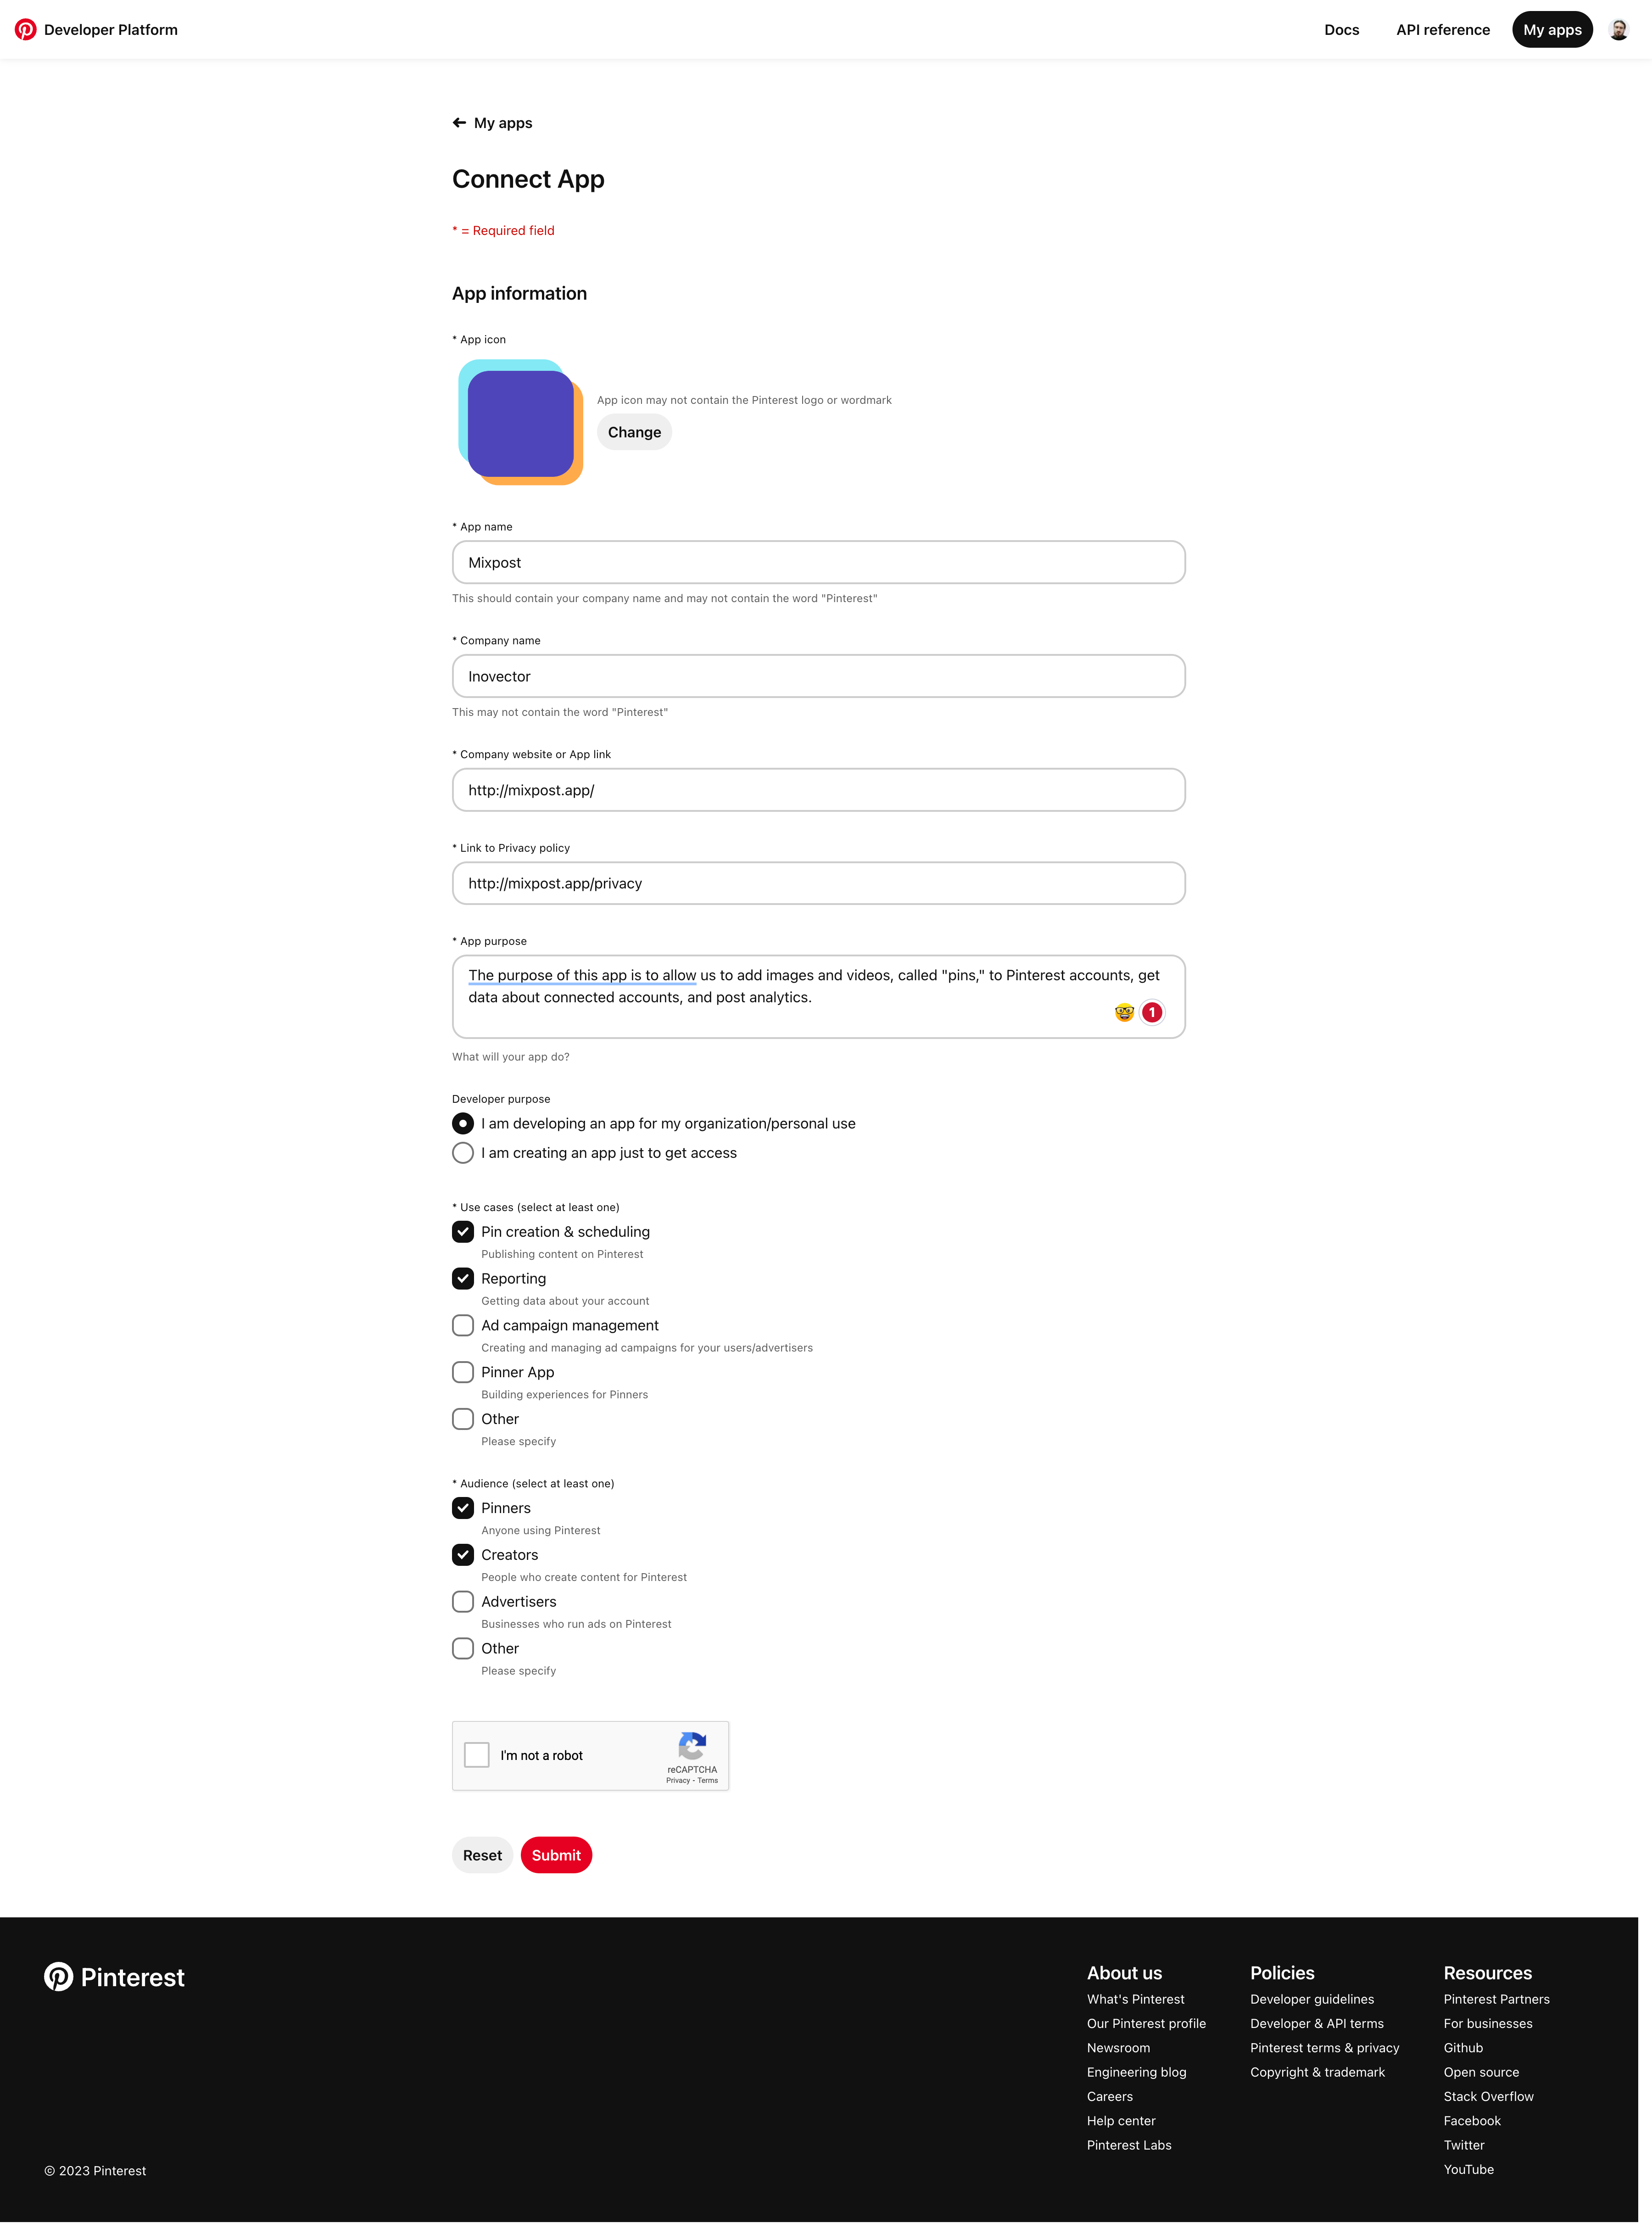
Step 2: Create a New App
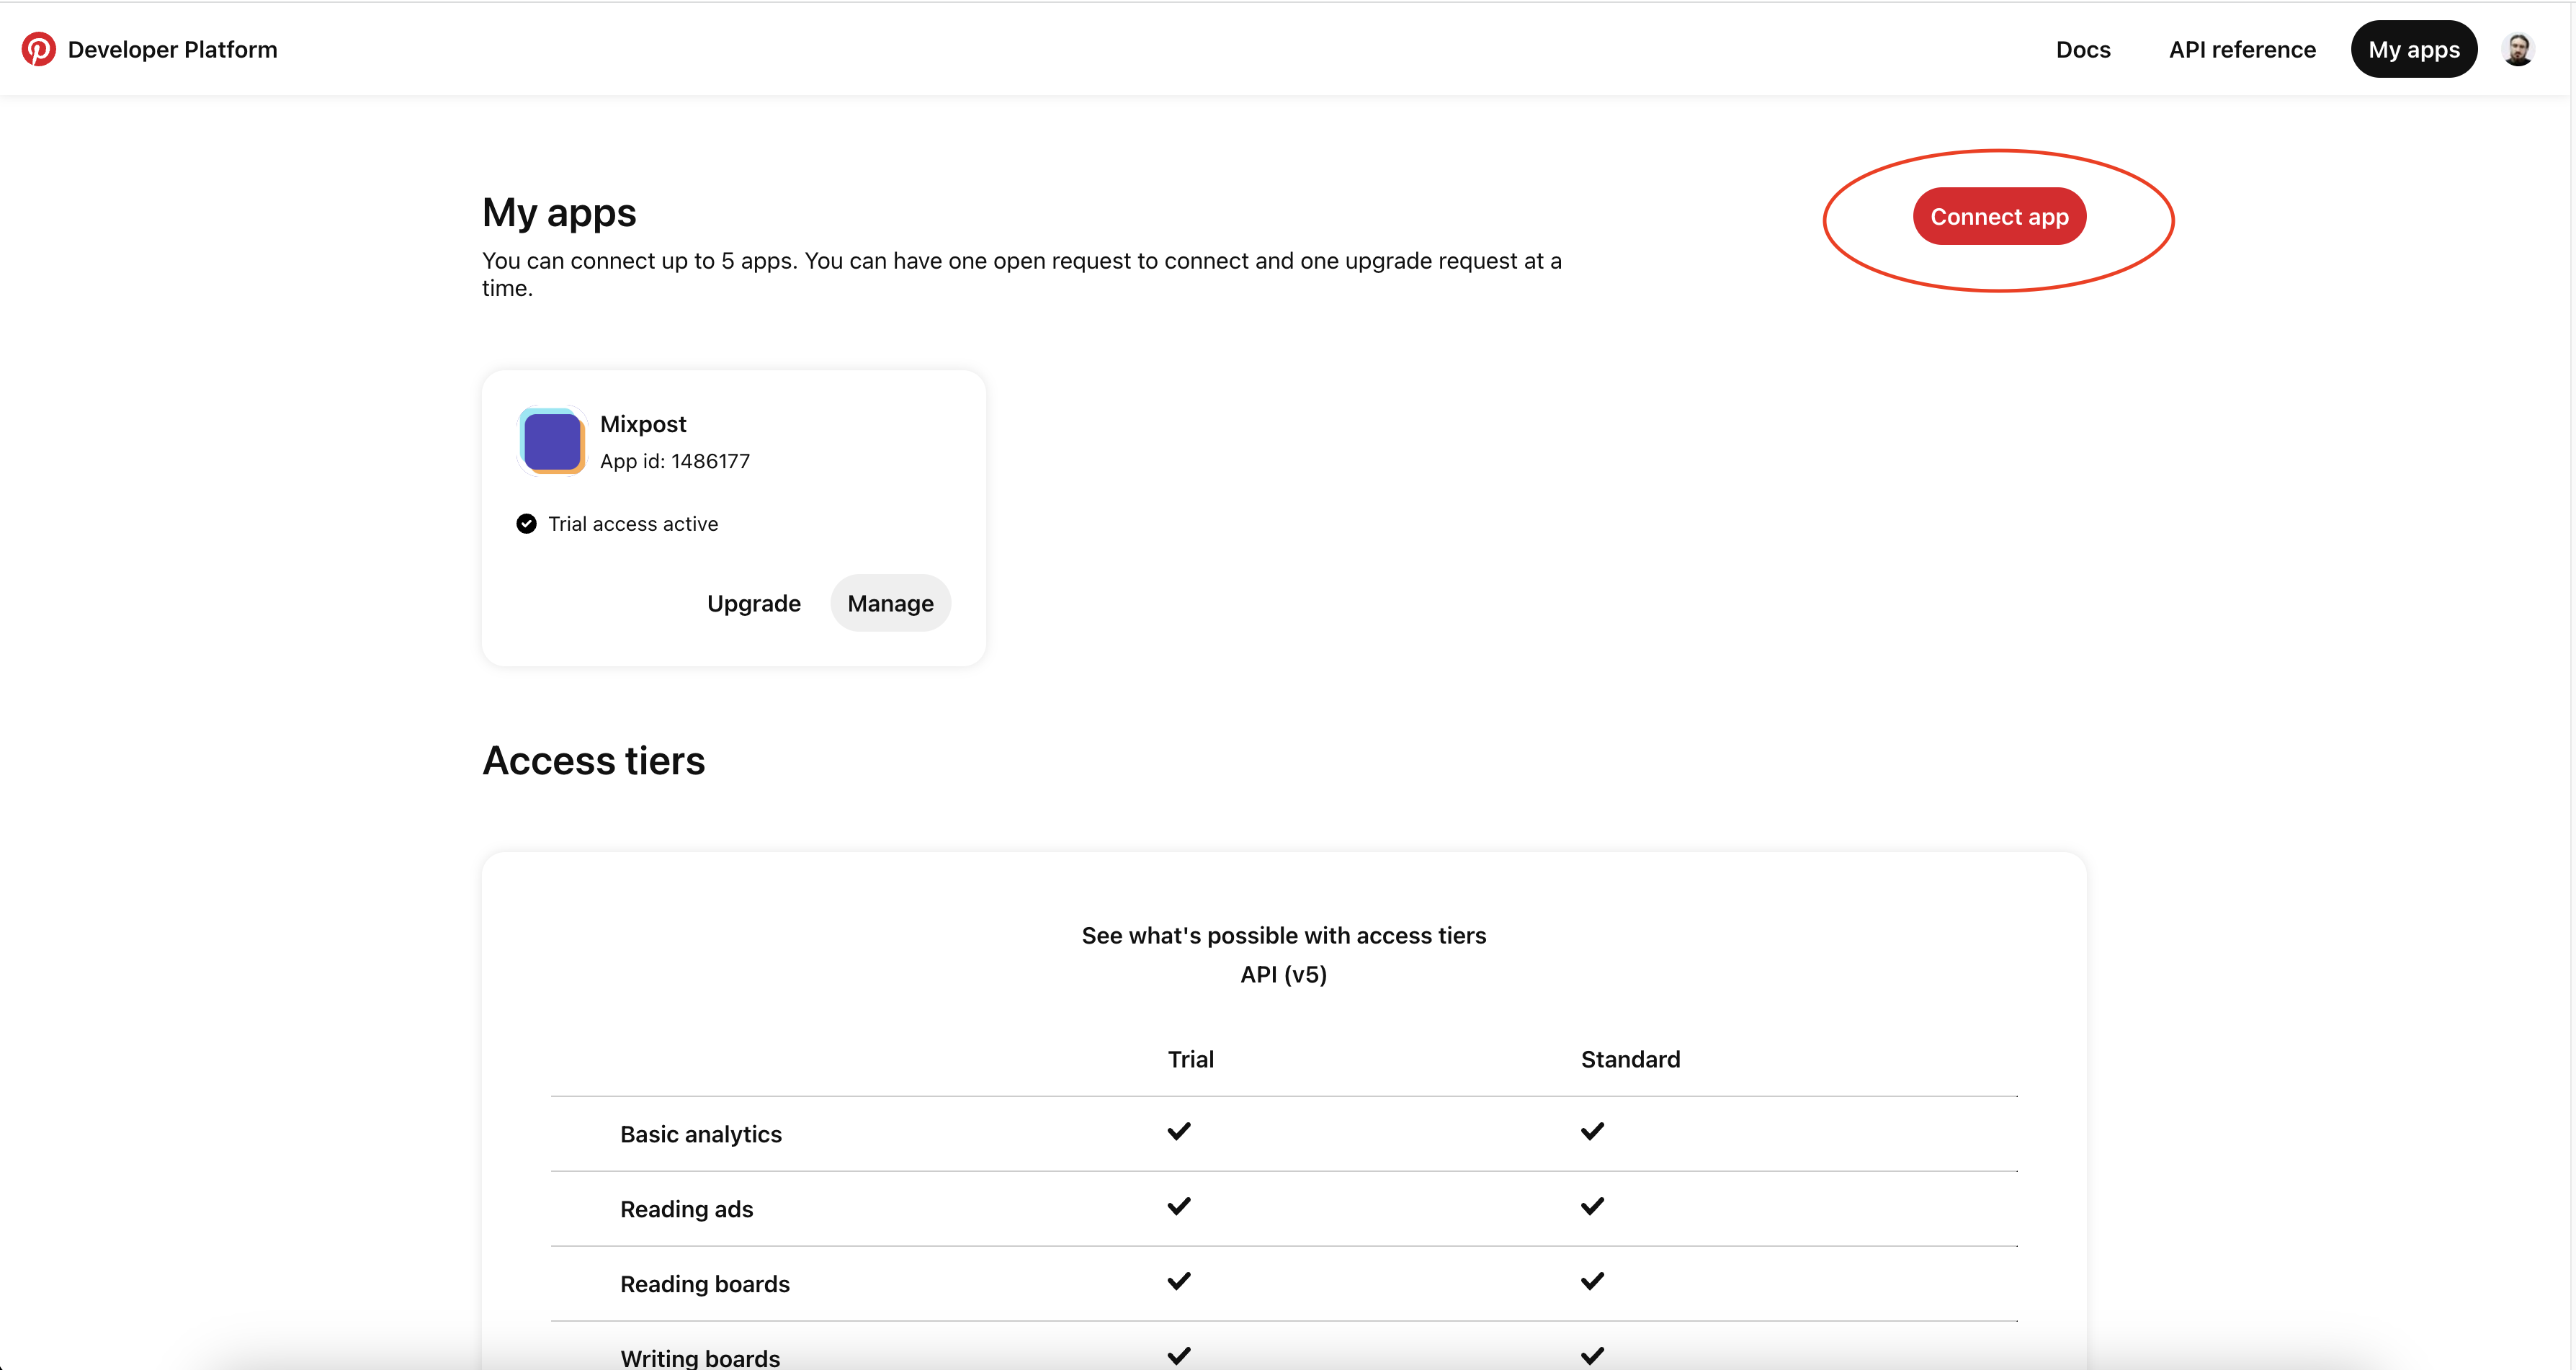
After you've signed up for a developer account, you need to create a new app. To do this, click the 'Connect App' button on the Pinterest developer platform dashboard. Fill out the required information, such as your app name and company name, website, and app purpose.
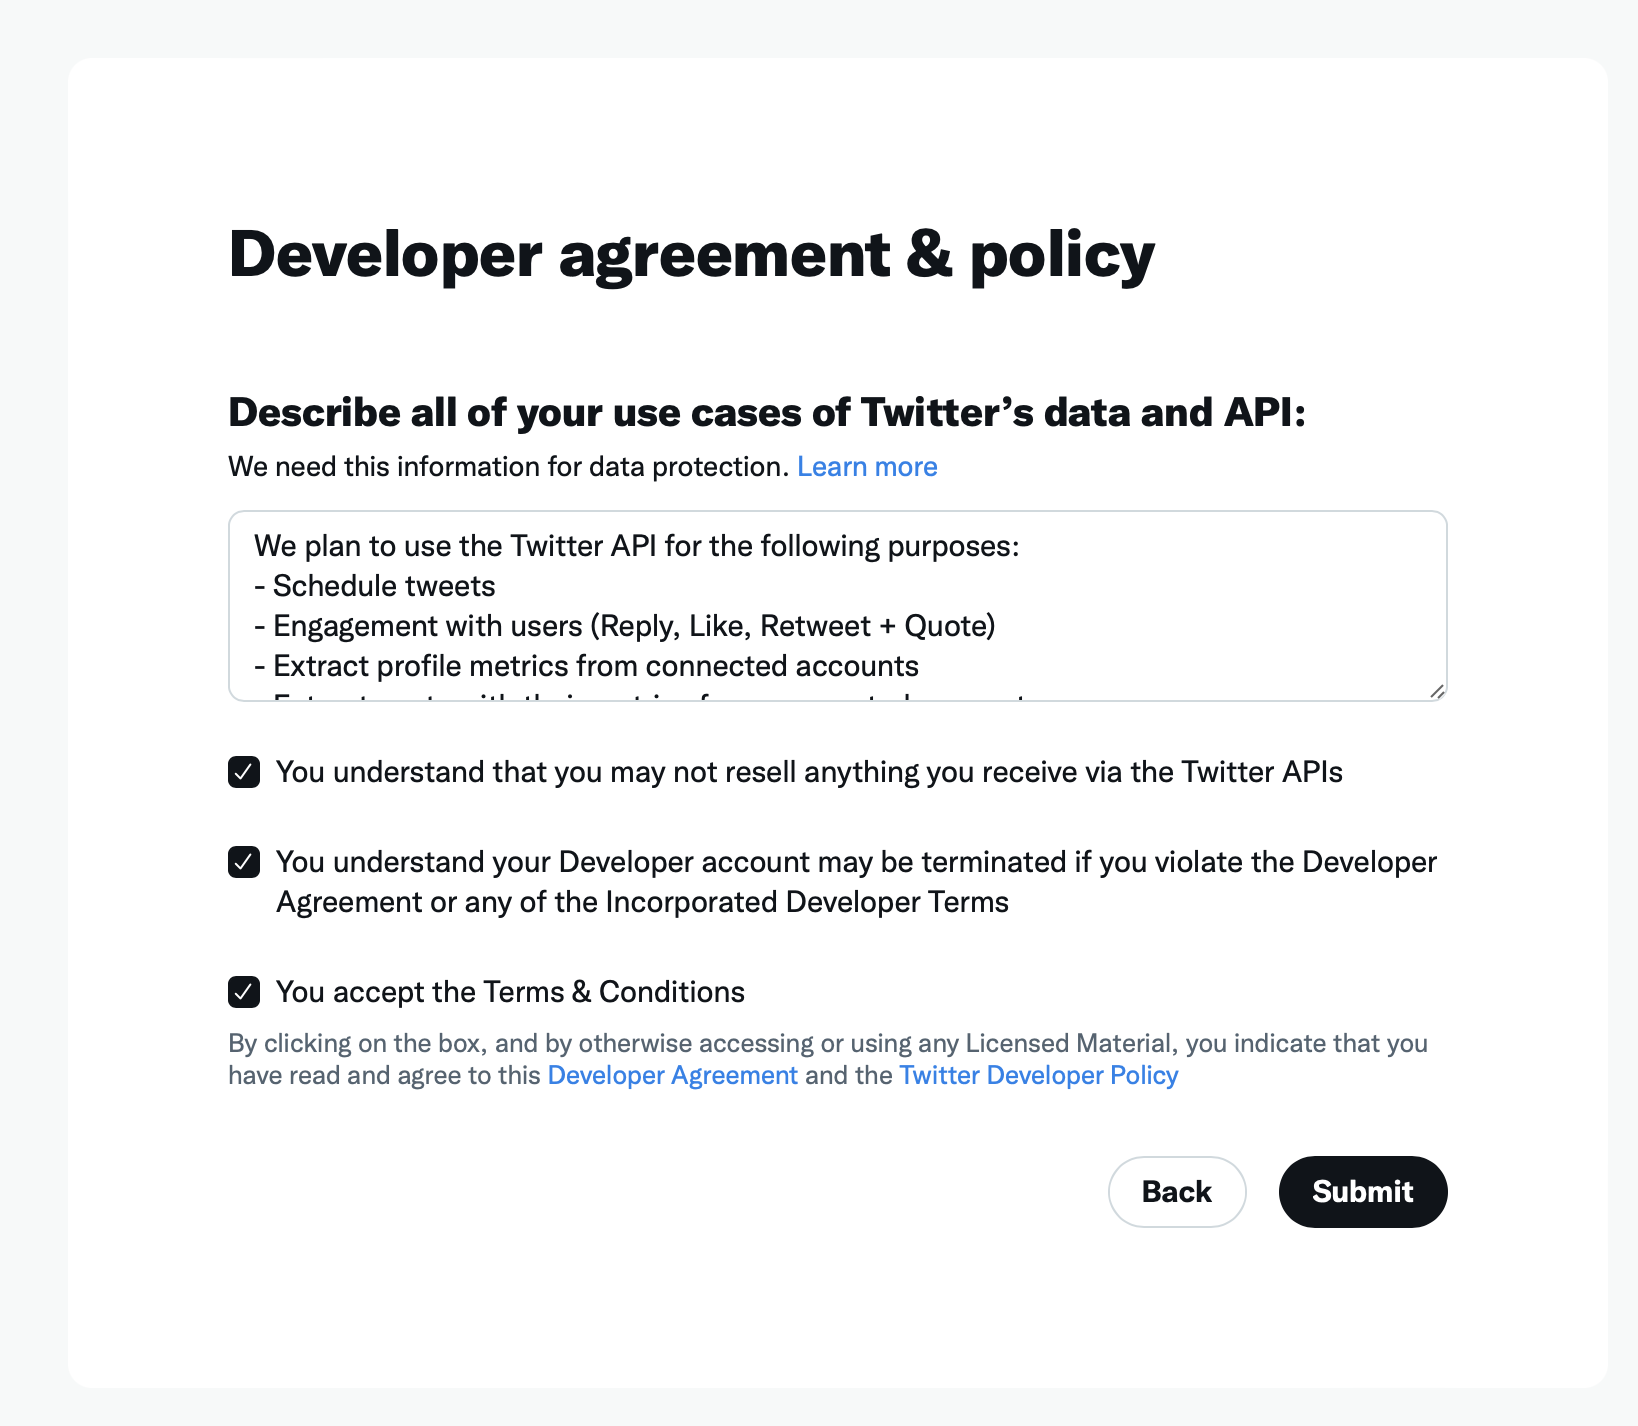
For the "App purpose" textarea you can use this:
The purpose of this app is to allow us to add images and videos, called "pins," to Pinterest accounts, get data about connected accounts, and post analytics.
- For the "Developer purpose", choice:
- I am developing an app for my organization/personal use
- For the "Use cases" select:
- Pin creation & scheduling
- Reporting
- For the "Audience" select:
- Pinners
- Creators
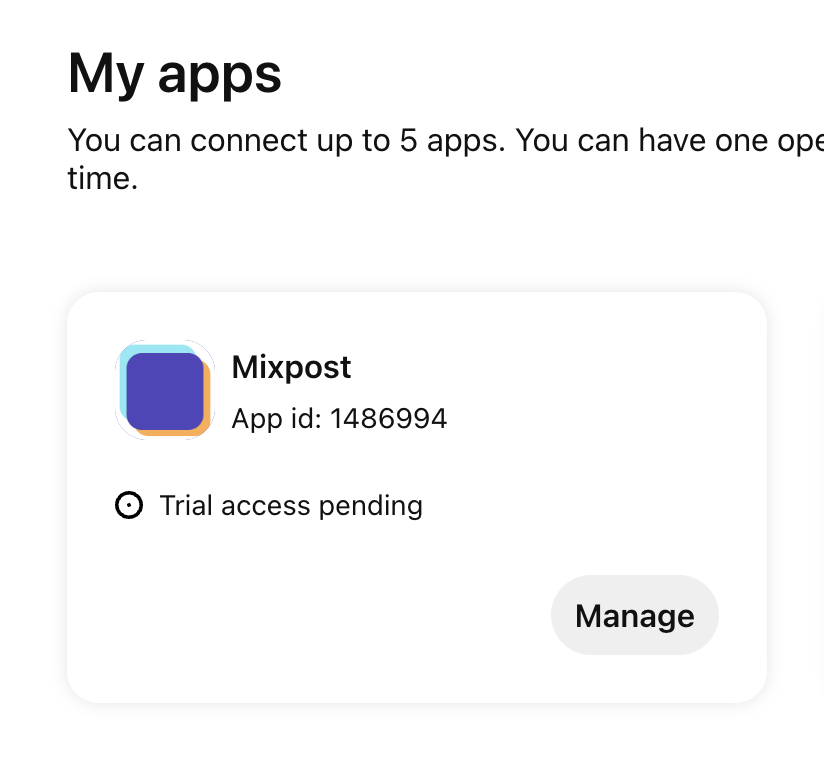
Click on "Submit". After this step, Pinterest will analyze the request and give you access in 1-2 days. You will receive an email once there is an update.
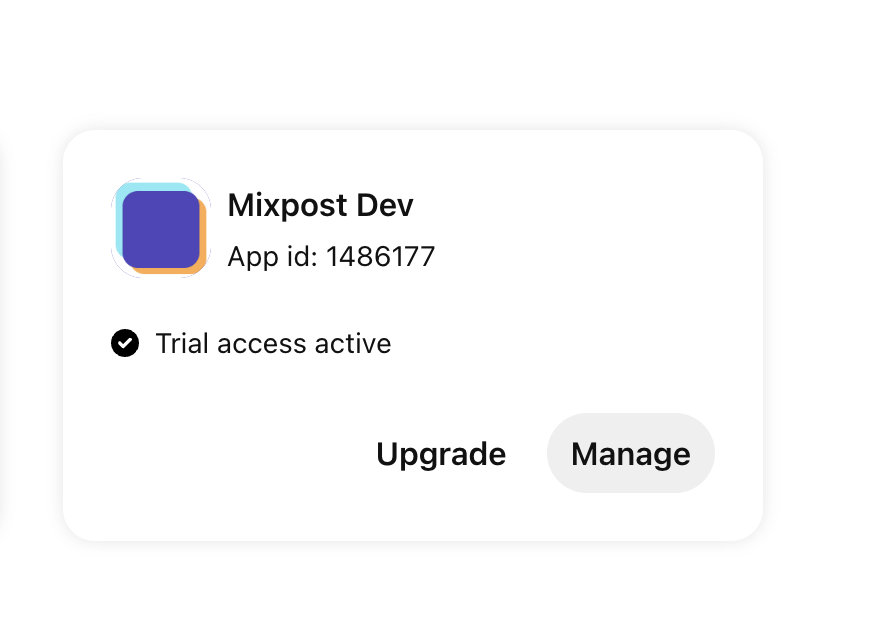
After the review, you will have Sandbox access (Trial Tier), what you post will be visible only to the user who creates it. In order for your posts to be visible to the public, you must request access to the Standard Tier. To do that, you have to click on "Upgrade" button and attach a video with your Mixpost Dashboard where you show how to connect a Pinterest account, how to schedule a post on Pinterest, how you see the analytics, and other actions related to Pinterest.
After success review:
Step 3: Configure Your App
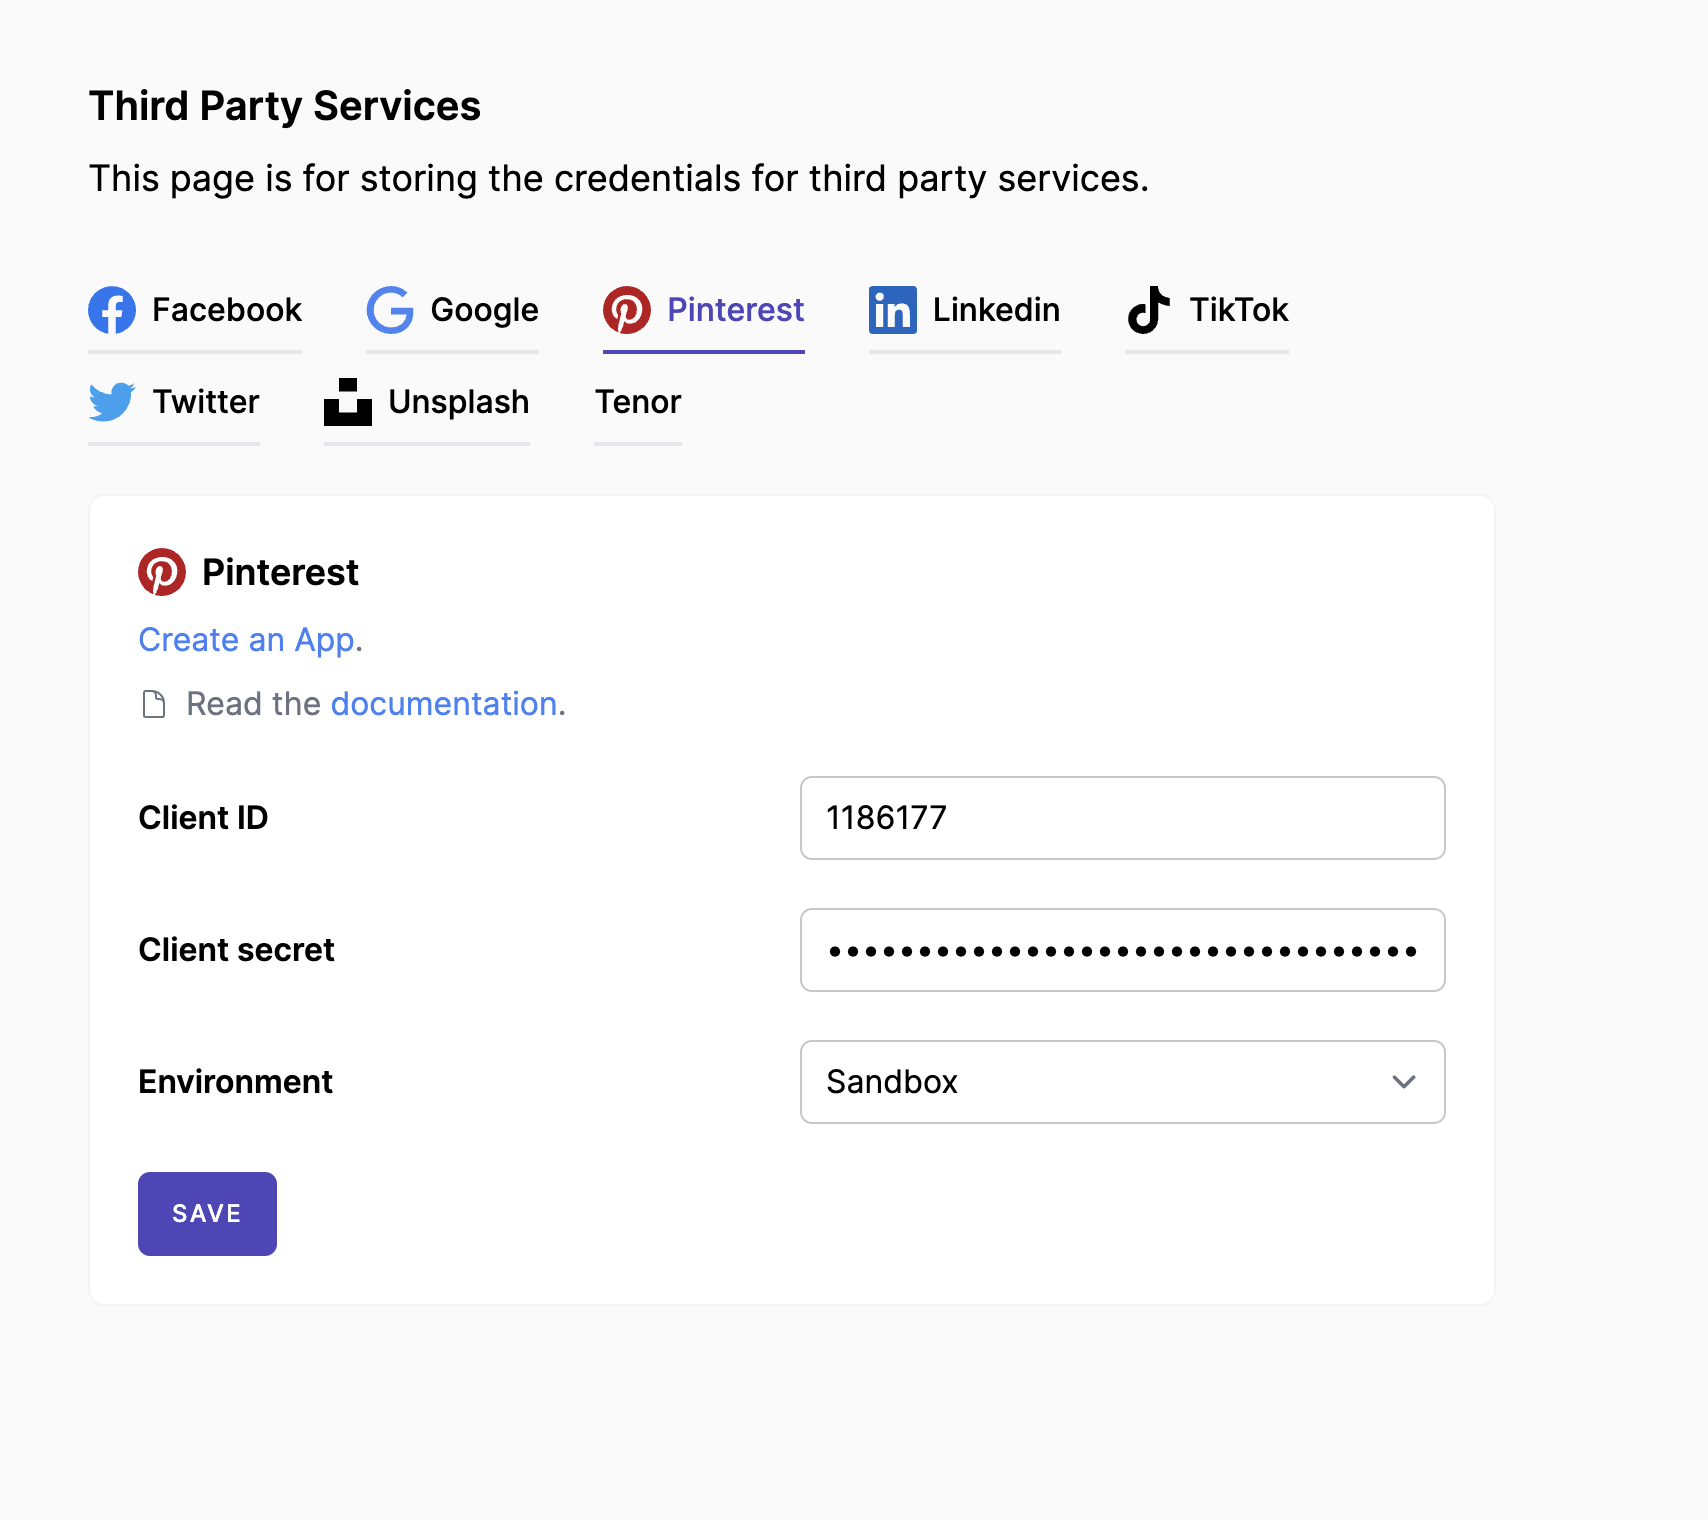
Once the application has been reviewed, you can start the setup. Go to the developer account "Apps" page: https://developers.pinterest.com/apps/, find your app and click on "Manage" button.
Here, you will see the 'App ID' and 'App Secret Key' that you need to use to authenticate your app. Copy them to your Mixpost dashboard on the Services page and for Environment select "Sandbox". If you have access to "Standard Tier", switch to "Production".
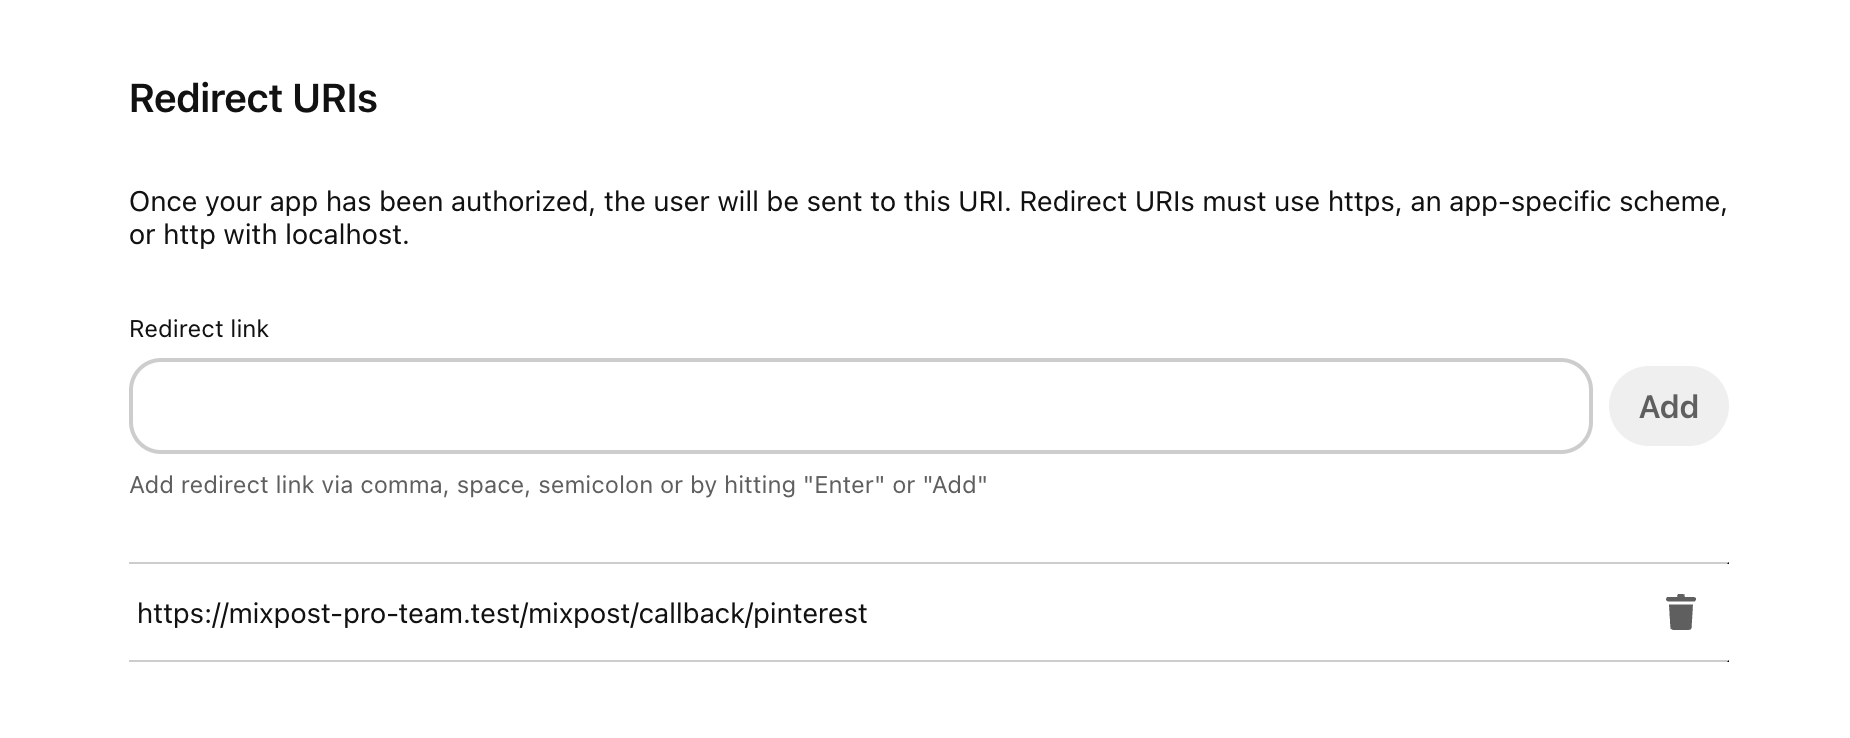
Back to your app on Pinterest, scroll down and here you have to set up the redirect URI for your app.
Add this: https://your-domain.com/mixpost/callback/pinterest, where your-domain.com is your real app domain.

LinkedIn is a great platform for businesses to showcase their products and services. By creating a LinkedIn app and connecting your products, you can easily promote your business and reach a wider audience. Here's a step-by-step guide on how to create a LinkedIn app:
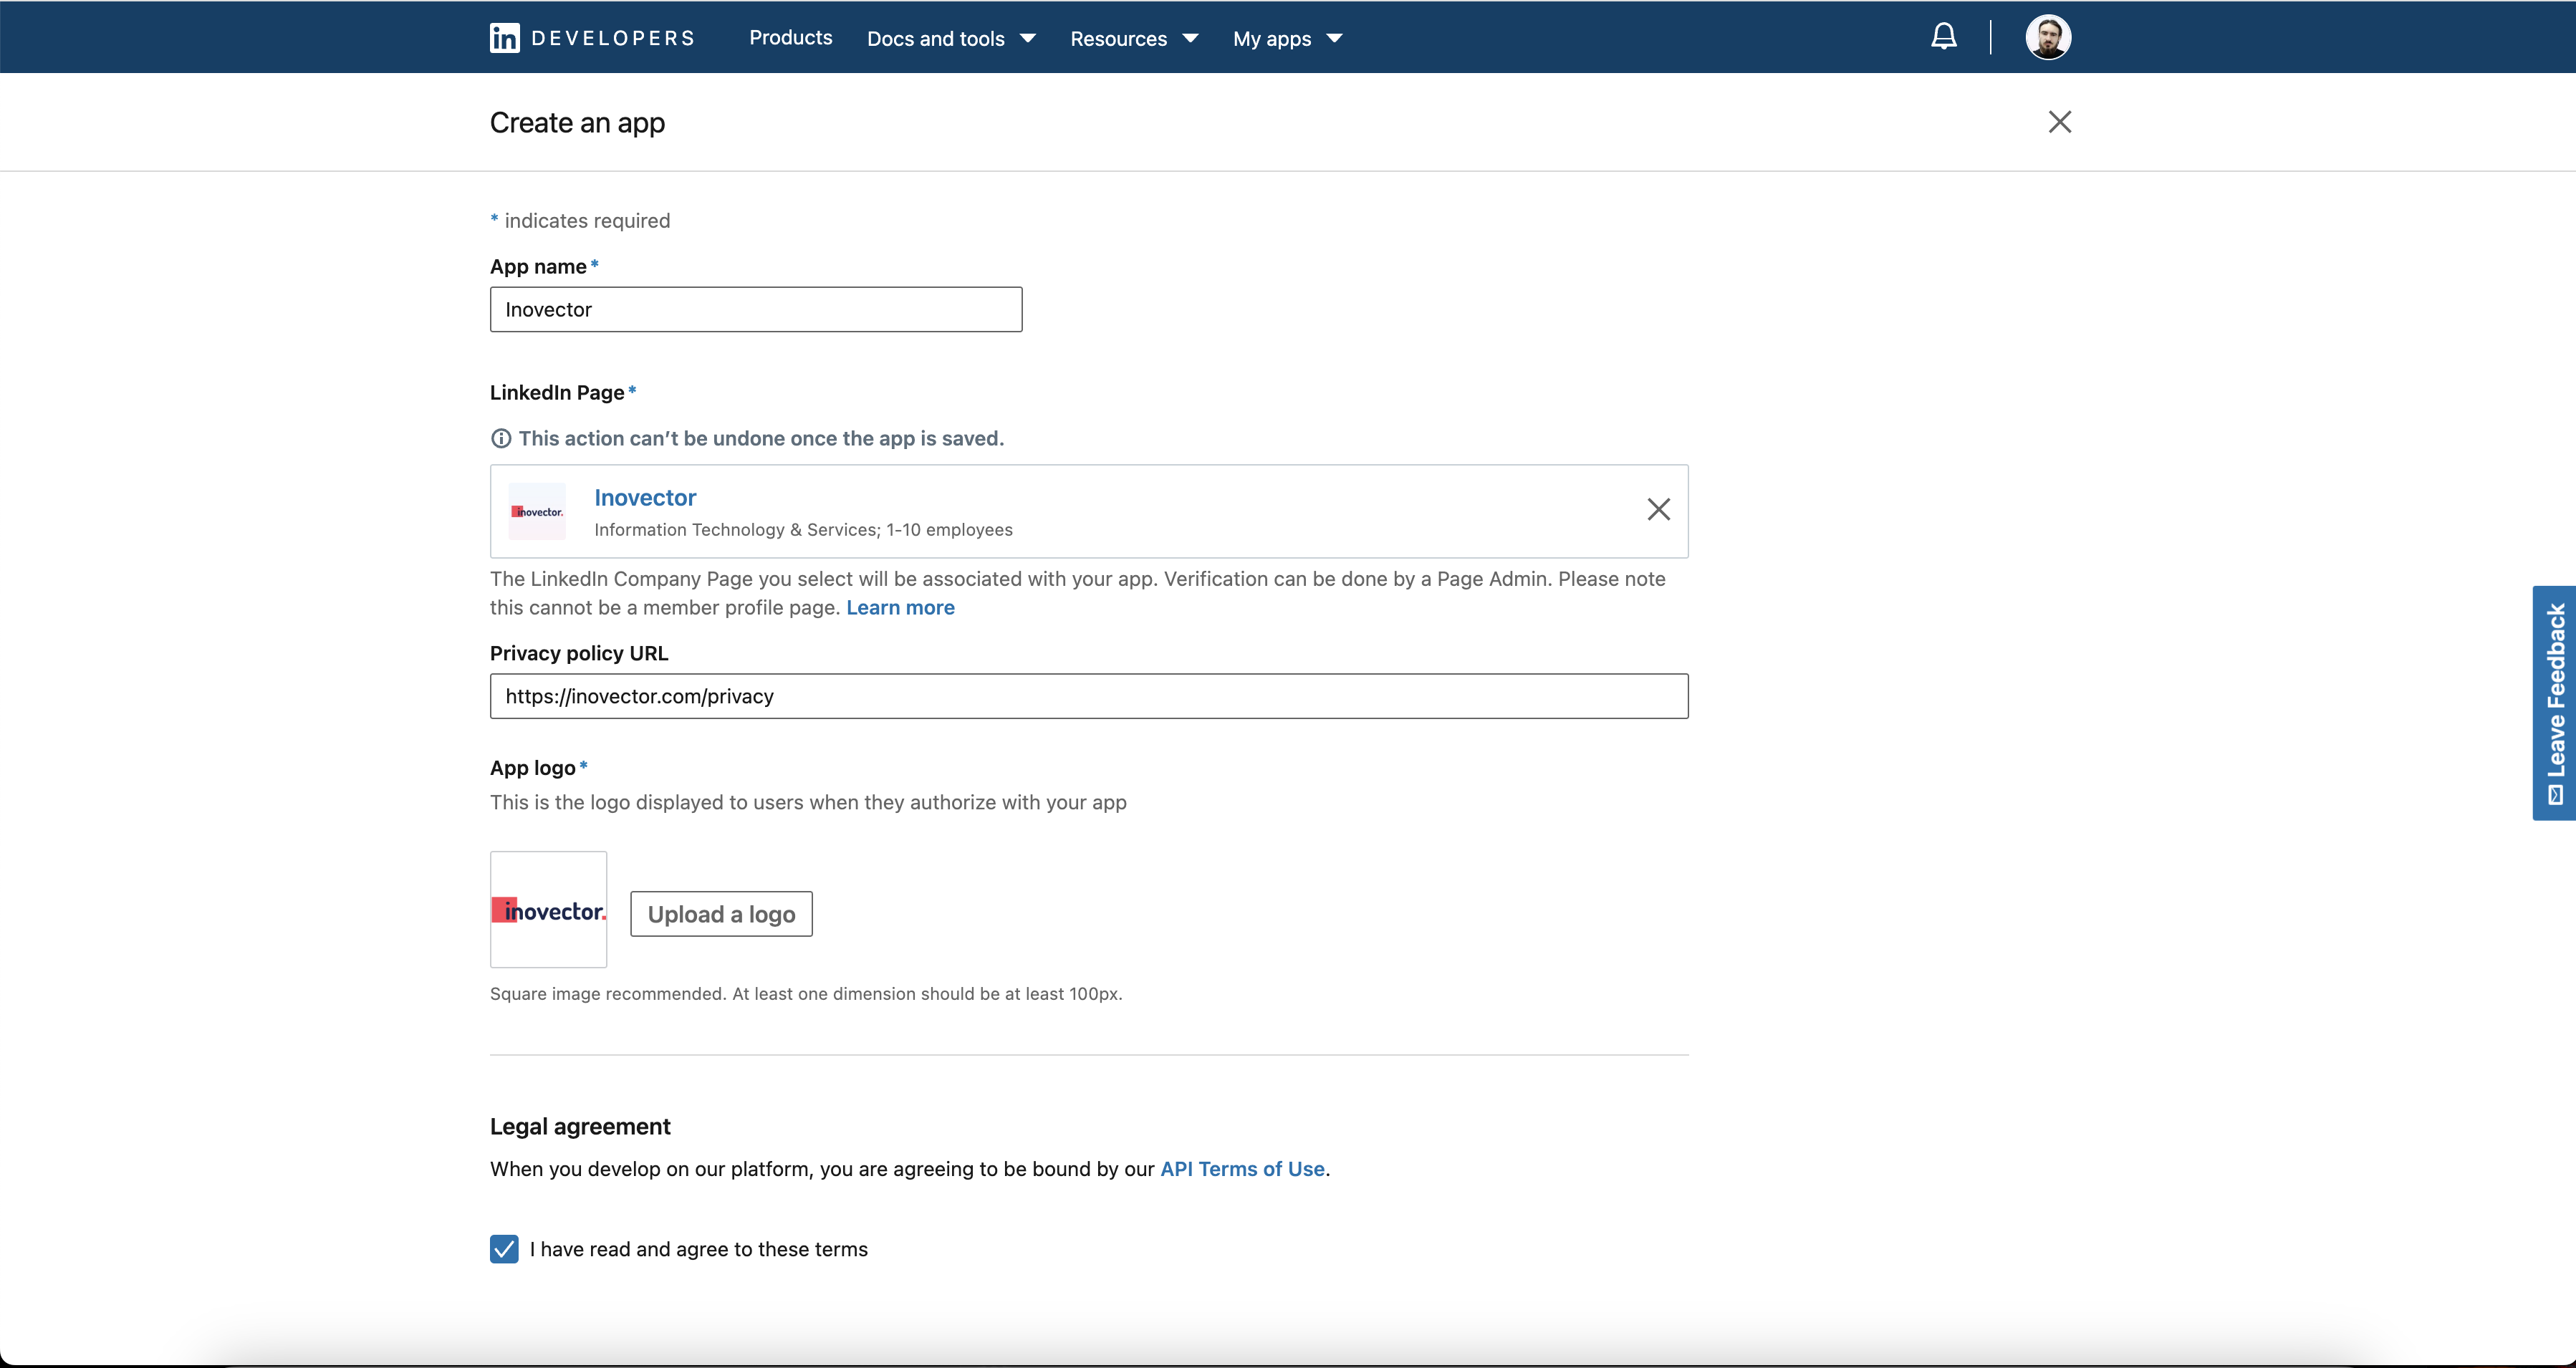
Step 1: Create an App
To create a LinkedIn app, you must first have a LinkedIn Account. Then, follow these steps:
- Go to the LinkedIn Developer website at https://www.linkedin.com/developers/
- Click on the "Create App" button in the center of the screen
- Fill out the required information, such as the app name, LinkedIn page, privacy policy, and app logo
- Agree to the LinkedIn Developer Terms of Use and click "Create App"
Step 2: Connect Your Products
Now that your LinkedIn app is created, you can connect your products to it.
LinkedIn offers the possibility to post on:
- Personal profile
- Business page
If you want Mixpost to be able to post only on your personal page, you must add only these 2 products:
If you want Mixpost to be able to post on the personal profile and on the business page, you must add this product:
- Community Management API
Unfortunately, only legal companies receive access to the "Community Management API", for that you must send them all the necessary information and documents in the request for access to the "Community Management API".
Products that offer the possibility to post only on the personal profile do not require verification.
If you need the "Community Management API", submit a request and you have to wait for access to the "Development Tier" which has very small limits. With access to the "Development Tier" you can use Mixpost to post on your business pages/personal profile. If you need more limits, you can request an upgrade attached with other information about your legal company and a video with a voice from the Mixpost dashboard. Requesting access to this product is done as described below.
If you already have an app created with products added just to post on your personal profile. You need to create a new application with "Community Management API" only
To add products, follow these steps:
- Go to the "Products" section of your LinkedIn app dashboard
- Request access to products for your needs. For example, I want to be able to post on my personal profile:
- Share on LinkedIn
- Sign In with LinkedIn using OpenID Connect
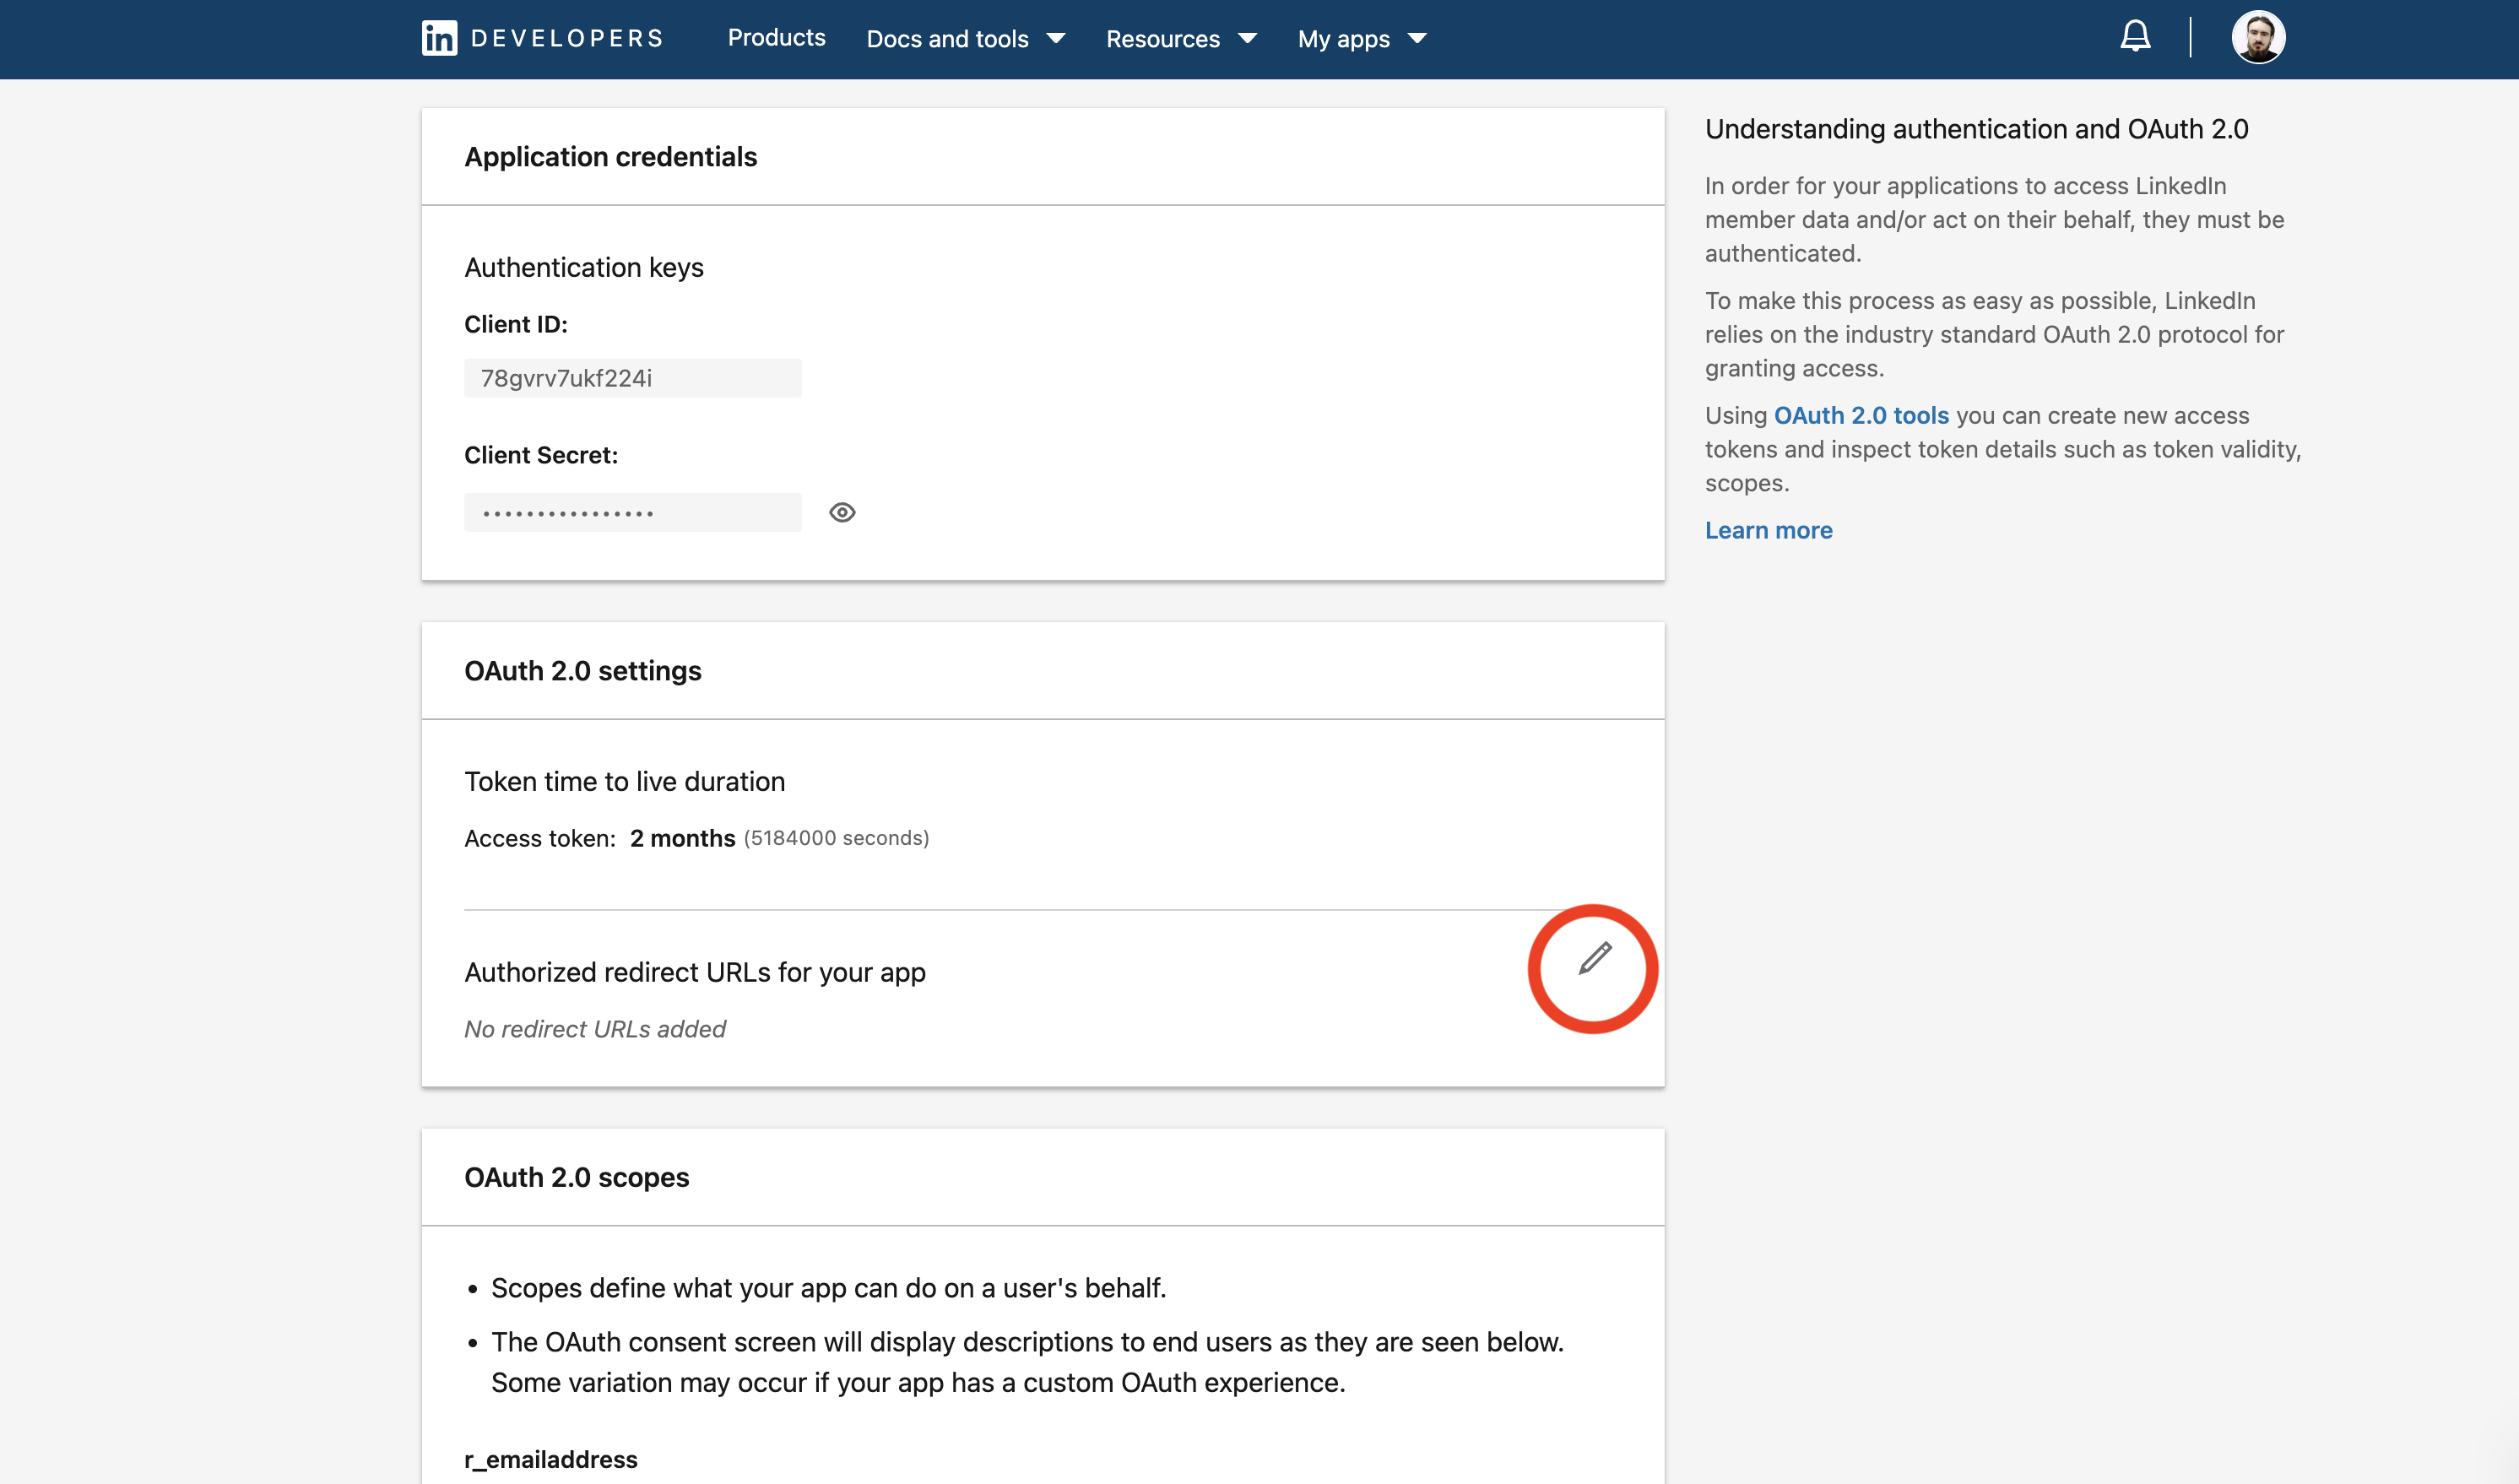
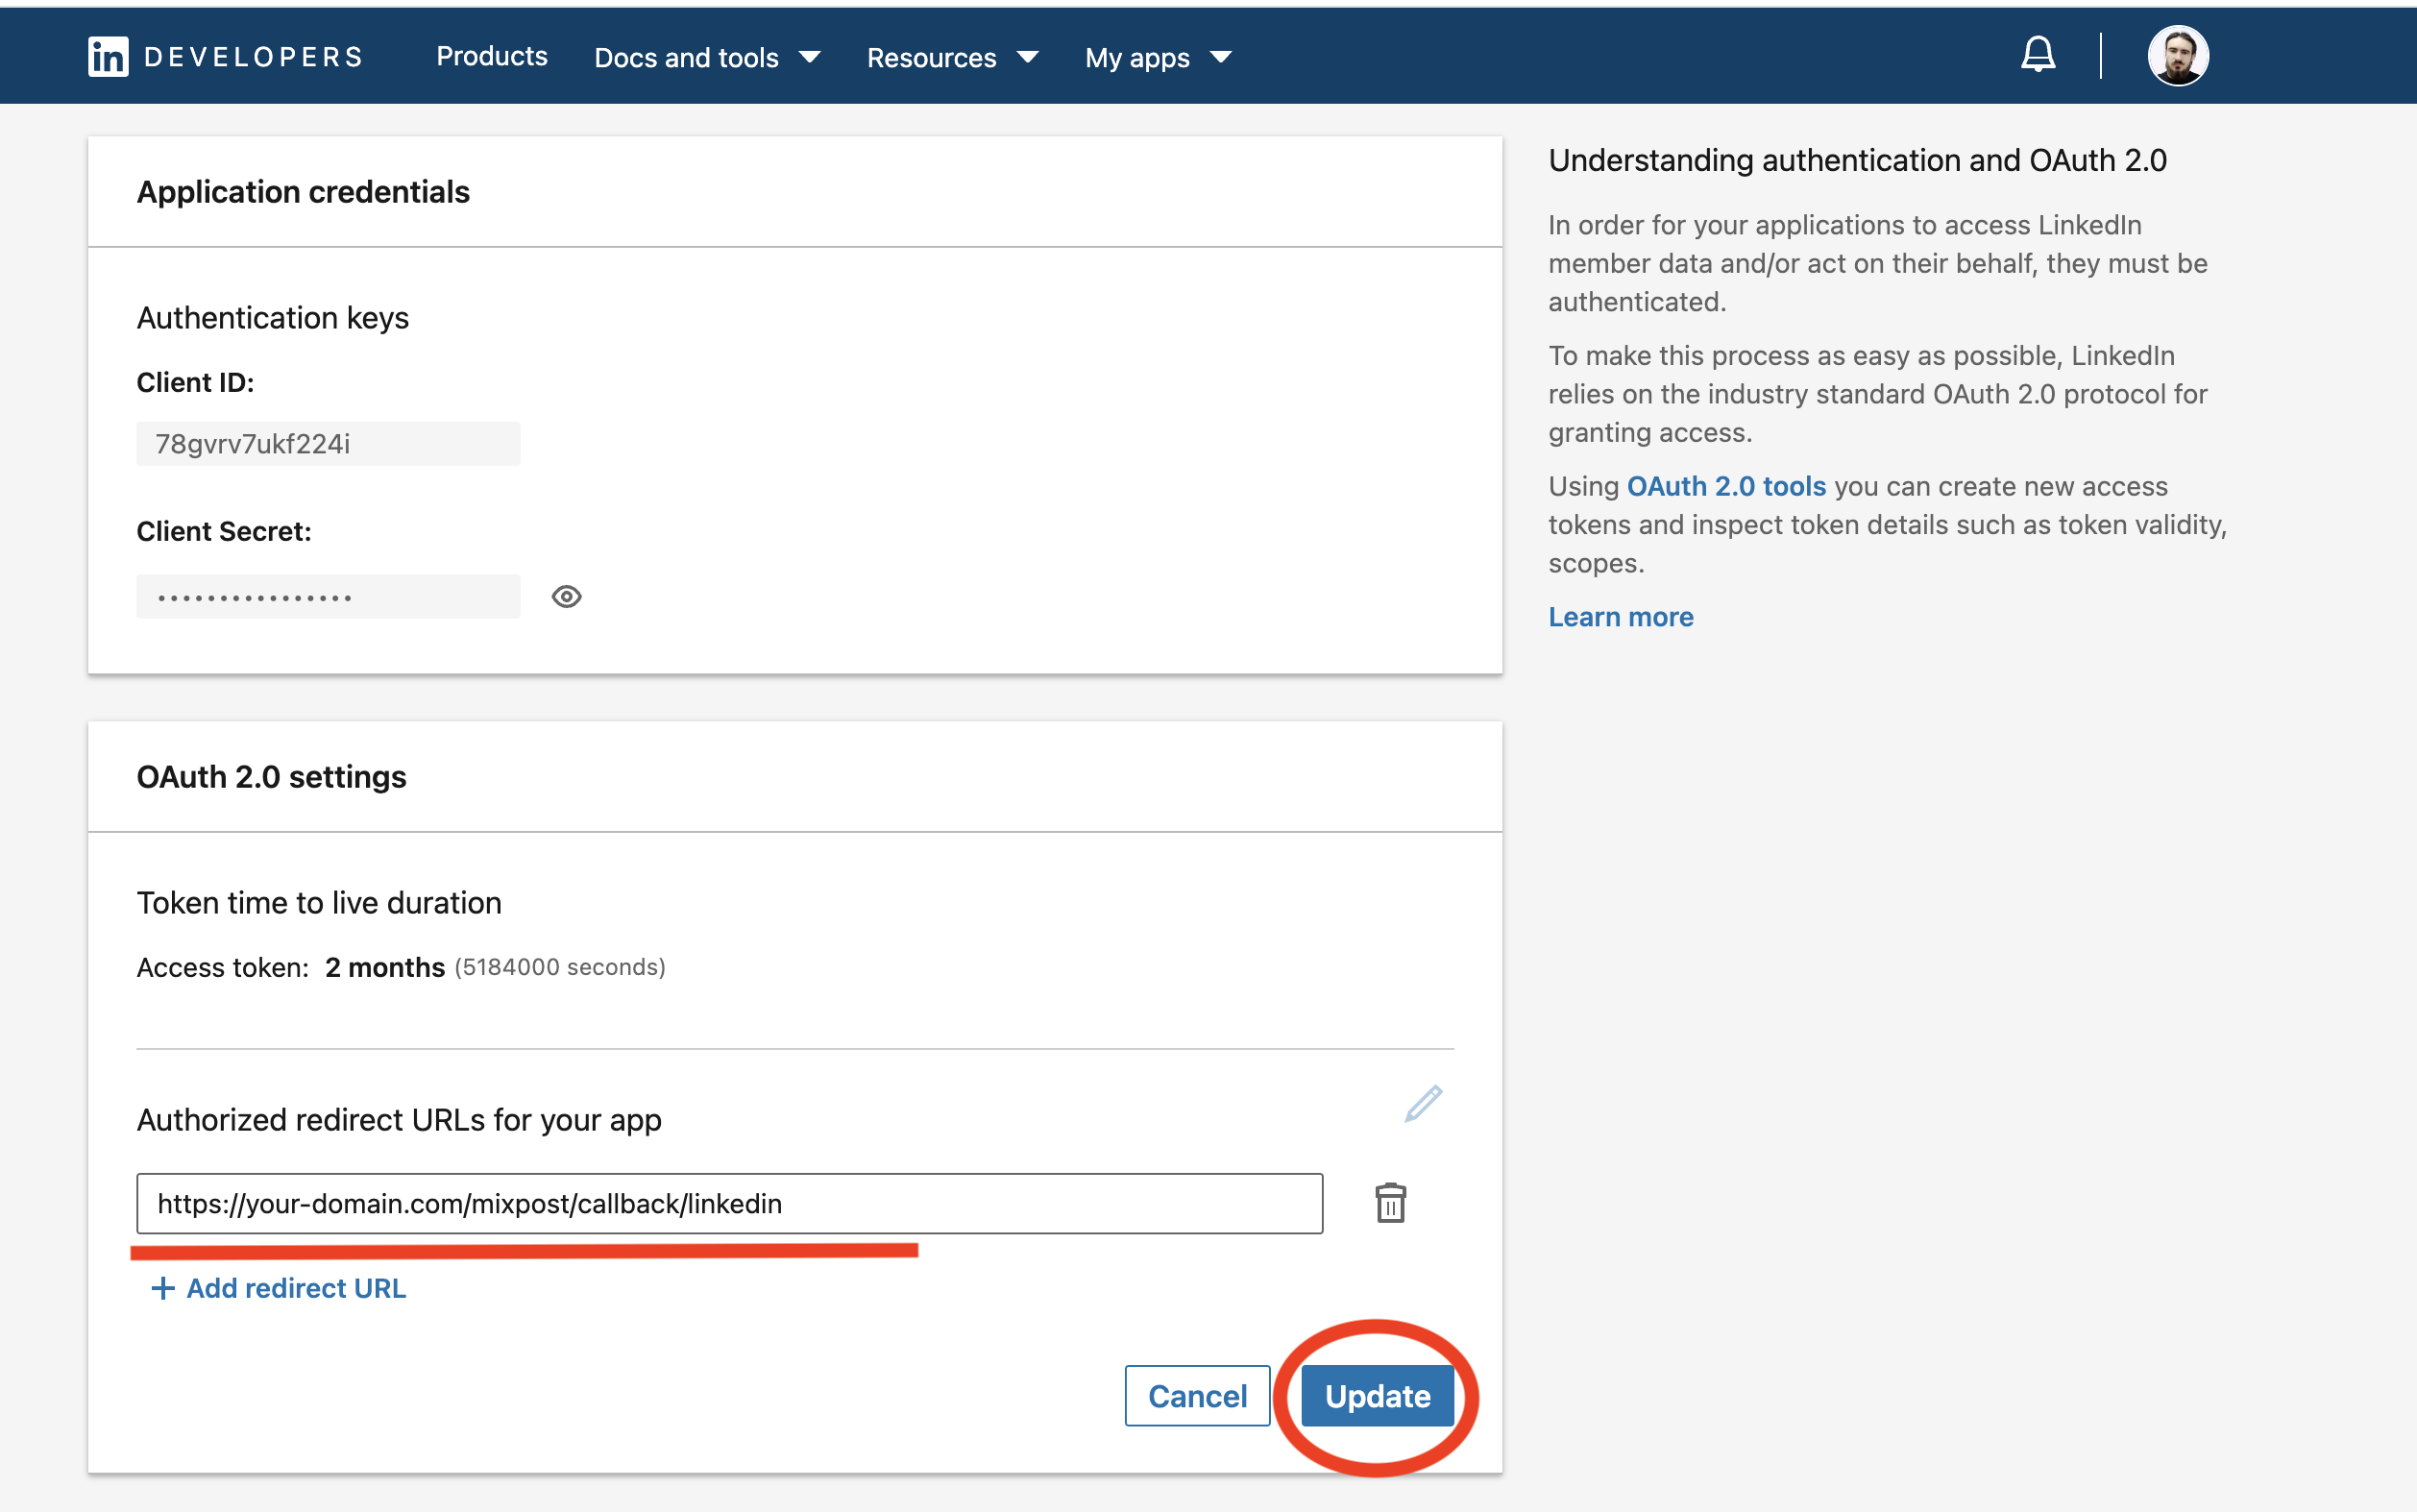
- Configure the "Authorized callback URLs"
https://your-domain.com/mixpost/callback/linkedin
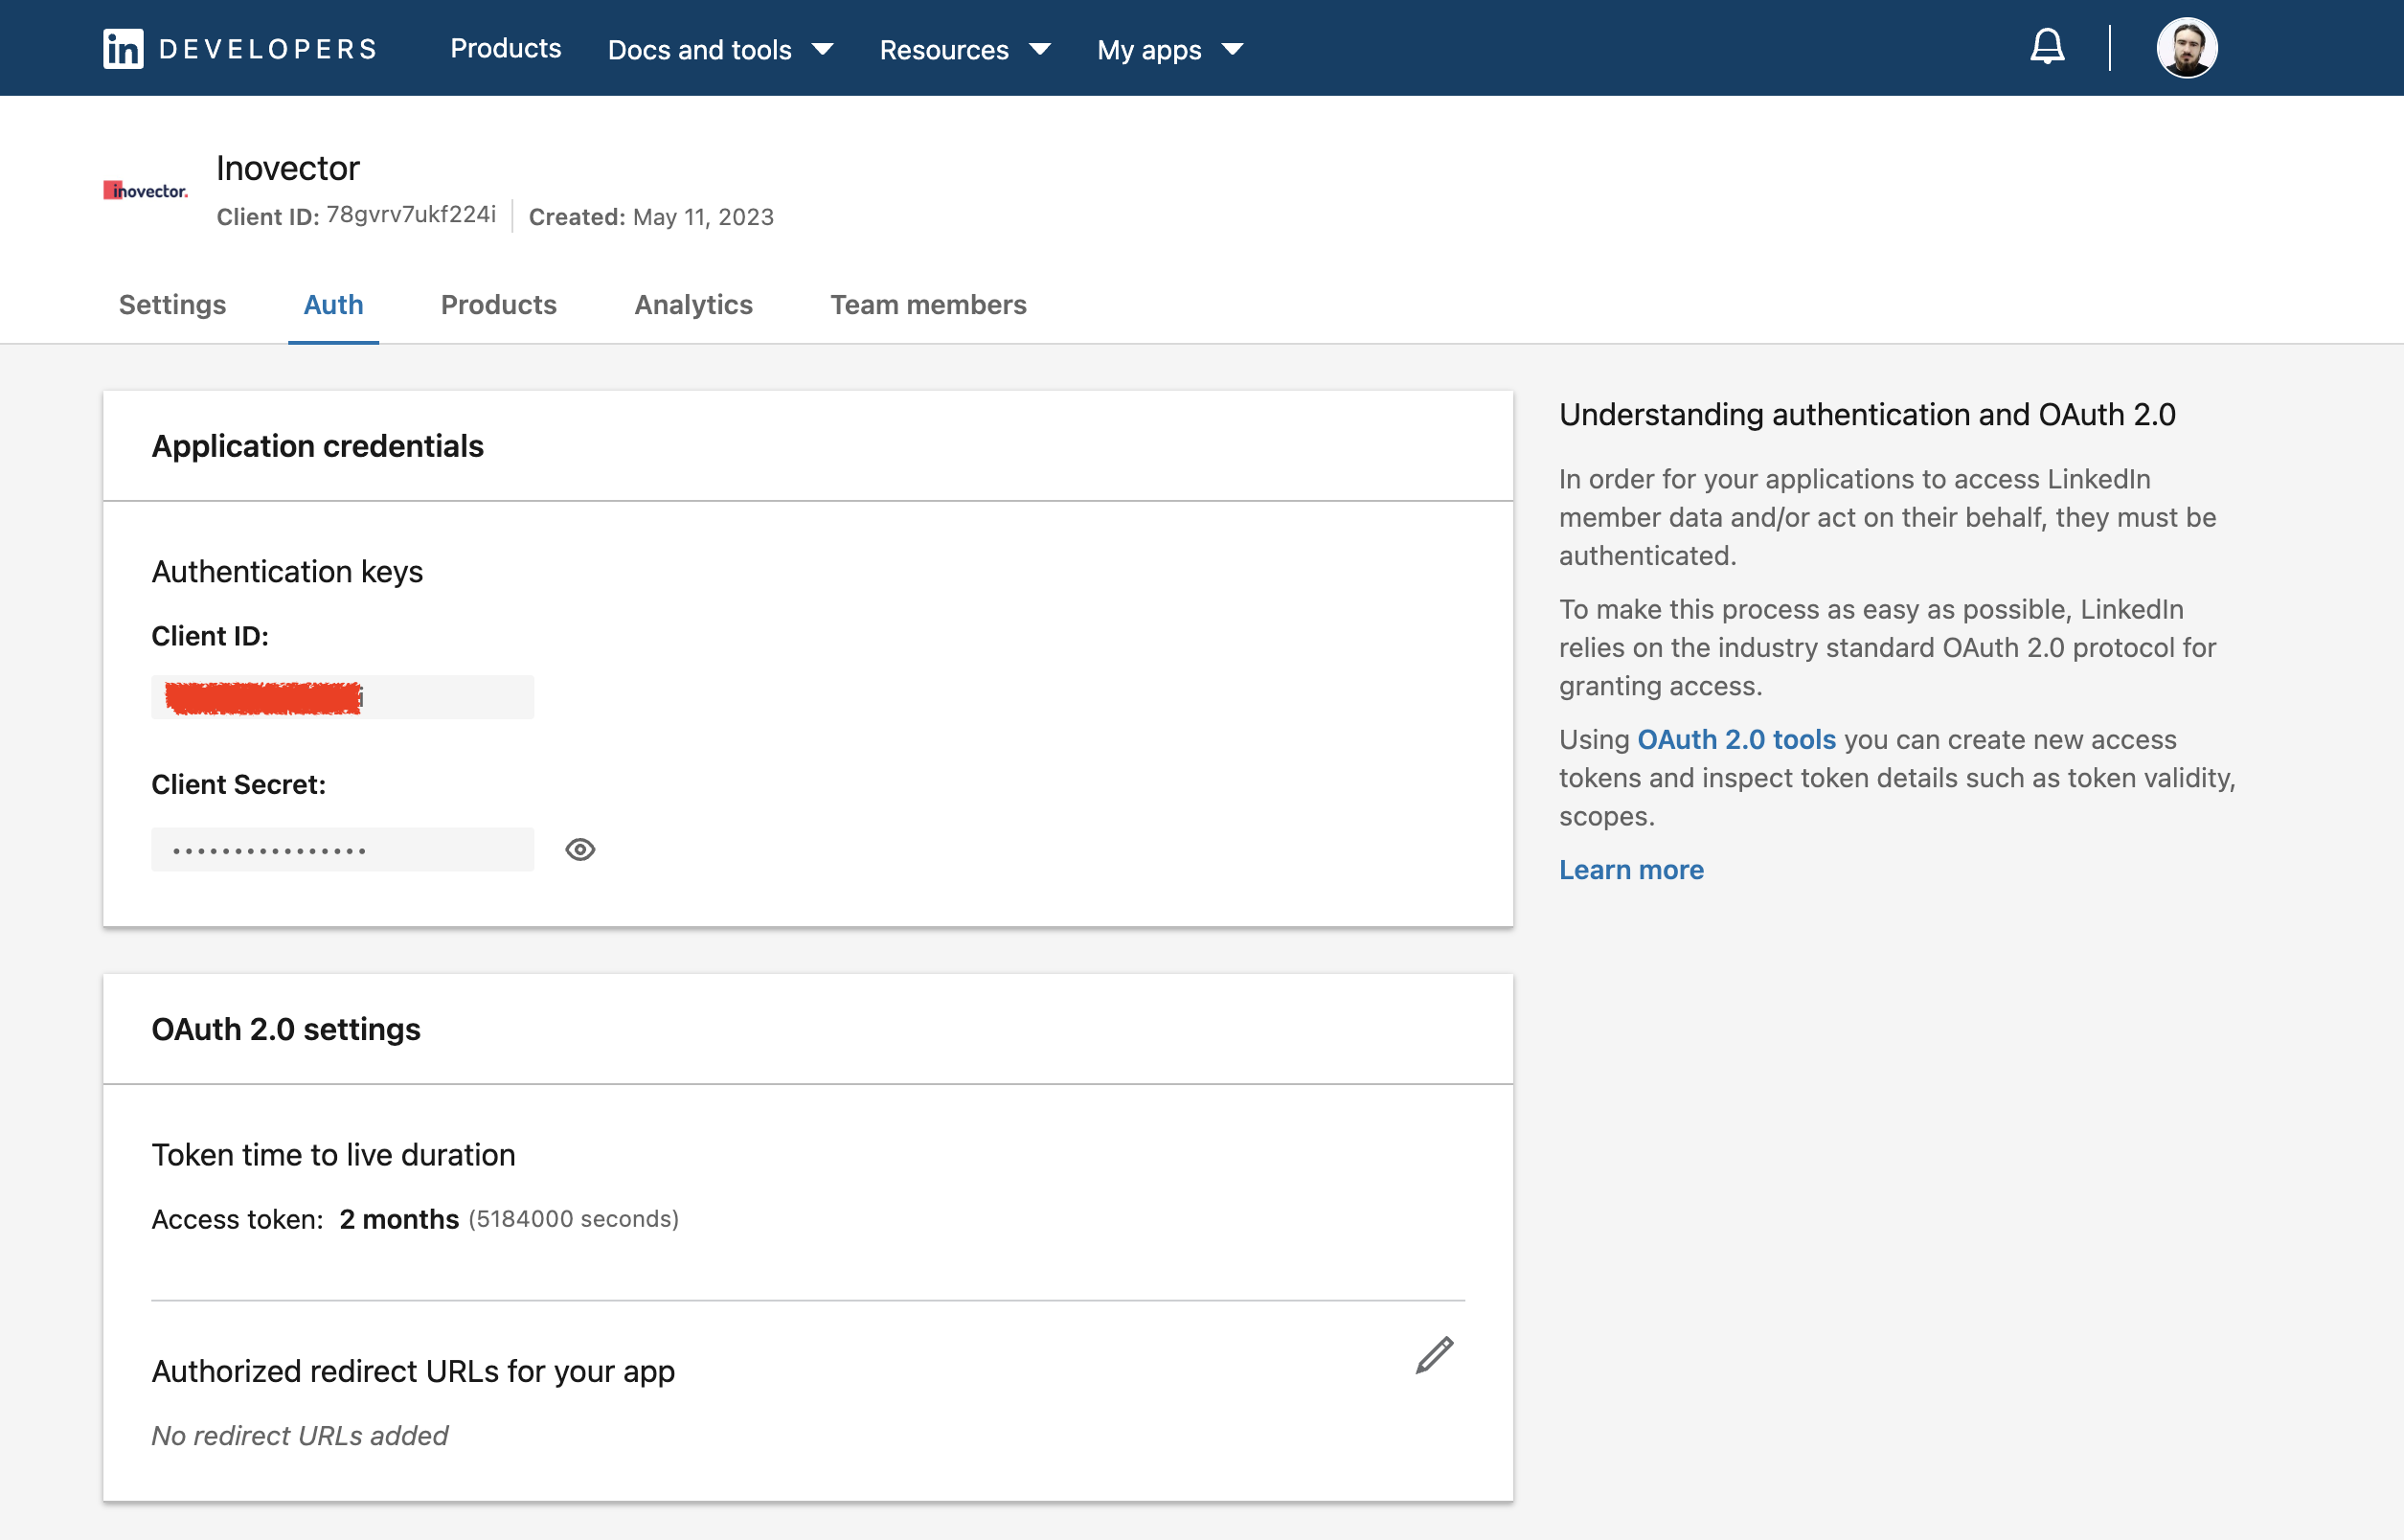
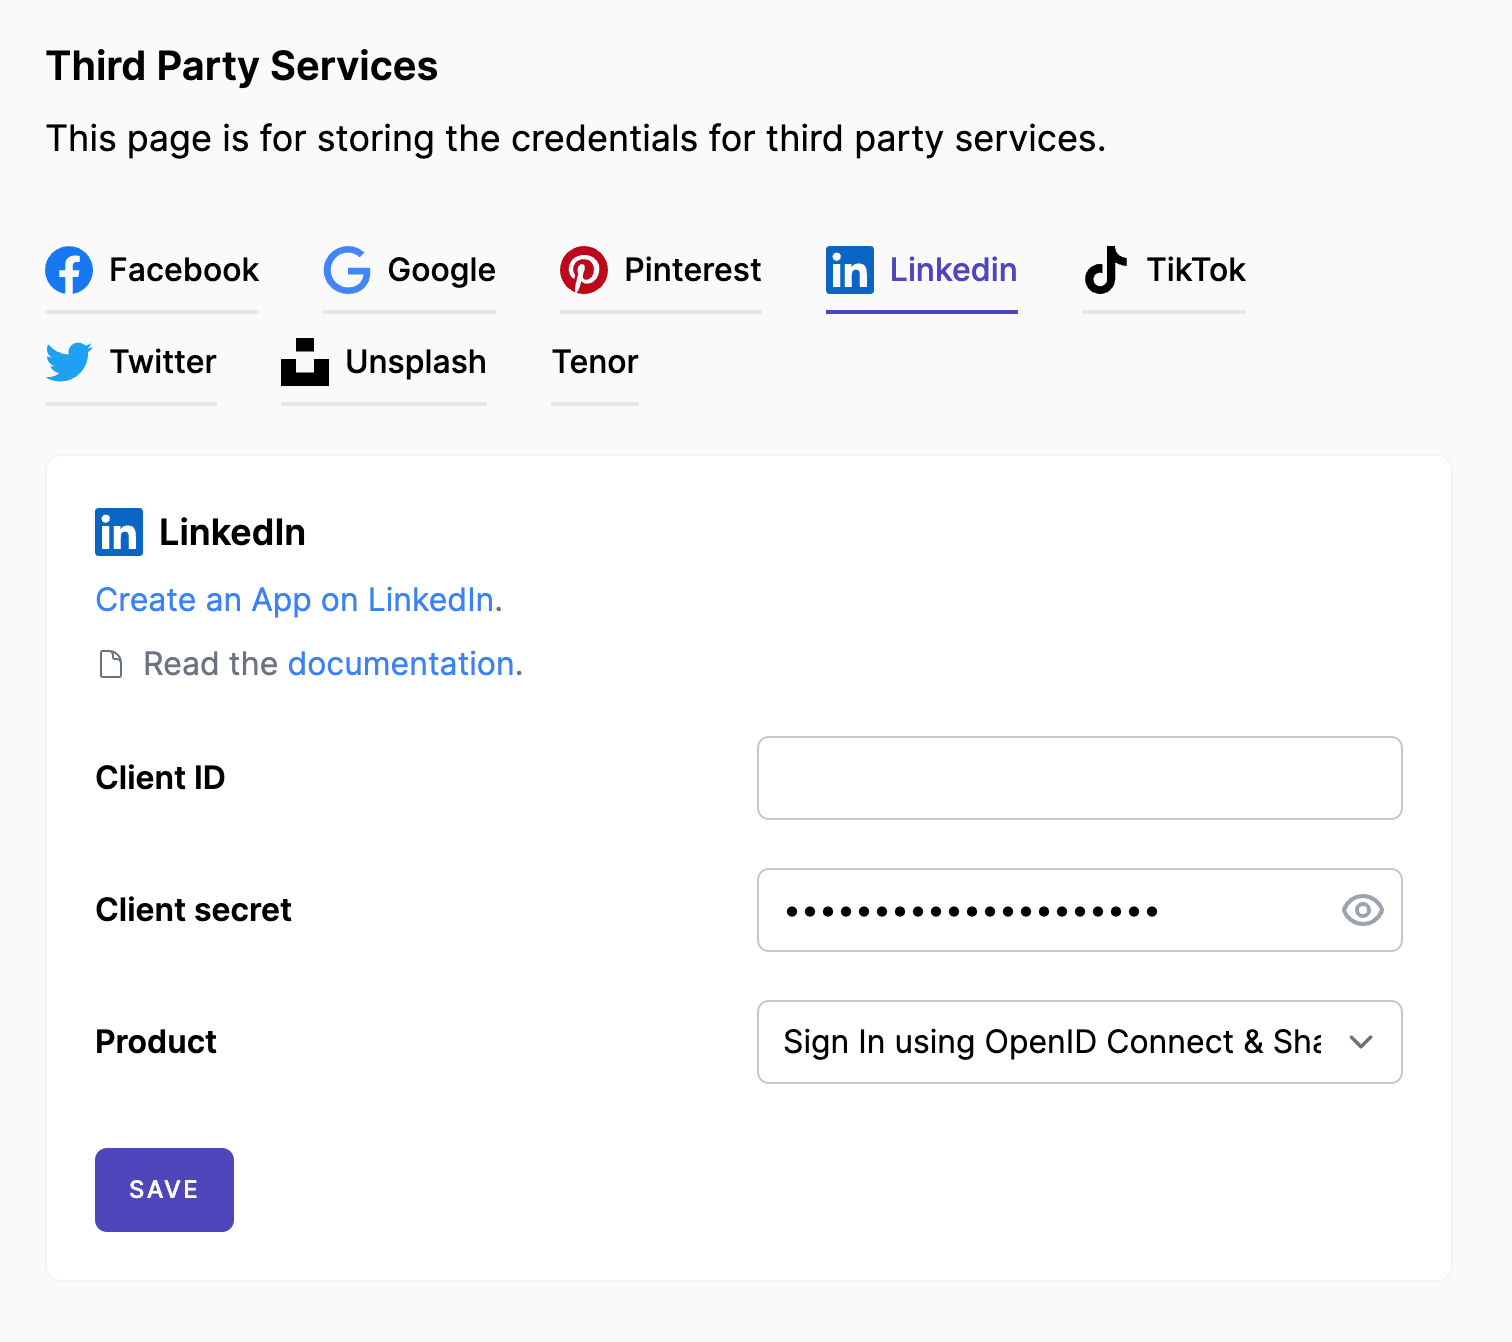
https://your-domain.com/mixpost/callback/linkedin_page - Go to the "Auth" section and copy the "Client ID" & "Client secret" to your Mixpost dashboard, page "Services". If you are using Pro/Enterprise, this page is in the Admin Console. Also here, on the services page, don't forget to select the product.
Here is an example of the "Content Management API" request

TikTok
TikTok has become one of the most popular social media platforms. If you want to integrate TikTok into your application, create a TikTok App API. Here's a step-by-step guide on how to do it.
Step 1: Create a TikTok Developer Account
Before creating a TikTok App API, you need to have a TikTok developer account. If you don't have one, go to https://developers.tiktok.com/signup and sign up for a developer account.
Step 2: Create a New TikTok App
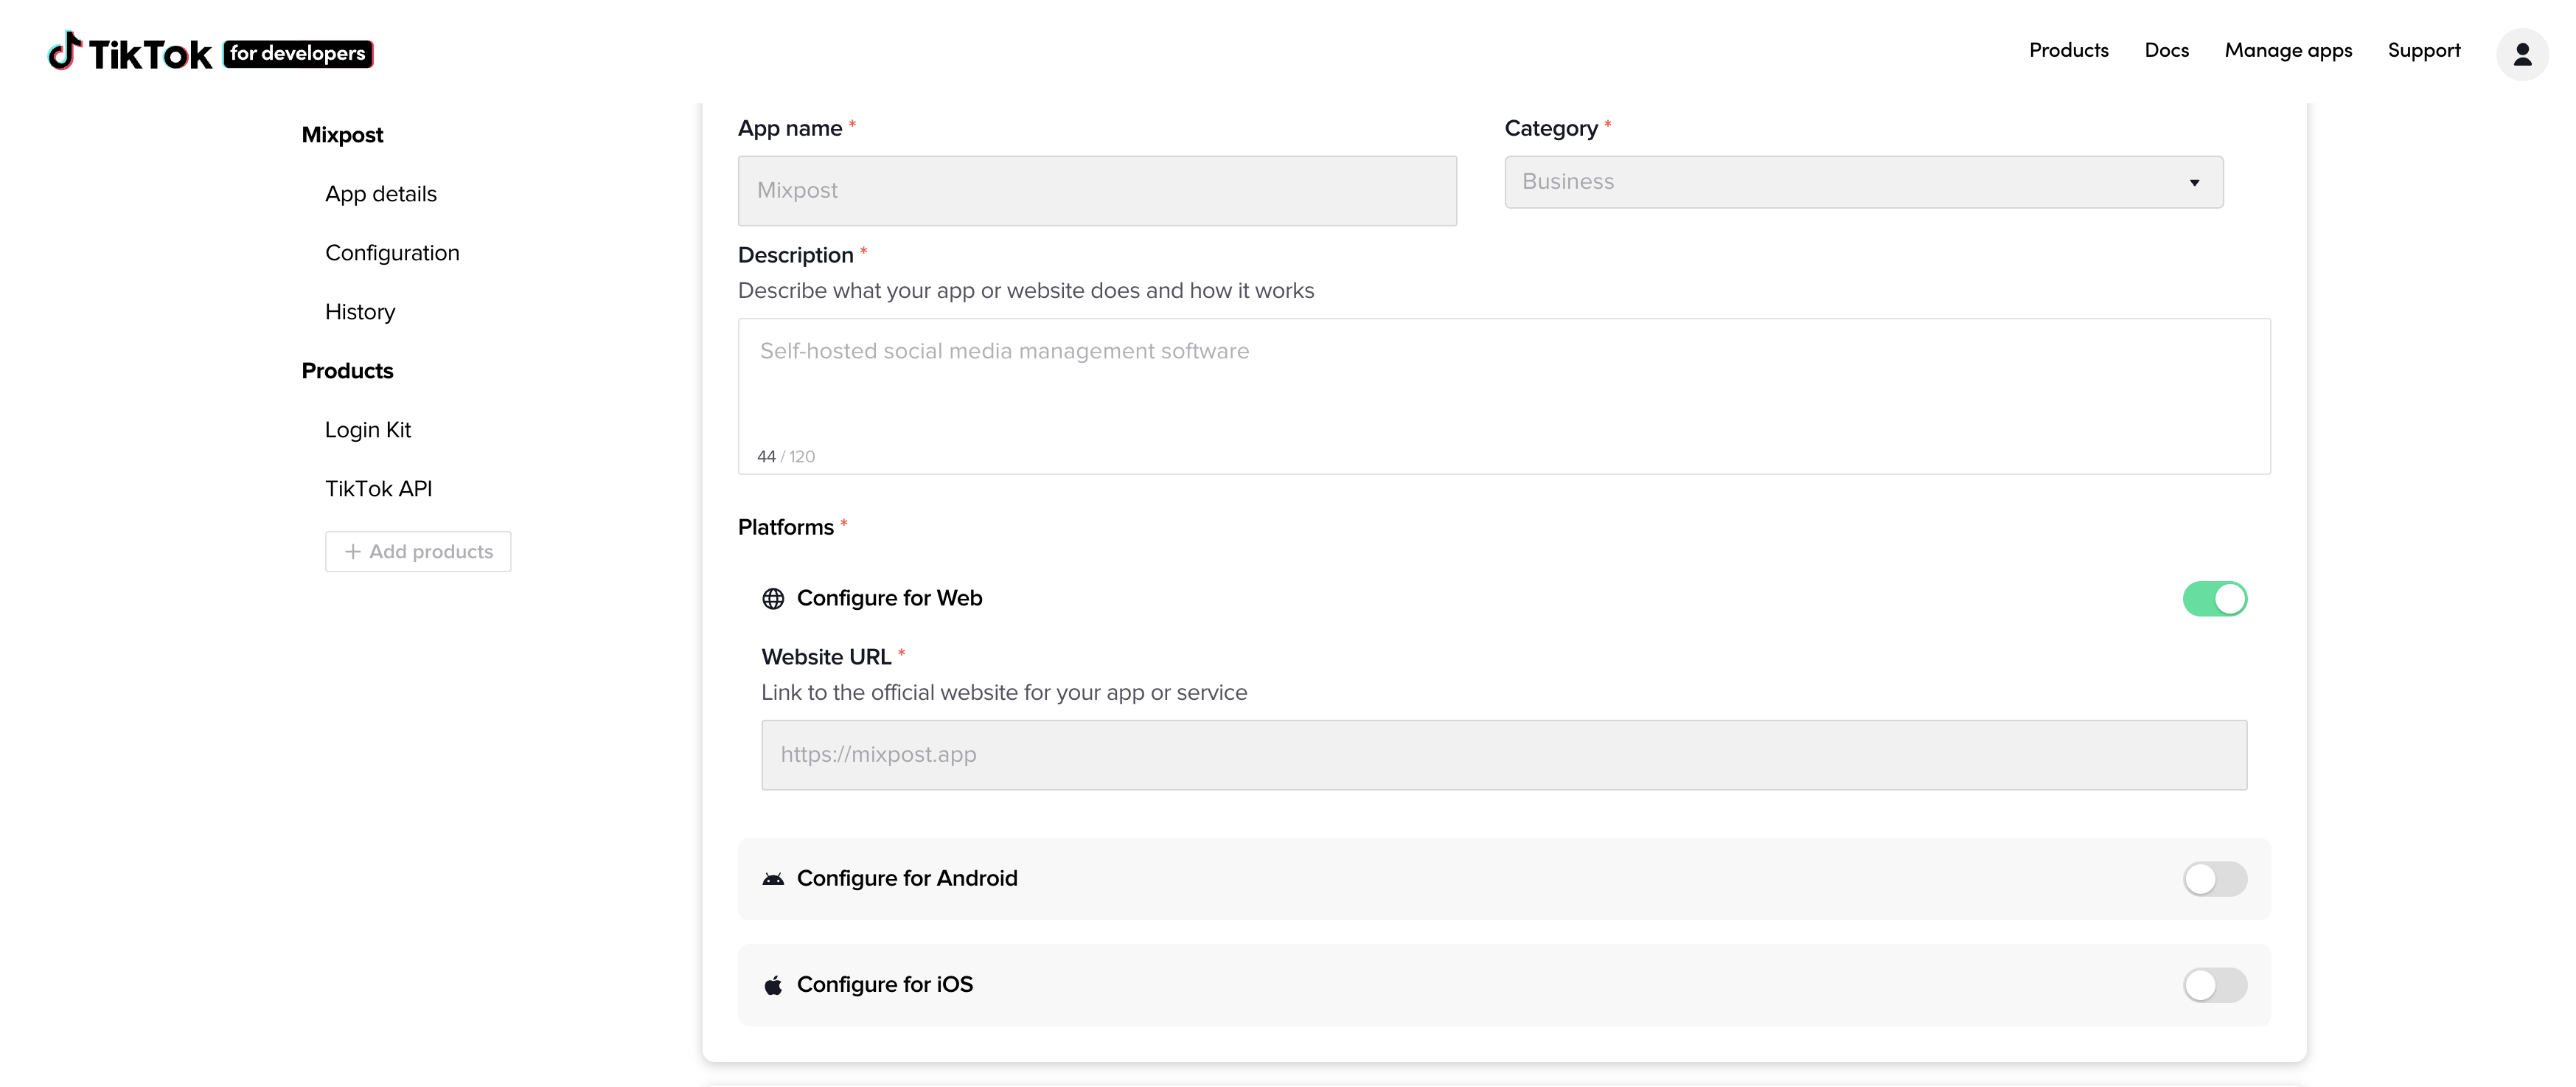
Once you have your developer account, log in and go to the "Manage apps" menu item. Click on "Connect an app" and fill in the information required. You will be asked to provide the following:
- App Icon
- App name
- Category
- Description (example: Self-hosted social media management software)
On the "Platforms", enable "Configure for Web" option and put the Link to the official website for your app or service.
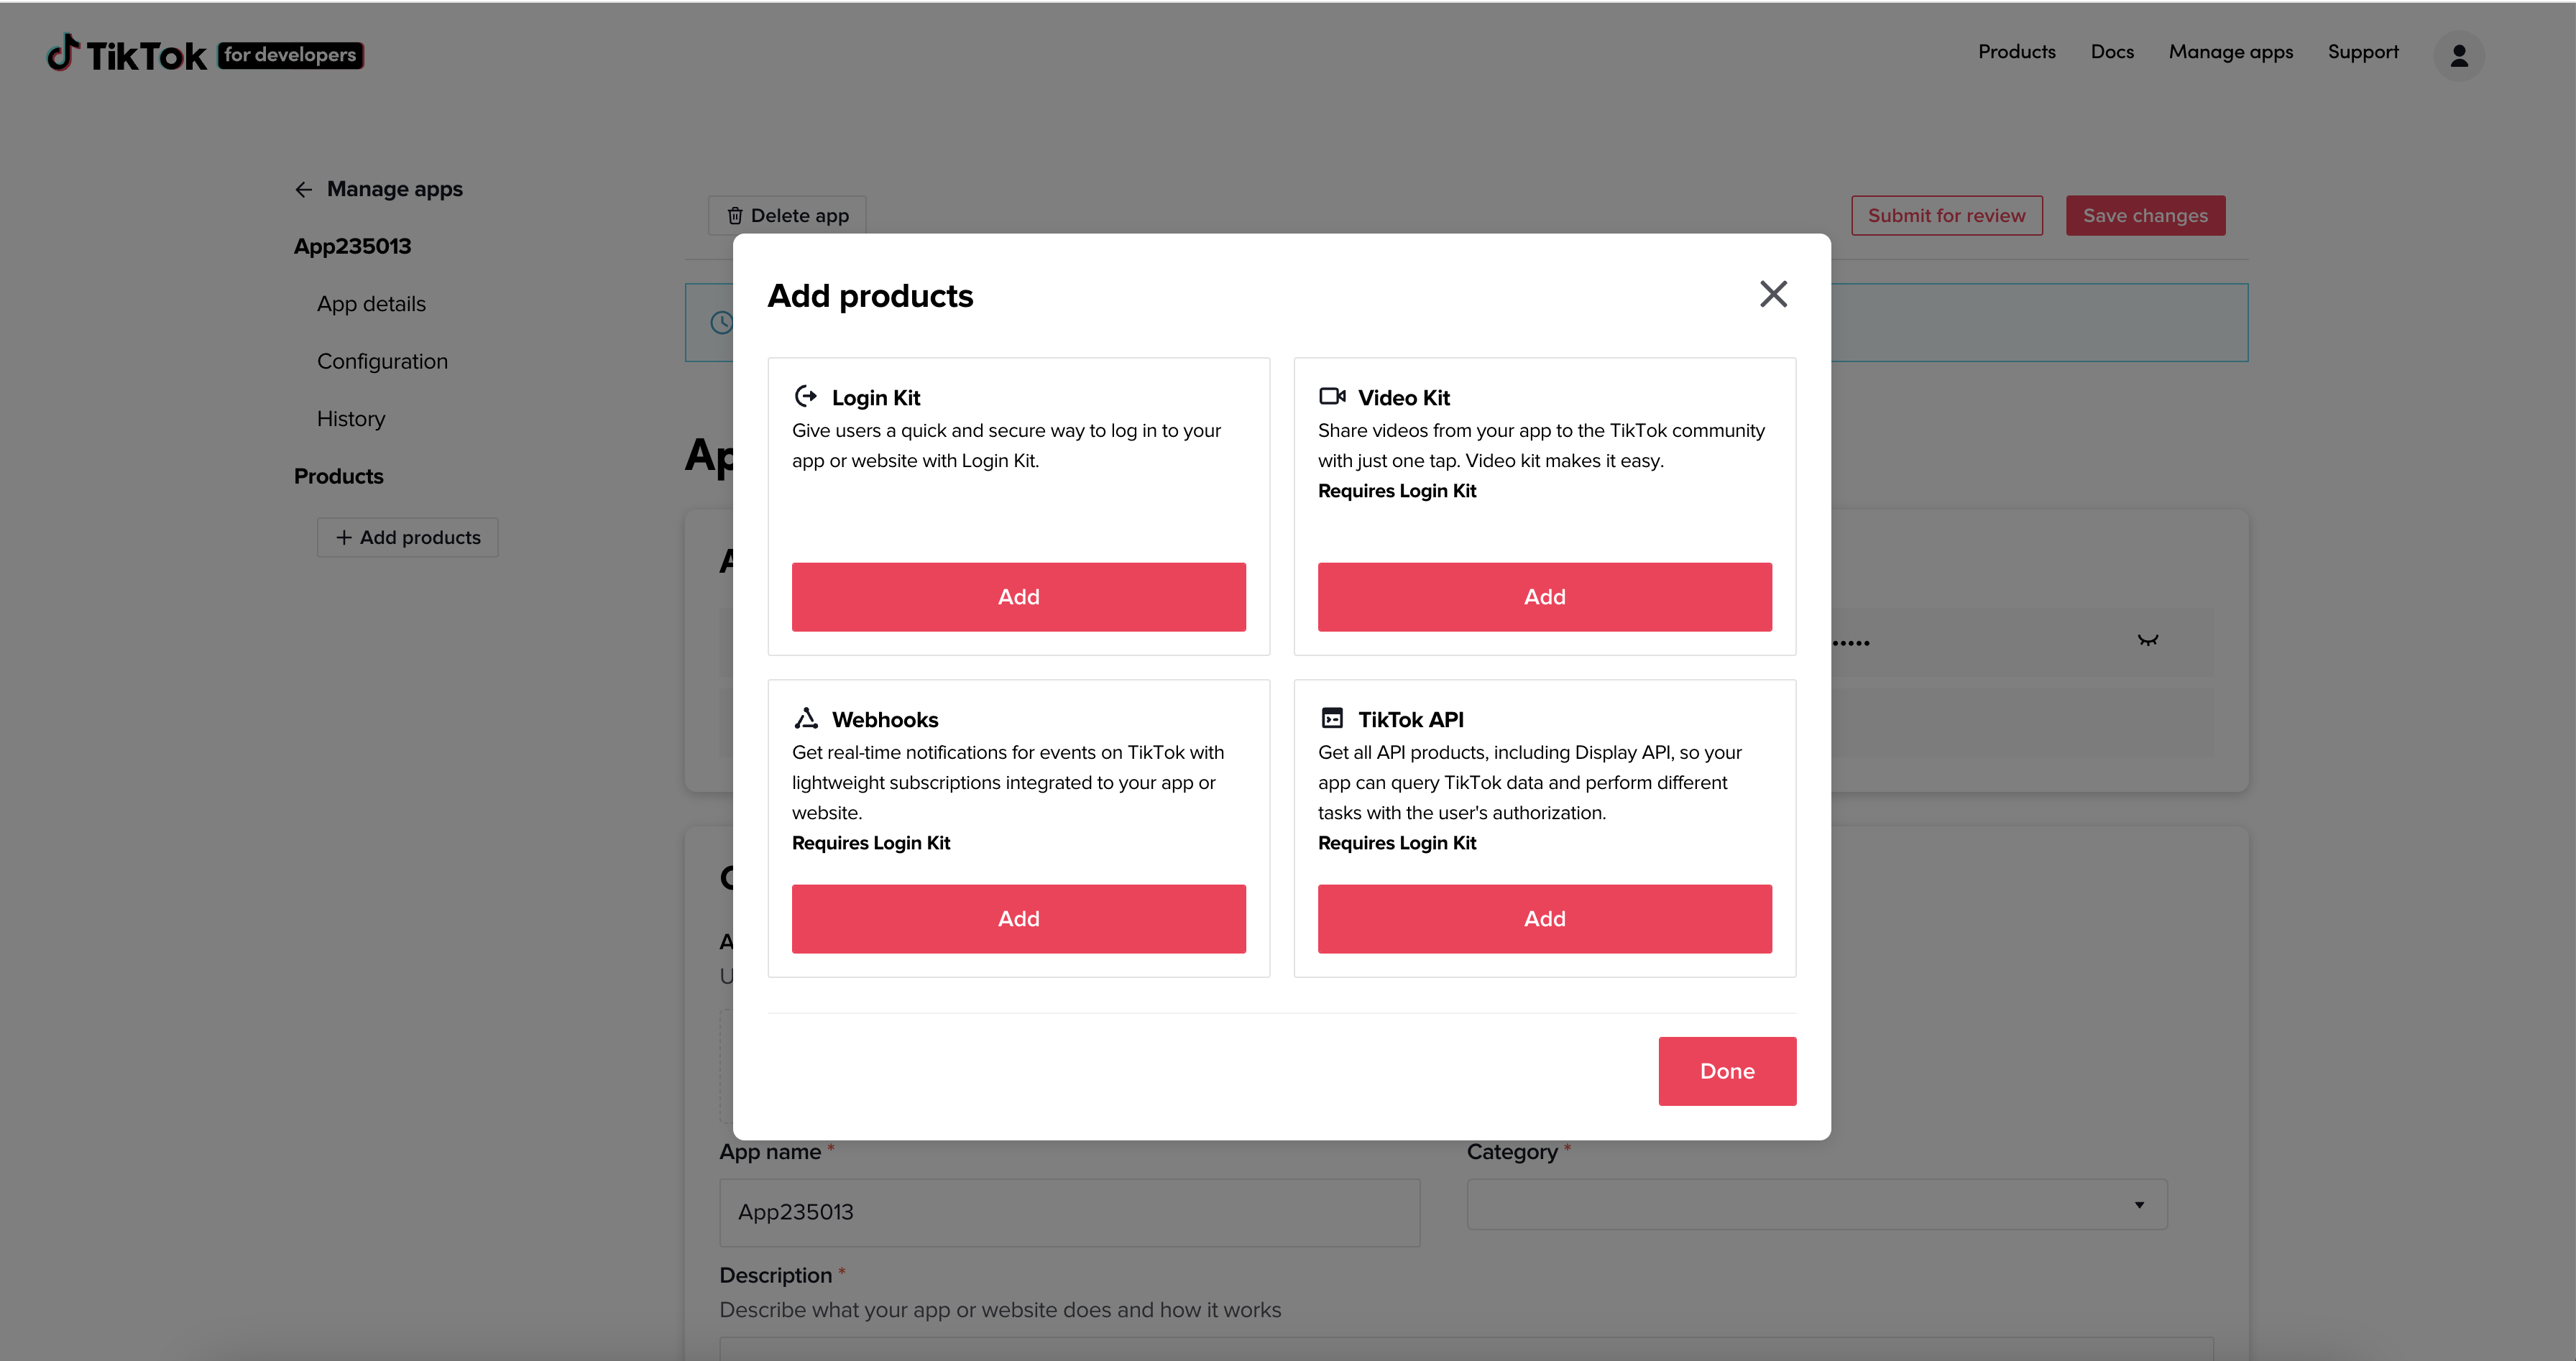
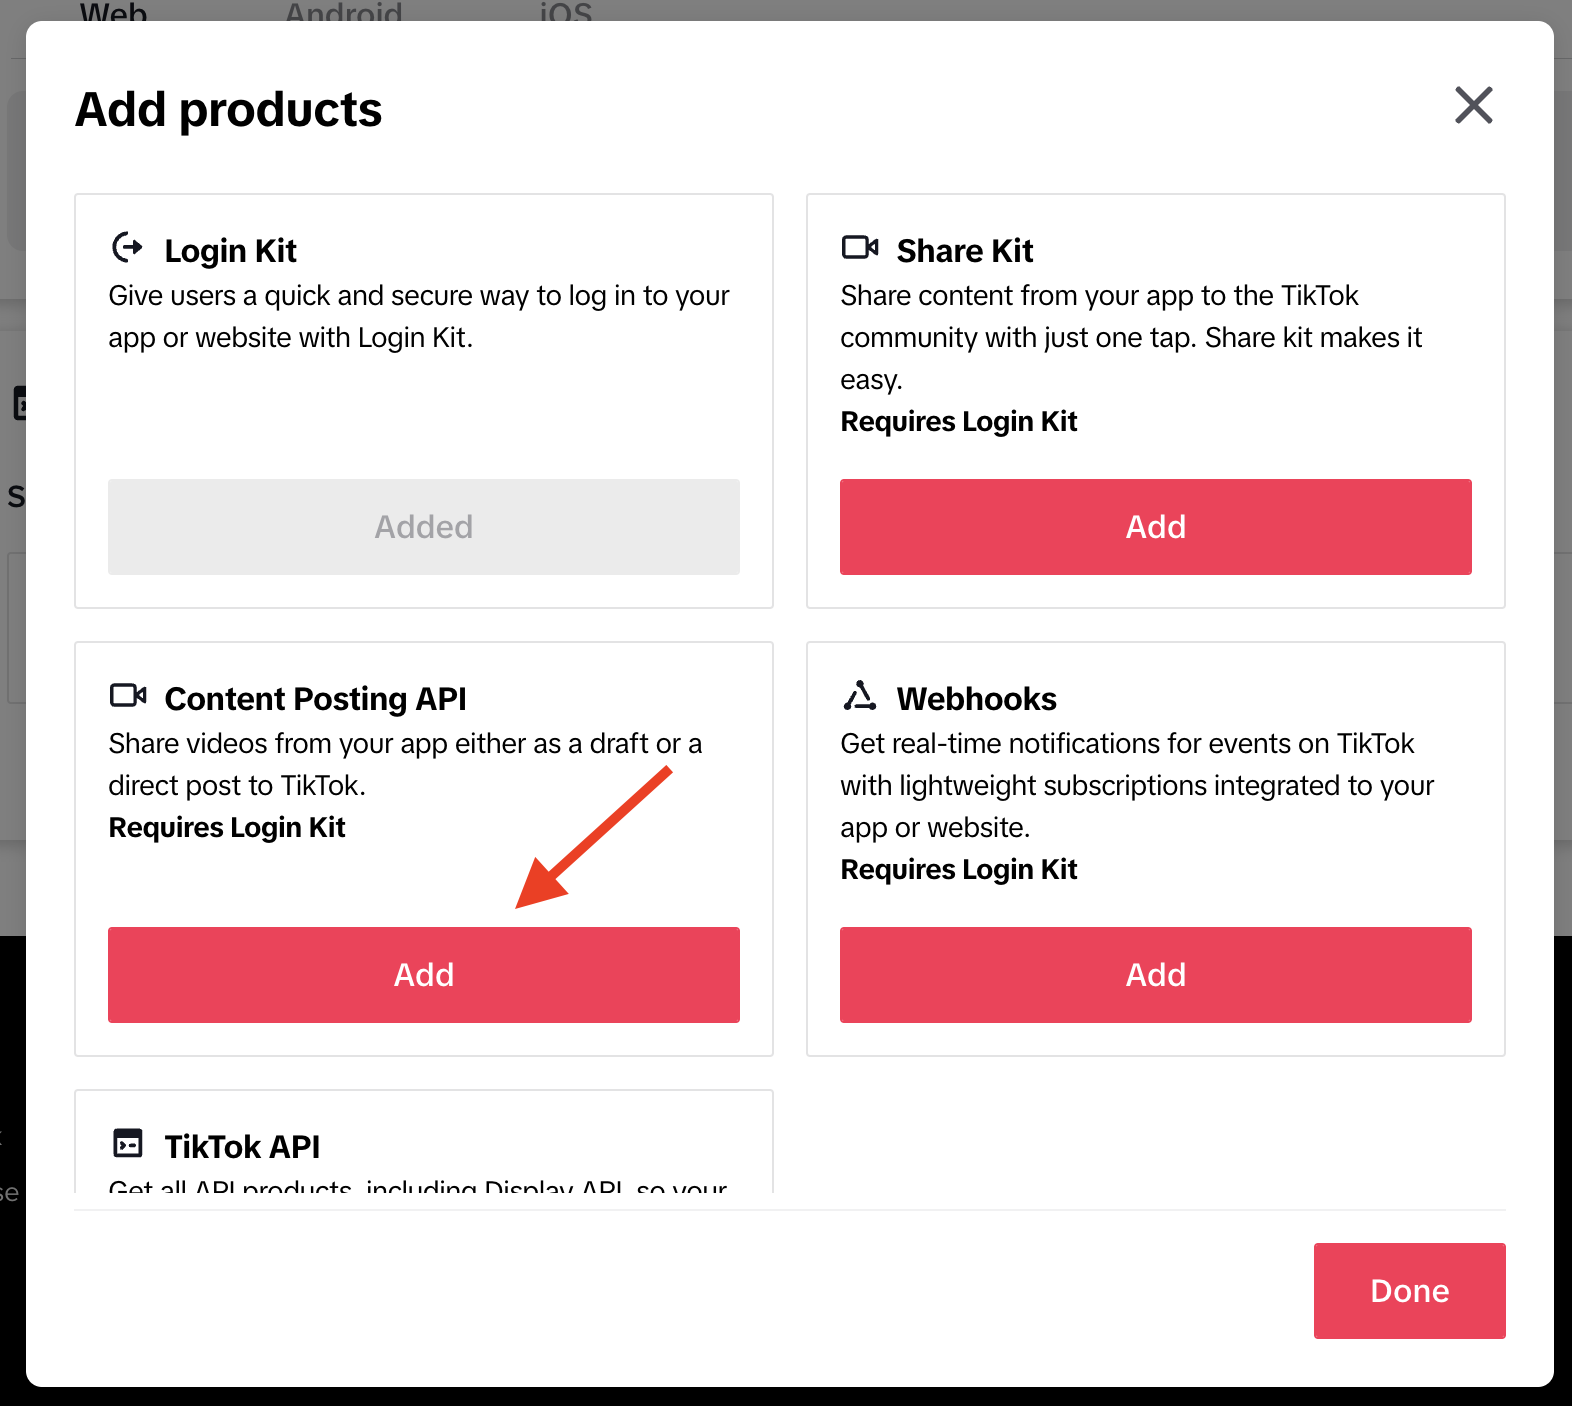
Next, in the left sidebar, click on "Add products" button and add the following products:
- Login Kit
- TikTok API
Then click on "Done" button and scroll down to the "Products" section.
On the "Login Kit" fill in the "Terms of Service URL" & "Privacy Policy URL" input.
Don't have these pages?
Don't worry, with Mixpost you can generate Terms, Privacy policy pages in seconds.
Navigate to "Admin Console -> Pages" and click on the right-top "Generate Samples" button.
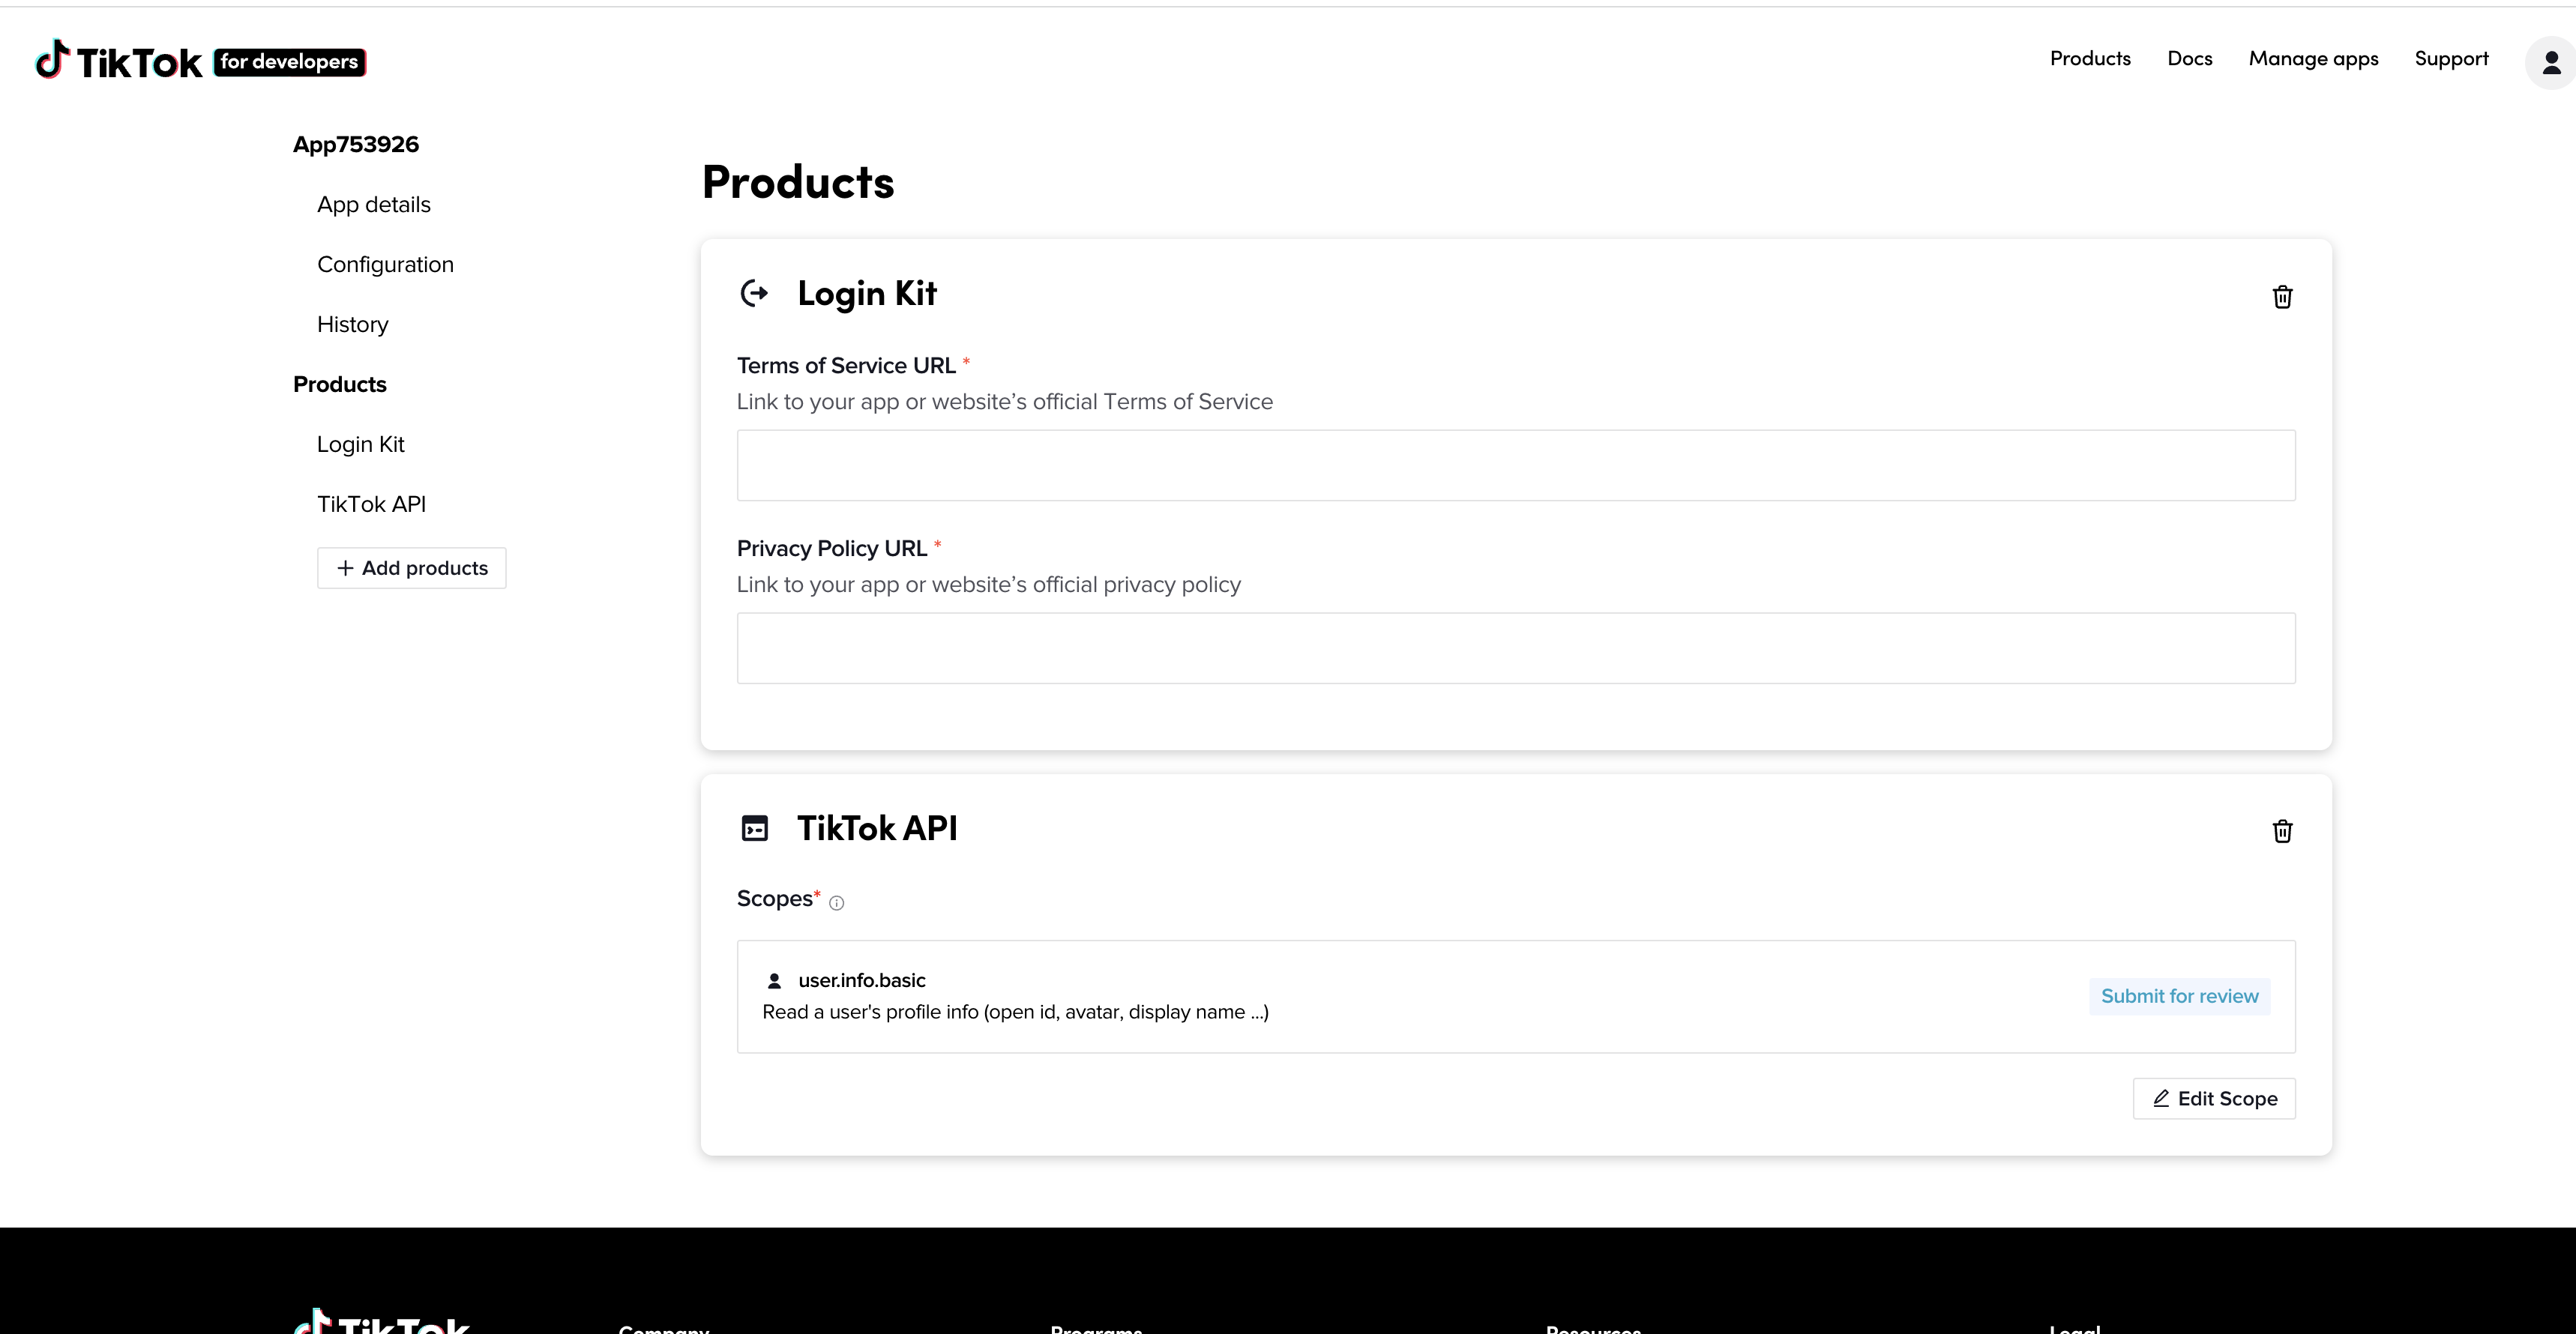
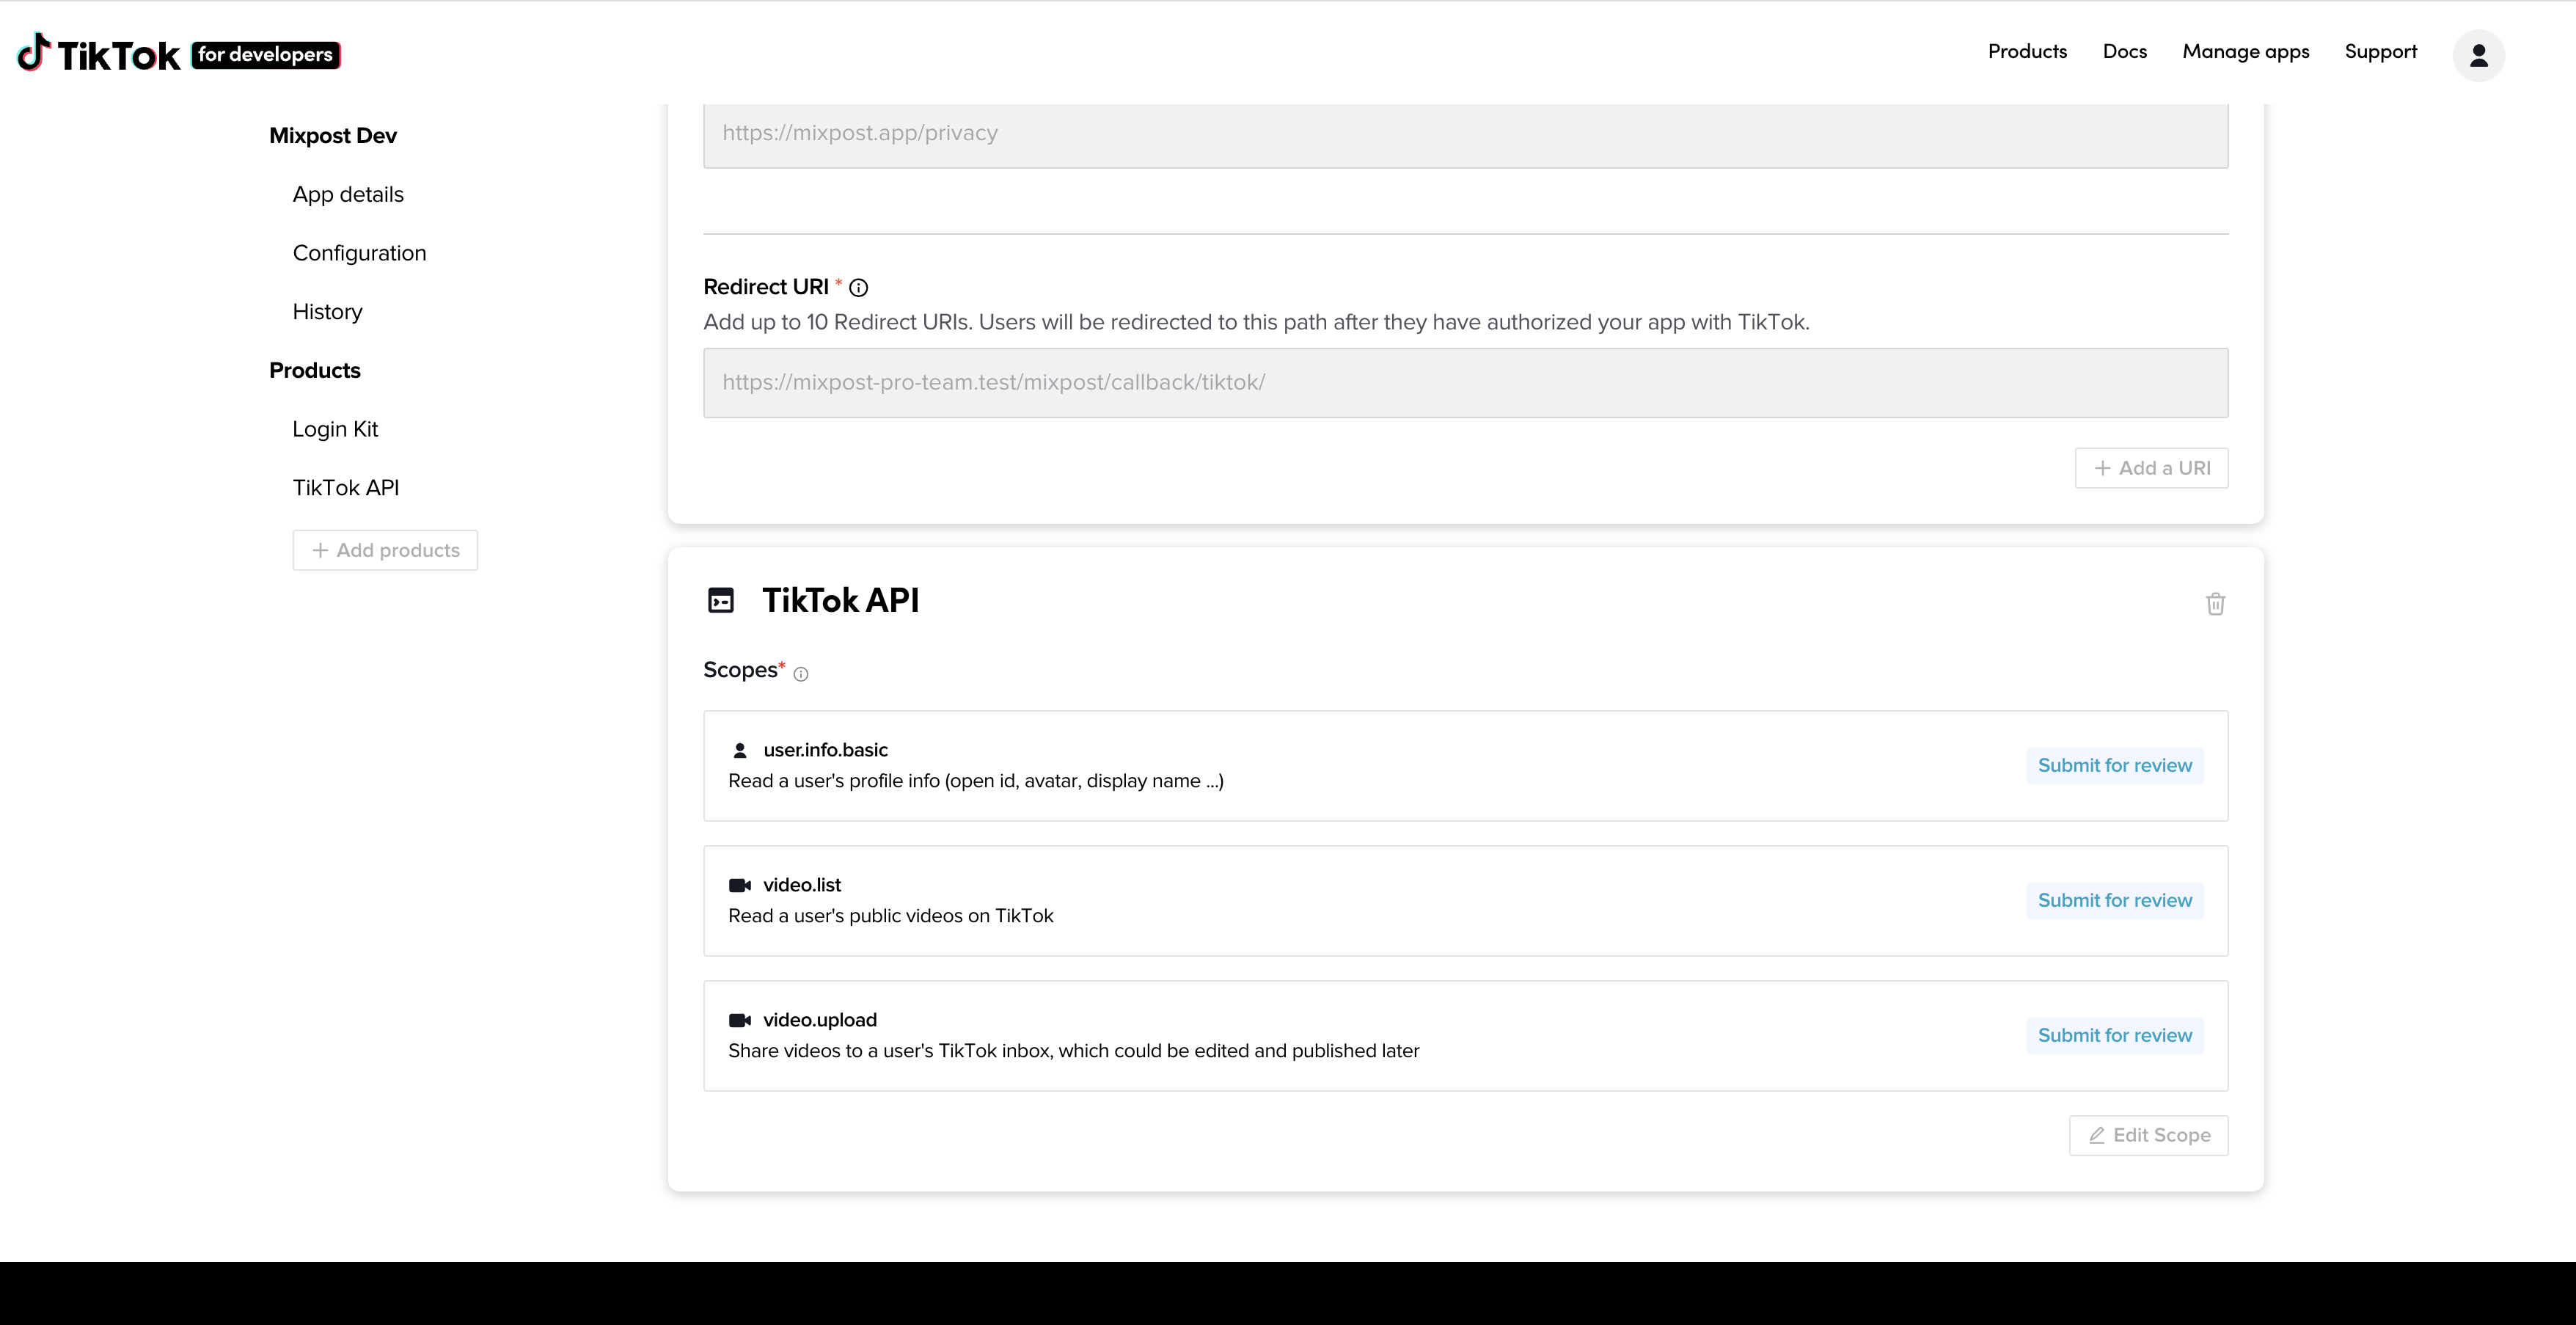
Scroll down to "TikTok API" section and click on "Edit scopes" button. Enable the following scopes:
- video.list
- video.upload
- user.info.profile
- user.info.stats
- user.info.basic (enabled by default)
Click on "Done" button.

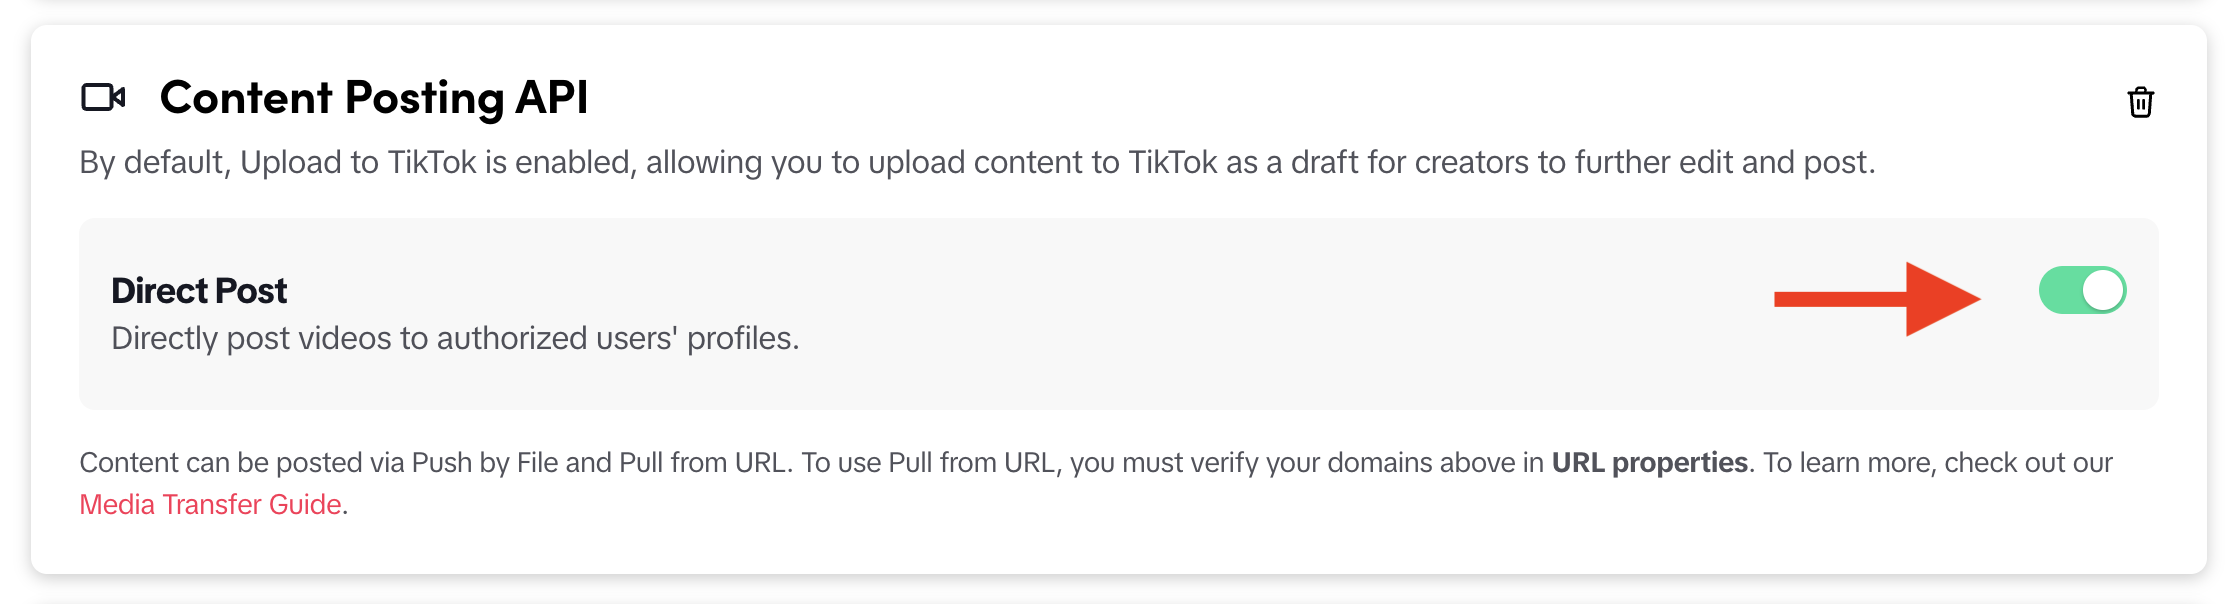
📥 Allow Direct Post
With the products and scopes added above, you will be able to share videos to your TikTok inbox, then from the TikTok application, finish editing and publish the video. Also, TikTok offers the possibility to post the video directly. Unfortunately, TikTok does not want you to use the "Direct Post" method for internal/personal use, they want you to use it on a large scale if you have SaaS for example.
However, it depends on you what you will write in the request for access to "Direct Post" to give you access for internal/personal use.
Then, scroll to "Content Posting API" section and enable "Direct Post".
Finalizing configurations
Scroll up to "Login Kit" section and fill the "Redirect URI" input: https://your-domain.com/mixpost/callback/tiktok
Review your information and click the "Save Changes" button at the top right of the page
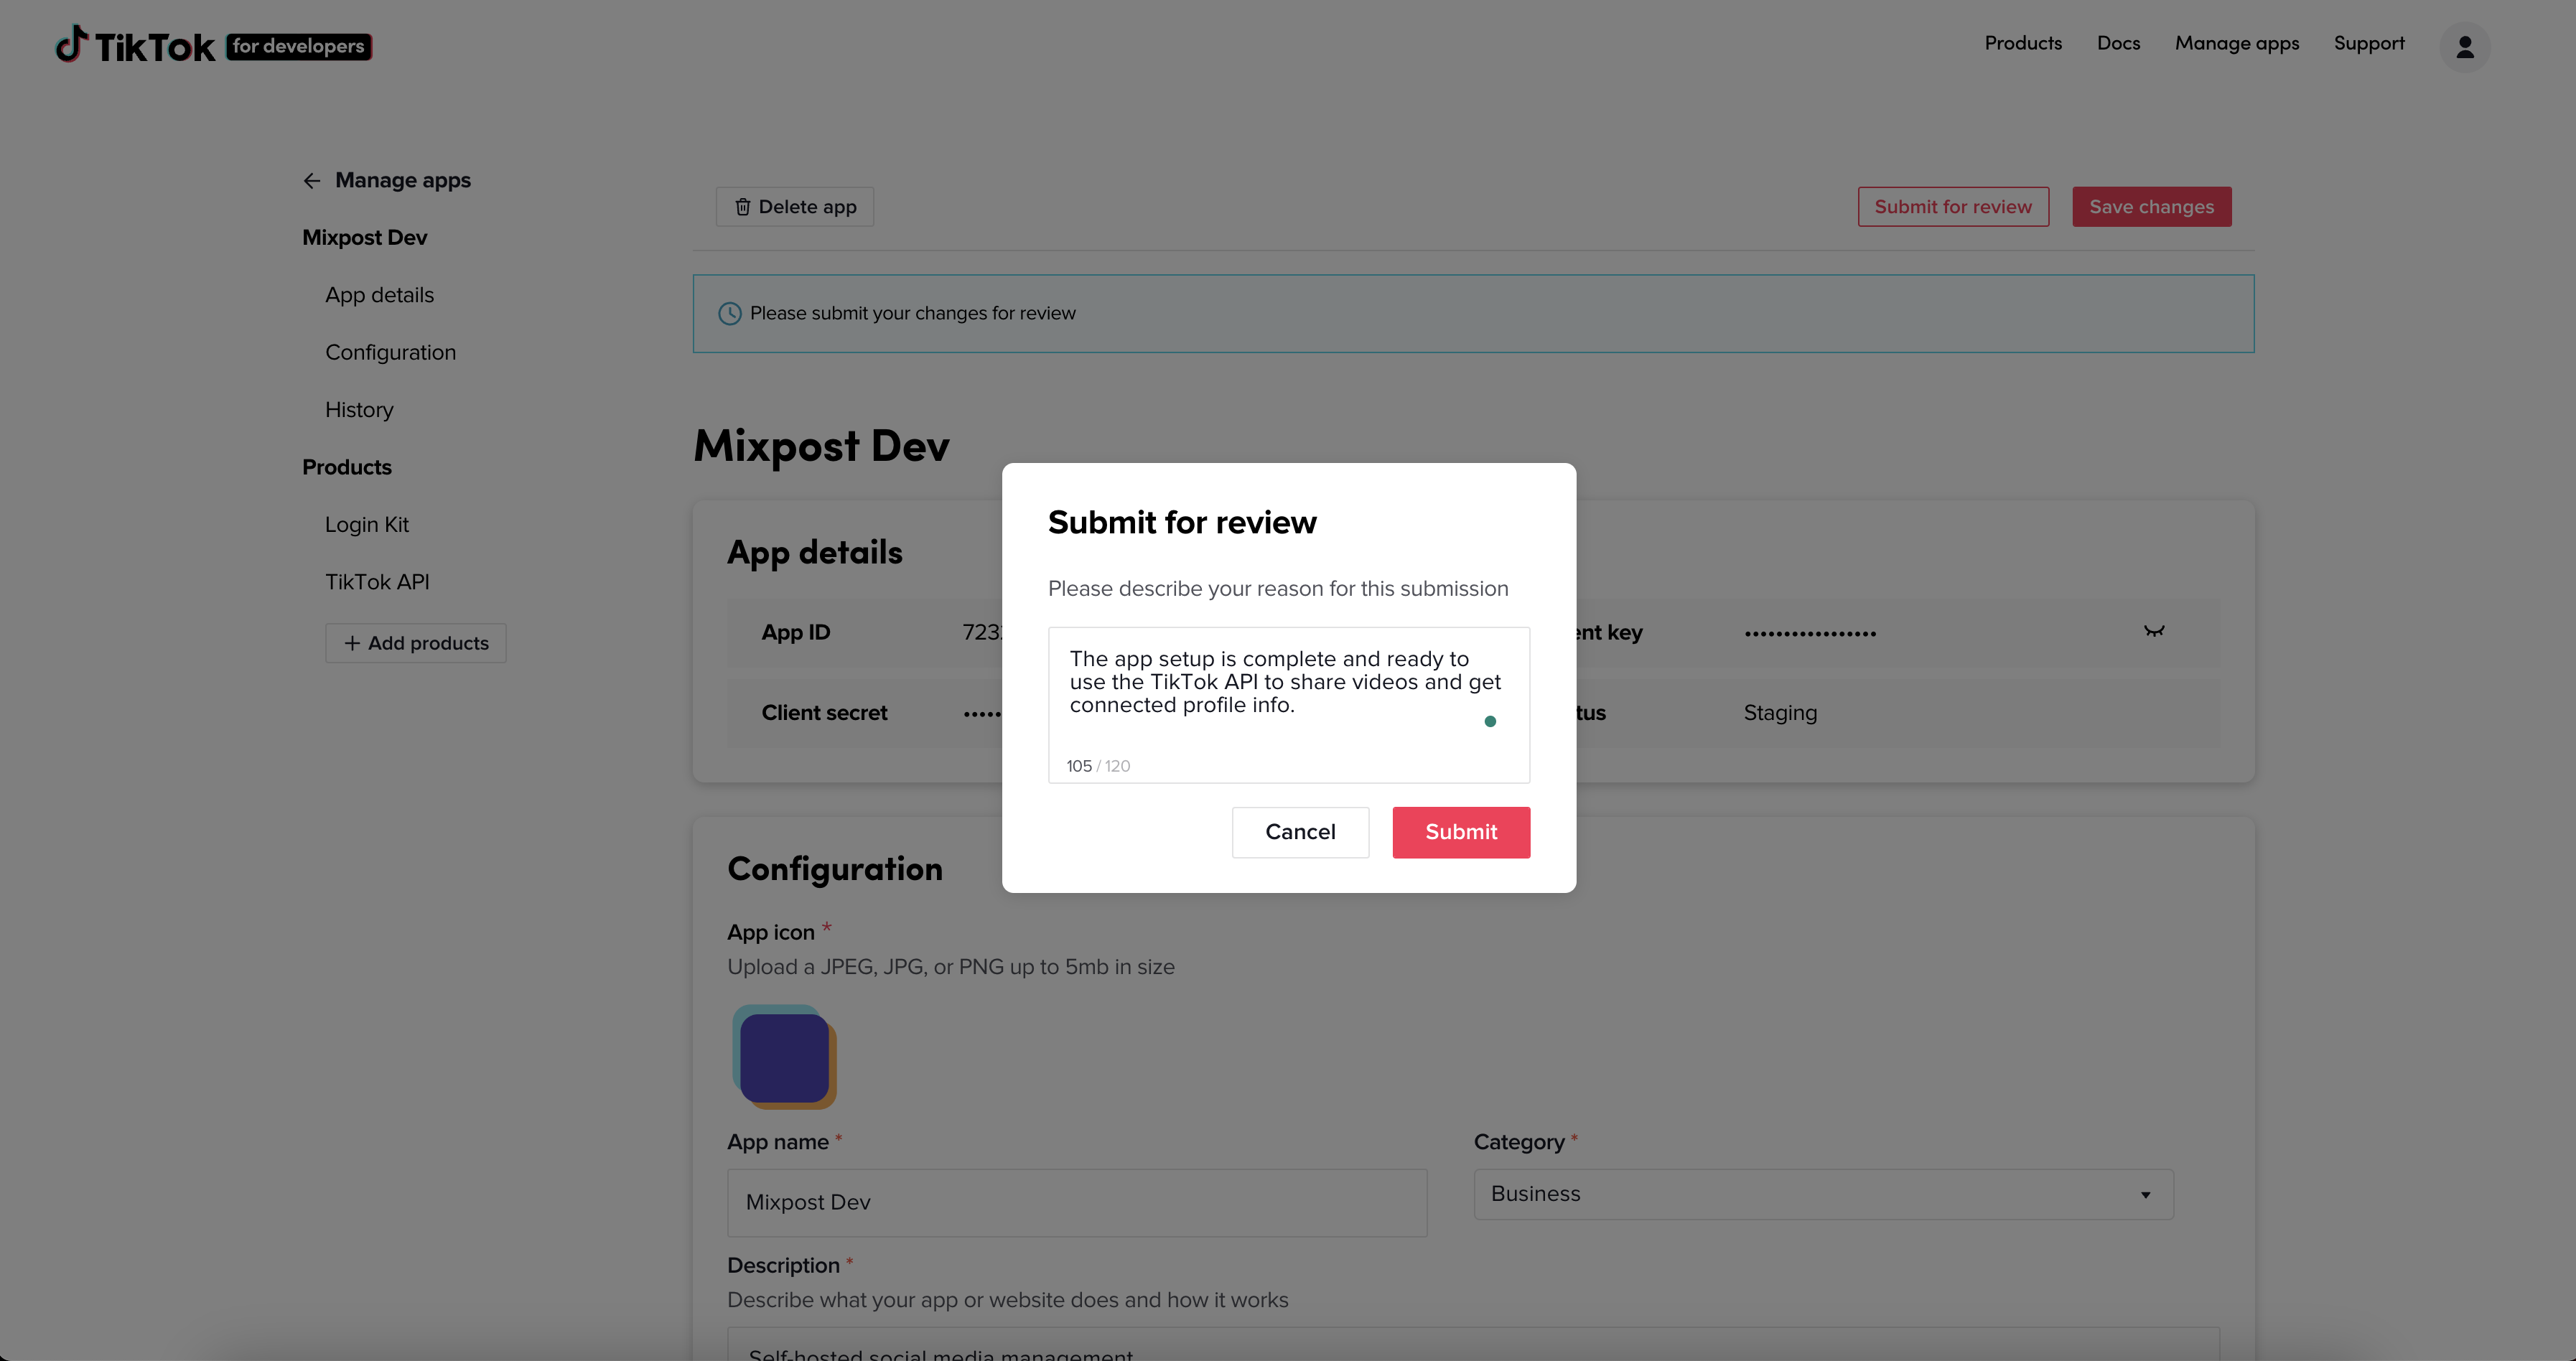
Step 3: Submit for review
After saving the application configuration, you can send it for review. Click the "Submit for Review" button.
For the "Reason of submission" textarea you can use this text:
The app setup is complete and ready to use the TikTok API to share videos and get connected profile info.
At this stage, TikTok will analyze your request and provide access within 1-2 days. You will receive an email once there is an update.
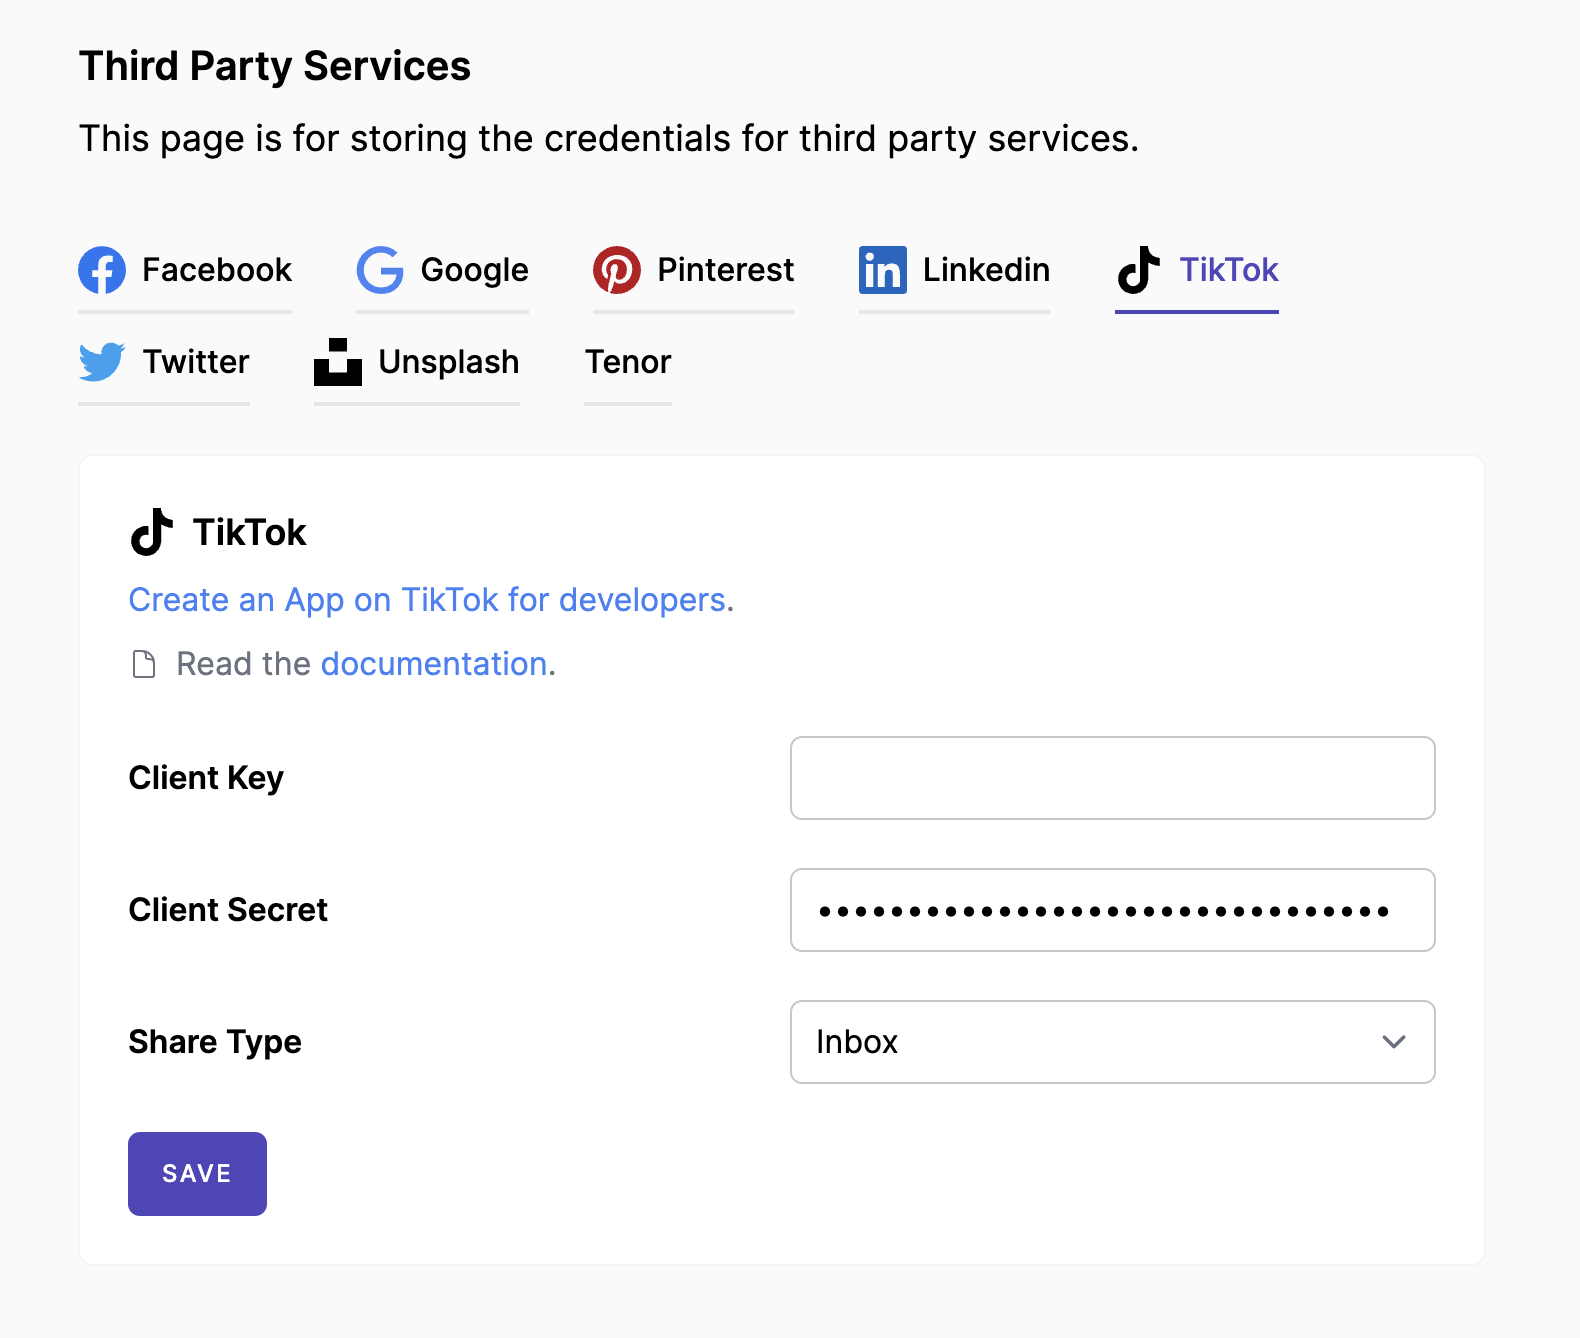
Copy the "Client key" & "Client secret" to your Mixpost dashboard, page "Services". If you are using Pro/Enterprise, this page is in Admin Console. Also here, on the services page, don't forget to select the Share Type.
Completion of direct posting after application review
After your app is successfully reviewed, you can use this "Direct Post" in an unverified state, but all videos uploaded will be restricted to a private viewing mode. To lift this restriction, your Content Posting API client must undergo an audit.
Here is an example of an audit and all the materials.
The processing of the audit by TikTok can take up to 1 week.
Please do not submit a video and PDF from our example, I recommend you prepare your video and PDF.
If you had TikTok connected to Mixpost before adding the "Content Posting API" product, you must re-authenticate your TikTok accounts, go to Mixpost: Accounts -> Add Account -> TikTok Account
Unsplash
Unsplash is a platform that provides access to a vast collection of free high-resolution photos. Unsplash also offers a developer API that allows developers to integrate the Unsplash photo collection into their own applications.
Step 1: Sign up for an Unsplash Account
Before creating an Unsplash App, you need to sign up for an Unsplash account. Go to the Unsplash website and click the "Join" button. Create your account by providing your name, email address, and password.
Step 2: Create an Unsplash App
Once you have signed up for an Unsplash account, go to the Unsplash Developers page and click the "New Application" button. Fill out the required fields to create your new application. You will need to provide a name for your app, a short description, and the website URL where your app will be hosted.
Step 3: Configure Your Unsplash App
After creating your Unsplash App, you will be taken to the "Application" page. Scroll down to the “Keys” section.
Step 4: Use Your Unsplash App
Now that you have created and configured your Unsplash App, you can start using the Unsplash API. To use the API, you will need to copy only “Access Key”, then go to Mixpost→Services→Unsplash and paste it into the API Key input**.**

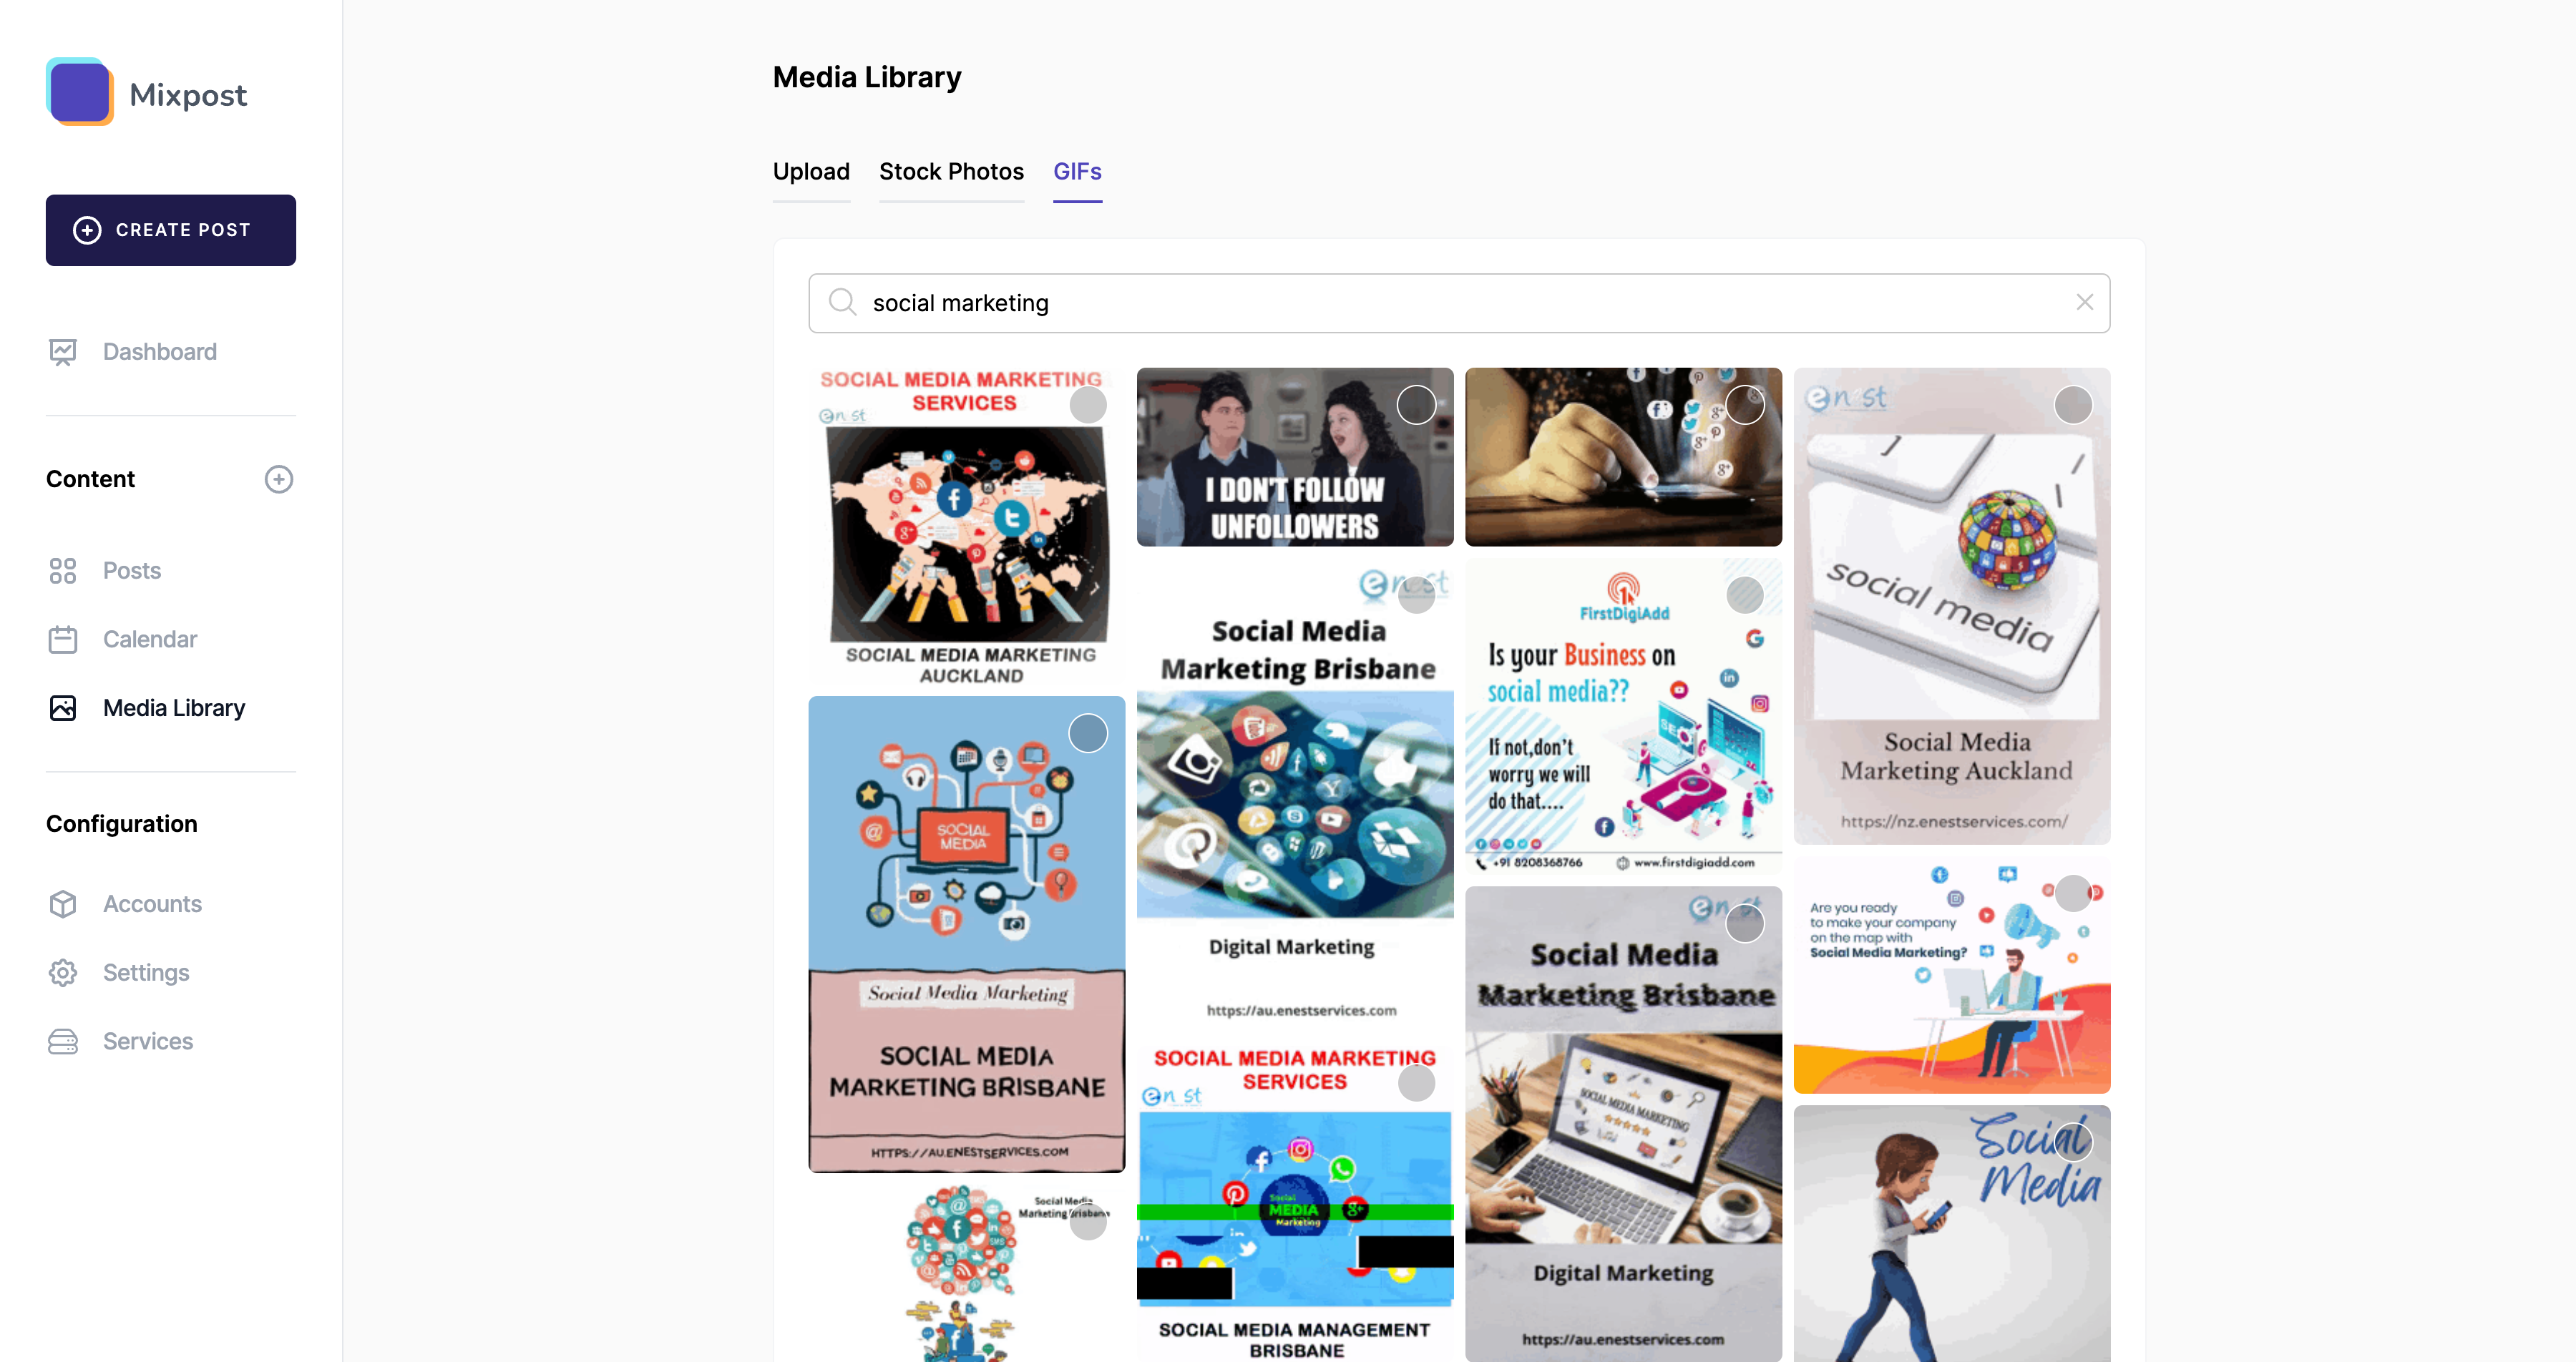
That's it! You have successfully created and configured your Unsplash App. Now you can use the Unsplash API to access their vast collection of free high-resolution photos from Mixpost Media Library.

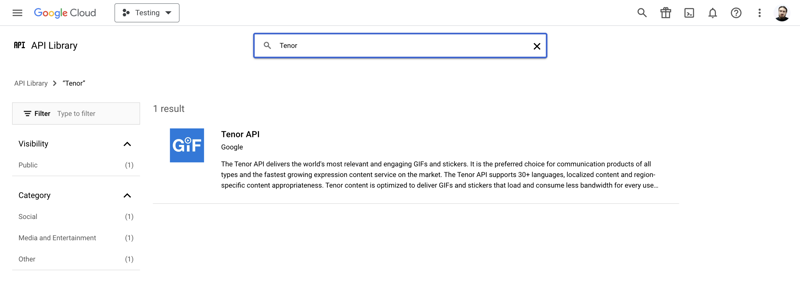
Tenor
Tenor is a GIF search engine that allows users to search for and share animated GIFs. To use Tenor, you need to create and configure a Tenor app with Google Console. Follow these simple steps to create and configure a Tenor app with Google Console.
Prerequisites
Before you start, make sure you have the following:
- A Google account
- A project in Google Console
Steps
- Go to the Google Console and select your project (create one if you don't have one).
- Click on the “Enable APIs and Services” button.
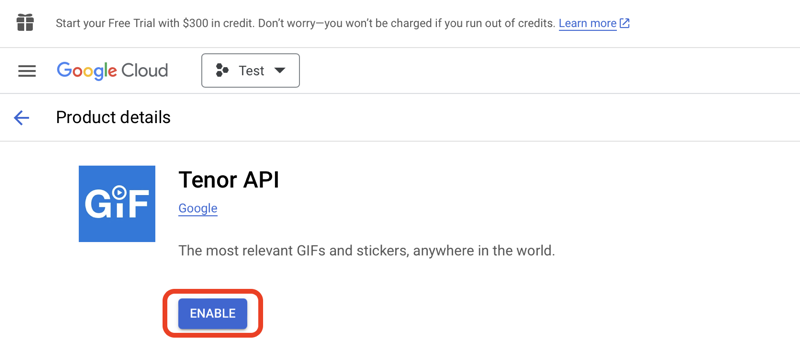
- Search for “Tenor” in the search bar and select the “Tenor API” from the list.
- Click on the “Enable” button to enable the Tenor API.
- Go to the “Credentials” tab and click on the “Create credentials” button.
- Select “API key” from the dropdown menu.
- Copy your API key and use it in your Mixpost app.


Conclusion
That's it! You have successfully created and configured your Tenor App. Now you can use the Tenor API to access their vast collection of animated gifs from Mixpost Media Library.
Open AI
Setting Up OpenAI Service
Configuring AI Assist
Conclusion
By following these steps, you can successfully set up OpenAI services and utilize the AI Assist feature on your Mixpost instance. To test the AI Assist feature, create a new post and while editing your new post, look for the AI Assist tool in the editor's toolbar.